
Disclosure: I was compensated for doing this post with product. However, all the opinions stated here are my own. I only use products I love and would recommend to my viewers.
Welcome to another exciting upcycling adventure! For years, vintage trunks have been an indispensable part of my home décor and storage solutions. Their timeless charm and robust utility make them perfect candidates for creative makeovers. I have an endless supply of these treasures in my basement, each waiting for its turn to be transformed. So far, I’ve had the pleasure of sharing the revival stories of two of these remarkable pieces, breathing new life into forgotten history. Today, I’m thrilled to unveil the journey of the third trunk in this series, a project that taught me valuable lessons about embracing the unexpected in DIY.
I’m always eager to experiment with new techniques and finishes on these trunks. While this creative freedom often leads to delightful discoveries, it occasionally steers me into uncharted territory—and sometimes, a bit of a predicament! In today’s post, I want to share a particular experience that was fraught with minor mishaps, but ultimately led to a fantastic outcome. More importantly, I’ll reveal how you can avoid some common mistakes when upcycling a trunk, turning potential frustrations into design triumphs.
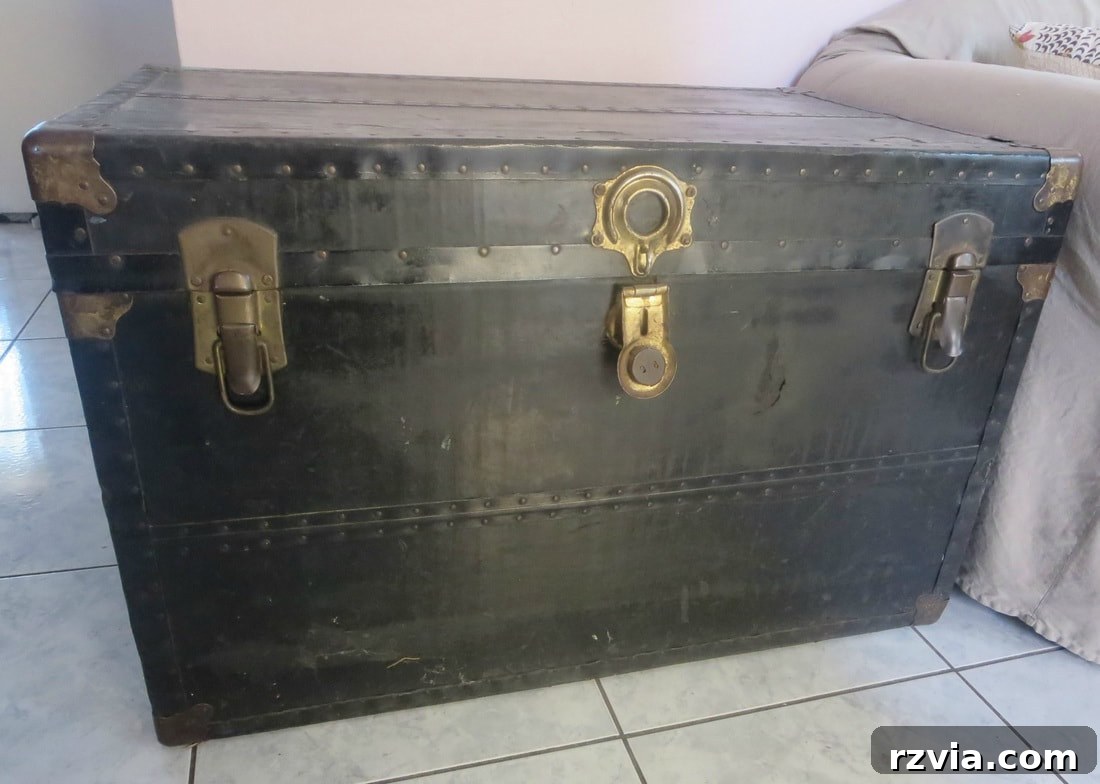
Here is a glimpse of one of the many trunks patiently awaiting its transformation. Like its siblings, it was in a state of neglect: filthy, covered in years of grime, and scarred with numerous scratches. Despite its worn appearance, I saw immense potential. I was incredibly eager to dive into this particular project, envisioning a stunning revival that would once again make this trunk a focal point in any room.
Disclosure: The items below are affiliate links that lead to Amazon.com. Should you purchase any of these products through the provided links, I will receive a small commission at no extra charge to you. This helps me continue to bring you engaging DIY content.
Essential Supplies for Your Trunk Transformation
- Old Fashioned Milk Paint in Soldier Blue (safepaint version): Chosen for its authentic matte finish and durability, milk paint adheres beautifully to various surfaces, offering a charming, aged aesthetic.
- Quality Paintbrush: Essential for smooth application and achieving an even coat, crucial for any painting project.
- Homemade Beeswax Furniture Polish: My secret weapon for nourishing and protecting painted surfaces while enhancing their natural sheen. (You can find my recipe here.)
- DecoArt Greek Key Stencil: A decorative stencil that adds intricate detail and a touch of classical elegance.
- DecoArt Americana Acrylic Paint in Antique White: A versatile acrylic paint perfect for stenciling, offering excellent coverage and a soft, classic hue.
- DecoArt Metallics in Bronze: Adds a sophisticated shimmer and depth, providing a beautiful contrast or complementary tone to other colors.
The Upcycling Process: From Vision to Reality (and a few detours!)
I started by thoroughly cleaning the trunk, preparing its surface for paint. Following this, I applied three generous coats of Old Fashioned Milk Paint in a gorgeous Soldier Blue. The application was smooth, and the color was vibrant – everything was progressing perfectly according to plan. This rich blue hue instantly transformed the trunk, giving it a fresh, inviting appearance. The milk paint dried beautifully, creating a matte, authentic finish that I adore.
After the paint had fully cured, I moved on to the next step, which was to seal and protect the beautiful blue finish. I applied a generous layer of my homemade beeswax furniture polish. This step is crucial for both preserving the paint and enhancing its luster, allowing that deep blue color to truly shine. The wax creates a protective barrier, making the trunk more durable for everyday use.
As you look at the photo below, take note of the trunk’s surface. Do you see its inherent unevenness? This detail, which seemed minor at the time, would soon play a significant role in my creative journey. Remember this, as it becomes a key part of the story later on.
The beeswax polish truly brought out a magnificent sheen on the trunk’s top surface. The deep blue, now protected and lustrous, looked absolutely stunning. I was immensely proud of this initial transformation.
Then, a familiar creative urge struck, leading to a sudden change of heart. My decoupage plan, though appealing, began to feel less exciting compared to a new idea: stenciling! Especially after I received this beautiful Greek Key stencil from the DecoArt Paint Company. They offer a vast array of designs, but this particular Greek Key pattern resonated deeply with me, a little homage to my heritage. The thought of adding such an intricate and meaningful design to the trunk filled me with renewed inspiration.
Full of enthusiasm, I eagerly unboxed the stencil and gathered my chosen paints. My brush was ready, and my vision for an amazing transformation was crystal clear. The excitement was palpable.
And then, it hit me. A moment of stark realization: I had already waxed the trunk.
A deep “Hmmm…” escaped me. Wax, by its very nature, is designed to protect and seal painted surfaces. If I tried to stencil over it, would the paint adhere properly, or would it simply slide around, creating a chaotic, smudged mess? I had come so close to achieving something truly amazing, and now, my spontaneity had potentially jeopardized the entire project.
This was a moment of pure anguish. I should have considered this crucial detail *before* applying the wax. For days, I agonized over this dilemma, weighing my options and second-guessing my impulsive decision. I even reached out to various Facebook DIY groups, seeking advice and commiseration from fellow crafters. The problem consumed my thoughts, even manifesting in dreams where the stencil paint dripped uncontrollably over my beautifully painted trunk. I honestly couldn’t explain my lapse in judgment this time; perhaps the excessive summer heat had clouded my creative process.
It was a rough week, filled with internal debate and significant procrastination. But eventually, I decided to bite the bullet and just go for it. My reasoning was simple: if I messed up, it would be a direct consequence of my deviation from the original plan. These things happen in DIY, and sometimes, you just have to adapt and go with the flow. Of course, that’s always easier said than done, especially when you’re staring down a potentially ruined project!
With a renewed sense of determination, I carefully taped the stencil onto the trunk. Given the wax, I adopted a unique technique: I used two brushes simultaneously – one for dabbing the paint onto the stencil, and the other to firmly press down the stencil, ensuring maximum contact with the waxed surface. Remember that photo earlier, the one showing the trunk’s uneven surface? This is precisely why I needed to hold the stencil down so rigorously. It felt like painting over a series of miniature hills and valleys, making precision a real challenge.
The *ideal* approach, of course, would have been to use a temporary spray adhesive to secure the stencil, eliminating the need for constant pressure. But having already embarked on this unconventional path, I decided to embrace the challenge. I just kept pushing the stencil down, meticulously dabbing the paint on, committed to seeing this through, no matter the imperfections.
A little insight into my paint choice for the stencil: I decided to combine DecoArt Metallic Bronze with Antique White. Instead of mixing them beforehand, I placed small dollops of each color side-by-side. I would then dab my brush into a bit of the bronze, then a bit of the white, and sometimes the two would subtly blend on the brush or directly on the stencil, creating unique, nuanced shades.
At this point, I had truly become fearless! After all, I had already “messed up” the process by waxing before stenciling. What else could possibly go wrong? This newfound audacity allowed me to experiment freely, turning a potential disaster into a canvas for creative improvisation.
As I continued dabbing the paint along the intricate Greek Key pattern, the colors began to evolve. In some sections, the bronze dominated, while in others, the antique white shone through. Where the two blended, a lovely, soft peachy tone emerged. Furthermore, because of the aforementioned undulating surface of the trunk, the paint adhered with varying intensities, creating a wonderfully distressed and multi-dimensional effect that I absolutely adored.
Was I going to let these “imperfections” stop me? Absolutely not! This spontaneous blending and varied intensity added character and depth, making the design truly unique. It proved that sometimes, letting go of rigid plans can lead to the most interesting artistic outcomes.
To ensure a cohesive design, I extended some of the key pattern work to the bottom edges of the trunk, tying the whole piece together.
Finally, I added a touch of the mixed bronze and antique white paint to the trunk’s hardware, allowing it to seamlessly blend with the stenciled pattern. A fresh application of wax on the leather straps also helped revitalize them, completing the trunk’s transformation. These small details really elevate the overall finish, giving the trunk a polished and thoroughly restored look.
Disclosure: The items below are affiliate links that lead to Amazon.com. Should you purchase any of these products through the provided links, I will receive a small commission at no extra charge to you. This helps me continue to bring you engaging DIY content.
And with that, my trunk was finally finished! What began as a straightforward decoupage plan evolved into an unexpected, yet wonderfully rewarding stenciling project.
Here, you can clearly see the fascinating variations in color and the differences in paint intensity within the stencil work. This organic, slightly weathered look is something I truly cherish. It’s distinctly different from any project I’ve tackled before, and it represents a beautiful blend of planning and spontaneous creativity. The subtle interplay of bronze, white, and peach hues creates a captivating depth that makes the trunk truly one-of-a-kind.
It has now been over a month since I completed this upcycled trunk project, and I am absolutely delighted with its performance. I must confess, I’ve put the surface through some serious everyday abuse, and it still looks fantastic.
There are no chips, no paint peeling off, and absolutely no lingering problems! The combination of the durable Old Fashioned Milk Paint, the protective beeswax, and the resilient DecoArt Americana acrylic paints has created a finish that stands the test of time and use. This unexpected durability is a testament to the quality of the products used and the successful (albeit unconventional) application method.
So, what valuable lessons did I take away from this challenging yet rewarding upcycling project?
First and foremost: Always make sure to have a comprehensive plan before you embark on any DIY project! Thinking through each step can save you a lot of headaches.
Second: Try your best to stick to that meticulously crafted plan! Deviations can lead to unforeseen obstacles.
Third: When stenciling, make sure you buy some proper stencil adhesive spray! It will make your life infinitely easier, especially on textured or uneven surfaces.
And perhaps most importantly: When all else seems to fail, or when your plans go delightfully awry, sometimes you just need to embrace the chaos and go for it! Creativity often blossoms in unexpected moments.
I want to extend my heartfelt gratitude to the wonderful people in my Facebook DIY group who offered invaluable advice and moral support during this (mildly) traumatic time! If you ever find yourself in need of assistance for your DIY projects, or if you’re searching for a supportive community of like-minded enthusiasts, please don’t hesitate to join us here. We’re always happy to help!
I sincerely hope that you can draw wisdom from my unexpected detours and learn from my “mistakes” so that you won’t have to navigate the same creative challenges! I consider myself incredibly lucky this time around, as the combination of DecoArt Americana acrylic paints and the resilient milk paint somehow made this project not just work, but truly shine. I absolutely adore how it turned out, and it now stands as a testament to embracing imperfections.
I guess good things, and truly unique pieces, can indeed come from mistakes after all! This experience reminds us that sometimes, the most beautiful creations are born from moments of improvisation and problem-solving.
If you enjoyed this upcycling story and found inspiration, please share it with your friends or save it to your Pinterest boards for future reference. The image above is perfectly sized for pinning!
For more creative DIY adventures and home decor inspiration, consider subscribing to my blog. You’ll receive my latest posts directly in your inbox twice a week. The subscription form is conveniently located on the sidebar and at the top of the page. Rest assured, your email address will never be shared with any third party.
More captivating paint projects:
Linking up to these inspiring Link Parties
This blog is intended for entertainment purposes only; my DIY tutorials should not be considered professional advice. For a full understanding of terms and conditions, please read my complete disclaimer here.
I truly appreciate receiving your comments and will do my best to reply to them or visit your blog in return. Please refrain from adding a hyperlink to your comment, as this may prevent its publication.