
DIY Bicycle Tire Rim Wind Chime: Upcycle an Old Bike Wheel into Rustic Outdoor Decor
Welcome back, fellow crafting enthusiasts and decor lovers! It’s that exciting time of the month again when the International Bloggers Club (IBC) convenes for our eagerly anticipated monthly challenge. This isn’t just a simple crafting session; it’s a vibrant, global gathering of creative minds, where friends from across the world share their unique projects, perspectives, and crafting traditions. We meet virtually each month to compare notes, celebrate our diverse approaches, and draw inspiration from how things are done in every corner of the world. Last month, we engaged in a candid reflection, examining our epic hits and fails, and prior to that, we delighted in sharing our exquisite spring crafts. Each challenge presents a fresh opportunity to explore new themes, push our creative boundaries, and connect through the universal language of DIY.
This month, our collective focus shifts to the invigorating world of outdoor projects. With the northern hemisphere joyfully embracing warmer weather, longer days, and the blossoming beauty of spring, it felt like the perfect excuse to step outside, breathe in the fresh air, and immerse ourselves in projects inspired by nature. While our wonderful friend Michelle, residing on the other side of the world, experiences the hues of autumn, the spirit of outdoor creativity unites us all. For my personal contribution to this challenge, I decided to embark on a charming upcycling adventure: transforming an overlooked and forgotten bicycle tire rim into a distinctive, melodious, and truly unique wind chime. My aim was to breathe new life into discarded metal, proving that beauty can indeed be found in the most unexpected places.
Essential Materials for Your Upcycled Bicycle Rim Wind Chime
To recreate this charming piece of outdoor decor, you’ll find that the materials are surprisingly simple and often items you might already have on hand or can easily acquire. The true magic of this project lies in its resourcefulness and the personal touch you’ll add to each component.
- An Old Bicycle Tire Rim: This is the foundation of our wind chime. Look for a sturdy rim, ideally one that still holds its shape well. The size doesn’t matter as much as its integrity. You might find one in your basement, a local bike repair shop, or a salvage yard.
- Black Spray Paint: A good quality outdoor-grade spray paint in a matte or semi-gloss black will provide a sleek, durable base for your project. This color helps to unify the piece and allows the natural textures and vintage elements to truly pop.
- Natural Twine: Jute or hemp twine is perfect for this project, offering a rustic aesthetic and sufficient strength for outdoor exposure. You’ll need a generous amount, so having an extra roll is always a good idea to avoid mid-project dashes to the store.
- Vintage Keys: These unique items will serve as the melodic chimes. Collect an assortment of old keys from antique stores, flea markets, or even forgotten drawers. Their varied shapes, sizes, and subtle sounds create a delightful symphony when caught by the wind.
- Optional but Recommended: Work gloves, a drop cloth or old newspaper for painting, wire cutters or sharp scissors, and a clear protective spray coat to seal the paint and twine for extra weather resistance.
Step-by-Step Guide: Crafting Your Rustic Wind Chime
Step 1: Discovering and Preparing Your Bicycle Rim Base
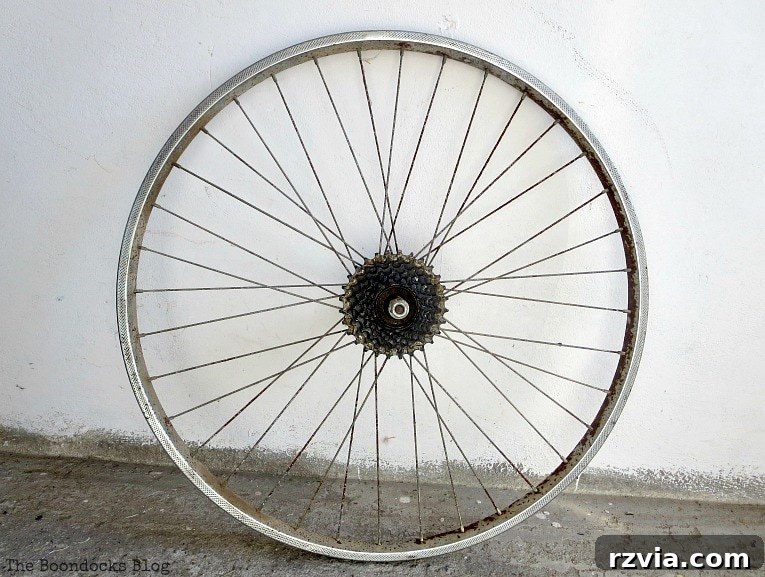
My crafting journey often begins with a treasure hunt in my own home, and this project was no different. I ventured into the depths of my trusty basement, a repository of forgotten items and potential future projects. There, nestled amongst sentimental relics and lingering dust, I unearthed the perfect centerpiece: an old bicycle tire rim. It was a remnant from a bygone era, a bicycle once ridden by my children, now simply rusting away. While I admit to having a certain respect for the natural patina of rust, especially in small doses that add character, this particular project called for a slightly different aesthetic. The sight of those old bikes, patiently awaiting their destiny, also sparked a thought – perhaps they too hold potential for future upcycling endeavors?
Step 2: Refreshing the Rim with a Protective Coat of Paint
As much as I appreciate the rugged beauty of rust, the rim I found was heavily oxidized, and for this specific wind chime, I envisioned a cleaner, more refined base. My goal was to diminish the pervasive rust while allowing just a hint of its aged character to subtly peek through. To achieve this, I opted for a classic black spray paint. This choice not only beautifully masked the majority of the rust but also created a sophisticated, versatile canvas. The deep black would offer a striking contrast to the natural twine and the metallic gleam of the vintage keys, enhancing their visual impact.
When undertaking spray painting, remember a few key tips for the best results: always work in a well-ventilated area, preferably outdoors. Lay down a drop cloth or old newspapers to protect your surroundings. Apply the paint in several thin, even coats rather than one thick layer. This technique prevents drips, ensures uniform coverage, and creates a more durable finish that will stand up to outdoor elements, preserving your wind chime for seasons to come. Allow adequate drying time between coats for optimal adhesion and longevity.
Step 3: Seeking Inspiration and a Perfect Backdrop at the Farm
With the rim expertly prepped and painted, a new question arose: where would my finished wind chime find its perfect home? My mind drifted to idyllic scenes of lush gardens and sprawling backyards, ideal settings for outdoor decor. I confess, I felt a slight pang of envy admiring Michelle of A Crafty Mix’s gorgeous garden, beautifully showcased in her Behind the Scenes post. Unlike her serene green space, I reside in a bustling city apartment, where the soundscape is dominated by traffic, honking horns, and revving motorcycles, rather than chirping birds and rustling leaves. And as for my balcony, despite my best intentions, I proudly maintain a “brown thumb” status, confirming my lack of natural greenery.
Driven by the desire for a picturesque backdrop and a craving for some tranquil outdoor crafting time, I asked my husband if we could make a quick trip to our farm. Conveniently located just five minutes away by car, the farm has always been a sanctuary for creativity and relaxation. He’s always delighted to have me there, and truth be told, since embarking on this blogging adventure, my visits haven’t been as frequent as I’d like. So, with my freshly painted rim and crafting supplies in tow, we set off. The farm became my temporary creative studio, offering the perfect blend of peace and natural beauty that my rustic wind chime deserved. It’s a wonderful reminder that sometimes, the most inspiring projects call for a little change of scenery and an embrace of nature’s quiet charm.
Step 4: The Art of Twine Wrapping – Embracing Imperfection and Innovation
Once settled into the serene environment of the farm, I eagerly took out my spool of twine and began the intricate process of wrapping it around the bicycle rim. The vision was to create a rustic, textured band that would elegantly contrast with the dark metal and provide sturdy anchor points for the forthcoming keys. The rhythmic motion of wrapping was almost meditative, each strand bringing the nascent wind chime closer to its final form. However, as often happens in the world of DIY, an unexpected challenge presented itself about halfway through the process: I realized, to my dismay, that I didn’t have enough twine to cover the entire rim. A moment of potential frustration quickly turned into an opportunity for creative problem-solving – a hallmark of any dedicated DIYer.
It was late Saturday afternoon, and in Greece, shops typically close after a certain hour, and virtually everything, save for coffee shops, remains closed on Sundays. A journey back home to search for more twine would not only mean losing precious daylight but also risking missing the coveted “Golden Hour” – that magical period just after sunrise or before sunset when natural light casts a perfect, warm glow for photography. The thought of delaying the project was simply unacceptable. Was a mere shortage of twine going to deter a DIYer on a mission? Absolutely not!
Instead, I embraced the limitation as a design opportunity. I decided to wrap the remaining twine on the opposite side of the rim, creating a wonderfully asymmetrical and distinctly unique design. This serendipitous decision resulted in a wind chime that celebrates individuality and the charm of the handmade. It’s a testament to the belief that perfection is often overrated, and that sometimes, the most captivating beauty lies in the quirky and the uneven. This happy accident not only solved a problem but also infused the piece with an unexpected layer of character and a compelling story, making it truly one-of-a-kind.
Step 5: Securely Crafting the Hanging Mechanism
With the twine wrapping now complete, the next critical phase was to create a robust and visually harmonious hanging mechanism. To ensure both stability and aesthetic appeal, I deliberately left one end of the twine longer than the other during the initial wrapping. Taking these extended loose ends, I carefully crossed them over the open center of the rim. This strategic crossing allowed me to attach them securely to the opposite side, forming a stable structure from which the wind chime would gracefully suspend. The intention behind leaving one twine end significantly longer was specifically to fashion a sturdy loop at the very top, which would serve as the primary hanging point for the entire piece.
Once the knots were tied firmly and tested for strength, I meticulously trimmed any superfluous twine. The objective was to achieve a clean, unobtrusive finish, ensuring that no dangling ends would detract from the rustic elegance of the main design. My aim was for the hanging twine to appear as an integral, continuous element, seamlessly blending with the overall aesthetic rather than looking like an afterthought. This attention to detail, even in the seemingly simple act of knotting, is what elevates a handmade item from merely functional to truly charming, contributing significantly to the wind chime’s cohesive and authentic appeal.
Step 6: Infusing Melodic Charm with Distinctive Vintage Keys
Ah, the vintage keys! Those delightful, familiar treasures from my previous crafting adventures are making yet another appearance, and for very good reason. You might find yourself wondering, “Are we going to see these keys in every single project, Mary?” Well, allow me to recount their charming story. Not too long ago, I lovingly crafted a captivating canvas wall art piece using this very collection of vintage keys. It was, if I may say so myself, a rather beautiful creation. However, my sweet, discerning, and art-loving daughter, with her innate eye for beauty, promptly “confiscated” the finished canvas about a week after its completion, declaring it essential for her own art project! What could a proud mother say? In her eyes, it was clearly destined to be her canvas.
Initially, I found myself in a bit of a predicament, feeling “stuck” without my key supply. But a true DIY enthusiast always knows how to spin a challenging situation into a positive one! Instead of dwelling on the temporary loss, I embraced a renewed sense of opportunity. The keys were once again available, having served their purpose on the canvas, and were now perfectly suited for a fresh, new role. This meant they were absolutely ideal for imbuing the wind chime with a charming, melodic element. Vintage keys offer far more than just a pleasant tinkling sound; they carry whispers of history, a sense of timelessness, and an antique elegance that modern chimes often lack. Their varied sizes, shapes, and weights create a delightful, harmonious symphony when gently stirred by the breeze.
The process of attaching these precious keys was straightforward yet deeply satisfying. Using smaller, sturdy pieces of twine, I carefully tied each key to the lower edge of the bicycle rim. I intentionally varied their hanging lengths, which is not merely an aesthetic choice. This variation helps to prevent them from clanging together too harshly, allowing each key to produce its distinct tone and contribute to a richer, more complex soundscape. The natural, rustic twine beautifully complements the aged metal of the keys and the subtly painted rim, seamlessly tying the entire design together. This final step truly breathes life into the wind chime, transforming a static object into an interactive, musical piece of art that enchants both the eye and the ear.
Step 7: Embracing the Rustic Charm – Traces of History
Even after the careful application of black spray paint, some subtle remnants of the rim’s past life playfully peek through. Tiny patches of natural rust, like whispers of its history, are still visible in certain areas. Far from being a flaw, this is, in fact, a cherished feature of the design. These traces of age add immense character and an authentic rustic appeal, serving as a beautiful reminder of the object’s journey from a utilitarian bicycle component to a treasured piece of garden art. This intentional imperfection is precisely what gives the wind chime its unique charm and tells its compelling story, making it genuinely one-of-a-kind and resonating with the spirit of true upcycling.
Step 8: The Finishing Touch – Nature’s Own Adornments
Once the core structure of the wind chime was complete and it was gracefully suspended from one of the welcoming fig trees at the farm, a sudden spark of adventurous creativity ignited within me. Why not add a delicate, natural flourish to truly integrate the piece with its surroundings? I gathered a few vibrant, fresh leaves from the nearby foliage and gently attached them to the top of the wind chime, carefully weaving their stems into the twine. This small, yet impactful, addition instantly connected the piece more deeply to its outdoor environment, allowing it to blend seamlessly with the natural world around it. It’s a wonderfully simple way to introduce organic texture, a pop of natural color, and an extra layer of rustic charm, truly enhancing the wind chime’s harmonious aesthetic.
Step 9: Celebrating Imperfection and Capturing Golden Hour Beauty
As I stepped back to admire the finished wind chime, swaying gently in the farm’s soft breeze, a profound realization settled upon me: it wasn’t “perfect” in the conventional sense, and that, I believe, is precisely where its true charm lies. I am a firm believer that perfection is often vastly overrated, particularly when it comes to handmade crafts. This wind chime proudly boasts a quirky, wonderfully uneven look, from the varied lengths at which the vintage keys hang to the deliberately asymmetrical wrapping of the twine around the rim. These “imperfections” are not flaws; they are the very elements that make it unique, imbued with character and a genuine story of its creation. They are a reflection of spontaneous decisions, creative problem-solving, and the inherent beauty of working with what you have. This authentic, rustic aesthetic is, in my opinion, far more captivating and endearing than any meticulously symmetrical, factory-produced item could ever be.
And then came the moment for the anticipated “beauty shots,” especially during that magical “Golden Hour.” The soft, warm, ethereal light of the setting sun cast a breathtaking glow upon the wind chime, illuminating every intricate detail. It highlighted the rich textures of the natural twine, the subtle, aged gleam of the vintage keys, and the enduring character of the repurposed bicycle rim. It was a truly enchanting sight, a harmonious culmination of effort and inspiration bathed in nature’s perfect, golden light. This ethereal glow captured the essence of the piece, making it truly sparkle and sing even before the wind could stir its keys.
Why Upcycle? The Profound Joy of Sustainable Crafting
This project was about so much more than simply constructing a wind chime; it was an immersive experience in the profound joy of upcycling and the deep satisfaction that comes from transforming something old, neglected, or discarded into a piece of new, beautiful, and meaningful art. It served as a wonderful reminder that creativity can flourish even with seemingly limited resources, and that often, the most unexpected twists and turns—like running out of twine at a crucial moment!—can lead to the most memorable designs and innovative solutions. My trip to the farm wasn’t just a quest for a picturesque spot to hang my finished piece; although that was certainly a delightful bonus, and perhaps a tiny bit influenced by Michelle’s inspiring garden. More importantly, it was about finding a serene and natural space where my creativity could truly blossom, allowing this rustic wind chime to harmonize perfectly with its natural surroundings.
I sincerely hope you’ve enjoyed this outdoor project and feel genuinely inspired to embark on your own upcycling adventures. Repurposing items like old bicycle rims not only grants them a valuable second life, diverting them from landfills, but also adds unique character, a touch of history, and undeniable charm to your home or garden decor. Beyond the aesthetic benefits, engaging in sustainable crafting practices contributes significantly to a more eco-conscious lifestyle, proving that beauty and environmental responsibility can go hand in hand. It’s a truly rewarding endeavor that offers a win-win situation for both your home and the planet!
Now, I’d love to hear from you! What are your thoughts? Would you have turned back home for more twine, or do you, like me, find immense beauty and character in the wonderfully uneven and unexpected outcomes? Do you have a special secret place, a personal sanctuary, where you go to unwind, escape the everyday hustle, and let your creativity freely flow? Share your experiences and insights in the comments section below – I always love reading them! And may your crafting endeavors always be abundant, and may you never, ever run out of twine (or inspiration!).
If you’ve enjoyed what you’ve seen here today, please consider sharing it with your friends on social media, or save it for future inspiration on Pinterest. The image directly above is specifically designed to be Pinterest-worthy! And if you truly resonate with our creative journeys and desire more such content, I invite you to subscribe to my blog. You’ll receive my latest adventures and DIY insights twice a week directly in your mailbox. The subscription form is conveniently located on the sidebar, and I want to assure you that your email address will always remain confidential and will never be shared with any third party.
Disclosure: Please note that some of the items mentioned and linked below are affiliate links, connecting to Amazon.com. If you choose to purchase any of these products through my provided links, I may receive a small commission. This commission helps support my blog and enables me to continue bringing you fresh, inspiring, and lovely content, all at absolutely no extra charge to you. Your support is greatly appreciated!
Join the International Bloggers Club: Outdoor Crafts Edition
Now, the adventure continues! I warmly invite you to hop over and explore the incredible outdoor crafts shared by my talented friends from the International Bloggers Club. Each of them brings a unique perspective and innovative project to the table, promising even more inspiration for your outdoor spaces. Simply click on the images below my name to discover their wonderful creations and immerse yourself in a world of global DIY talent. If you’re eager to delve deeper into our past challenges and explore a treasury of creative ideas, you can always click here for a comprehensive collection of our previous projects.
The Int’l Bloggers Club: Outdoor Crafts
Join us in celebrating the spirit of outdoor crafting and sustainable living! Discover more incredible outdoor projects from my fellow International Bloggers Club members by following their inspiring work. An InLinkz Link-up