
Mastering Small Space Renovation: An IKEA Kitchen Installation Journey with Murphy’s Law
After weeks of dedication and a fair share of unexpected challenges, I am thrilled to finally unveil the transformation of our compact living and kitchen area! This project, which I’ve been eager to share, represents a significant step in making our small apartment truly functional and inviting. Today, we’ll dive deep into the heart of this renovation – the kitchen installation. Rest assured, I’ll be back soon to share the details of the bedroom, where a few more exciting DIY projects await their reveal.
Before we explore the finished look, it’s essential to recount the journey, especially the kitchen installation process. Because, as many DIY enthusiasts can attest, Murphy’s Law always seems to prevail, turning what seems like a straightforward plan into an adventurous tale of problem-solving and perseverance!
From Clutter to Culinary Corner: The Before
For many years, this specific corner of our apartment served a rather unglamorous purpose: a storage zone and an unconventional laundry room. When we first moved to Greece, we brought our American washing machine with us. Little did we know, its generous size was completely out of sync with standard European dimensions. It simply wouldn’t fit into our bathroom, forcing us to relegate it to this multi-purpose space. In fact, its prominent presence even inspired a previous blog post where I affectionately referred to it as my “elephant in the room.”
The “before” state of this area was far from ideal for a living space. It was cluttered, uninspired, and frankly, an eyesore that desperately needed a functional and aesthetic overhaul. In the photo below, you can also spot one of the MDF bookcases that has since been given a fresh coat of gray paint, demonstrating our ongoing commitment to upcycling and transforming our furniture.
Once we committed to the renovation, the first crucial step was to completely clear out the area, stripping it down to its bare bones. This gave us a blank canvas, allowing us to truly visualize the potential of the space and prepare for the exciting changes ahead.
The IKEA Dream Meets Reality: When Plans Go Awry
Our journey began with immense excitement as we purchased an IKEA kitchen, having meticulously planned every detail. We opted for a pre-packaged deal (the link is from an unfamiliar country, but it illustrates the product type), which offered specific components at a fixed price. This particular series, Knoxhult, seemed to be a limited-time offering, as its name rarely appears elsewhere. Our initial vision was straightforward: install the new kitchen along this wall, with the washing machine remaining in its current spot. We thought, “Easy peasy!”
However, as is often the case with home renovations, our “easy peasy” plan was swiftly challenged by an unexpected discovery. The plumber who originally installed the pipes had made a crucial error: the washing machine pipes were positioned against the wall where we intended to place our new sink, while the kitchen sink pipes were precisely in the spot currently occupied by our washing machine! This revelation was a classic case of Murphy’s Law in action, instantly rendering our carefully crafted IKEA kitchen layout unfeasible. Our dreams of a simple installation quickly transformed into a complex puzzle.
Adapting to Adversity: Rethinking the Layout
With our original plans rendered obsolete, we had no choice but to throw them out the window and start anew. Fortunately, the upper cabinets were flexible enough to work with the revised layout. It was the bottom half of the kitchen that required significant re-adjustment. We decided to place the stove in the corner, with a small cabinet nestled beside it. This new arrangement, however, left us with a rather large, awkward space in between, creating yet another challenge to overcome in our small space renovation.
The plumbing issue was more than just a matter of pipe location; it also meant dealing with the unsightly tangle of hoses and pipes directly behind the washing machine. This was certainly not the clean, minimalist look we envisioned for our new kitchen. The unexpected complexity of the existing infrastructure underscored the unpredictable nature of DIY home projects, especially when dealing with older installations.
Adding to the frustration was the sheer mess of hoses and pipes behind the washing machine. It was an absolute headache to contemplate how to integrate these into a modern, streamlined kitchen design. The thought of all that “nonsense” being visible was enough to make us groan in exasperation. Clearly, this was going to be more than just an IKEA assembly project.
Despite these setbacks, we forged ahead, adjusting our mindset to work with the new reality. Here, you can see the revised setup. The sink is now positioned where the washing machine used to be. We decided, “Okay, this is something we can work with.” It wasn’t the original dream, but it was a functional compromise that allowed us to keep the project moving forward. This adaptability is often key in successful DIY renovations.
The Plumbing Predicament: Why Professionals Might Be a Good Idea
Our resolve was immediately tested again by the peculiar plumbing arrangement. The water pipes were placed in such an awkward way that we couldn’t simply cut a large section out of the side of the cabinet to accommodate them. This was a critical moment, prompting us to ponder if perhaps hiring professionals might have saved us some headaches. While the DIY spirit is strong, moments like these make you appreciate the expertise of those who navigate such complexities daily. It certainly added a layer of difficulty we hadn’t anticipated for an IKEA kitchen installation.
To further complicate matters, the IKEA sink cabinets are designed to be flush against a wall, meaning they lack a solid back panel. This became a major issue when our revised layout meant the back of the sink cabinet would be exposed to the living area. What was intended as a simple assembly now required a creative solution to provide structural integrity and a finished look. Talk about our plans going completely awry! Every step seemed to present a new, unforeseen obstacle, truly embodying the spirit of Murphy’s Law in action.
Progress Through Perseverance: Tiling and Installation
Despite all these setbacks and the added pressure of a tight deadline (I was scheduled to leave at the end of the month), we plodded on with determination. We were incredibly fortunate to have the invaluable assistance of a good friend, who helped us with the tiling and general installation. We truly had no prior experience with such a complex kitchen setup, so their expertise was a lifesaver. A huge thank you to our amazing friend for making this ambitious project possible!
The moment the new tiles were placed against the wall, everything began to fall into place visually. We made the conscious decision to extend the backsplash all the way down to the bottom of the wall, and it made a HUGE difference. Not only did it significantly elevate the aesthetic appeal of the kitchen, creating a more cohesive and finished look, but it will also prove much easier to clean in the future. Luckily for us, we already had all the necessary tiles on hand, saving us an unexpected expense in our budget-friendly kitchen upgrade.
Conquering the Sink: A True Test of DIY Skills
To address the plumbing conundrum, we carefully opened a few strategic holes on the side of the sink cabinet, allowing us to snake the pipes through. While this particular section still requires a more permanent, aesthetically pleasing cover in the future, at least we now have a fully functional faucet! This was a small victory that kept our spirits high.
Oh, and for your information, the hardest part of this entire IKEA kitchen installation project was undoubtedly getting that sink to fit perfectly into the countertop. We must have attempted it at least five times, wrestling with all the clamps that needed to be maneuvered into place to secure the sink tightly. It was a challenging, sweat-inducing task, but also a valuable learning experience. Now, if I ever need to install another kitchen, I’ll know exactly what to expect and how to tackle it more efficiently. “Wink” – a hard-earned lesson in DIY plumbing and precision!
Crafting a Solution: The Sink Cabinet Backing
And what about the exposed back of the cabinet? To create a functional and presentable solution, I repurposed an old piece of plywood we had lying around. I varnished one side of it, aiming to make it waterproof, given its proximity to the sink. My intention was to match the color of the countertop for a seamless look, but as you can see, I failed miserably! It was a frustrating attempt at color coordination, a true jigsaw puzzle in terms of shades and tones – another reminder of Murphy’s Law at play. Eventually, we simply pushed it all the way up against the small column on the left and securely attached it to the cabinet with screws. It fit flush with the end of the sink cabinet, creating a much-needed divider between the kitchen and living areas.
Did you notice my subtle attempt to hide the visible hose with the little table on the bottom left? Well, that was another valiant effort that didn’t quite hit the mark – a creative solution that ultimately failed to fully conceal the plumbing. Such is the nature of DIY; sometimes you win, sometimes you learn!
Disclosure: The items below are affiliate links and link to Amazon.com. If you purchase any of these products through the links, I receive a small commission, which helps me continue to provide you with lovely content. There is no extra charge to you for purchasing through my affiliate links.
The Grand Reveal: A Functional and Charming Small Space
Alright folks, the moment you’ve been waiting for – the reveal! Please excuse the less-than-perfect photos; these were taken just hours before I left for the airport to fly to America, a true testament to getting this project finished in the nick of time. Despite the rush, I wanted to capture the essence of our hard work and share the finished living/kitchen area.
Here, you see one side of our newly transformed kitchen. One of the most impactful changes we made was painting the washing machine to blend seamlessly with the rest of the kitchen cabinetry. It made a HUGE difference, transforming it from an unsightly appliance into a more integrated part of the space. The result is a much calmer and more cohesive aesthetic, especially vital in a small open-plan living area.
This is the other side of the kitchen area, leading to our charming balcony. Hanging conveniently next to the door is my repurposed blue kitchen organizer, adding a pop of color and practical storage. We’ve strategically placed the garbage can next to the hose, though I must confess, this remains a bit of a sore spot for me aesthetically. There’s also a slight gap between the cabinet and the column that still needs attention. Eventually, my husband (the “hubs”) will need to devise a clever solution to cover this space, ensuring it remains accessible for future plumbing needs.
Next to the kitchen, you’ll find the Hejne shelving unit that I completed a few months ago. I’ve since added two more shelves, a decision that proved to be a brilliant idea! In a small apartment like ours, every bit of storage space is precious, and these additional shelves have significantly boosted our organizational capacity. On the second shelf from the bottom, you can also spot the broken plastic baskets that I cleverly covered with fabric, a testament to our philosophy of repurposing and giving new life to old items.
As you can clearly see, our refrigerator is snugly situated right in between the versatile shelving unit and our cozy daybed. I wasn’t exaggerating when I mentioned how truly small this apartment is – we deliberately downsized to create a more efficient and manageable living environment. Every inch of space is carefully considered and optimized to serve multiple functions, embodying the essence of small space living.
Now, let’s take in the view from across the daybed. In this photograph, you can see the plywood panel that acts as a subtle divider for the sink cabinet. And no, you absolutely cannot see my dirty dishes from this vantage point – a strategic design choice, I assure you! “Wink.”
I carefully painted this plywood divider a soft shade of gray. My intention was for it to blend into the background, ensuring it didn’t starkly stand out when viewed from the living area side of the room. Instead, our attention is drawn to the pretty blues of our charming table, complemented by those wonderfully happy chairs. This thoughtful color palette helps to create a serene and inviting atmosphere in our small, multi-functional space, effectively separating the kitchen’s practicalities from the living area’s comfort.
In the other corner of our living area, you’ll find the beautiful metal trunk that I lovingly made over several months ago. It serves as both a decorative accent and practical storage. Oh, and while I’m on the topic of repurposing, those curtains adorning our window once lived a previous life as a duvet cover! It’s a fundamental principle in our home: everything gets a second chance, a new purpose, and a fresh lease on life. This sustainable approach not only saves money but also infuses our space with unique character and personal history.
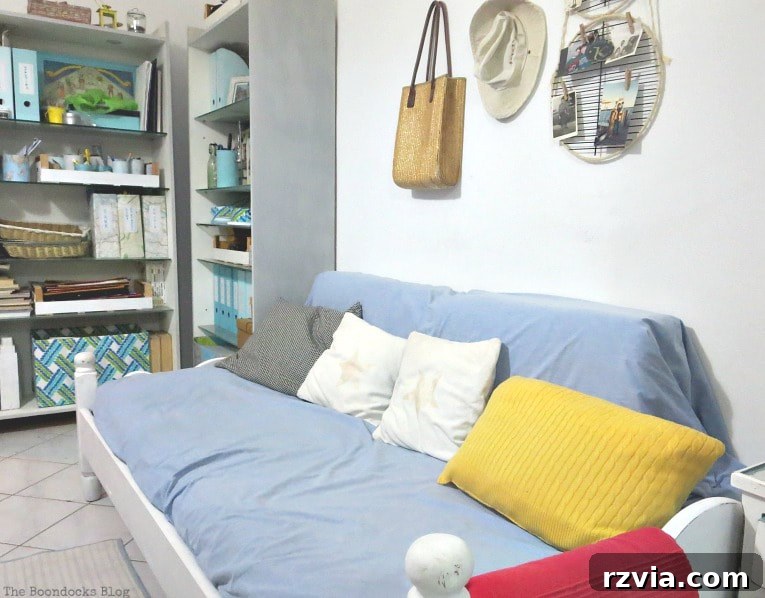
And so, we’ve come full circle, ending our tour with a glimpse of the bookcases positioned elegantly next to the daybed, as seen in the very first photo of this post. This arrangement ties the entire living/kitchen space together, showcasing how each element, whether repurposed or newly installed, contributes to a harmonious and highly functional small apartment.
Reflections on Transformation and Finding Joy in Small Spaces
Whew, that was indeed a long post, but believe me, the project itself felt even longer! I genuinely wanted to share every intricate detail of this transformation to illustrate how all these individual pieces, despite their initial challenges, ultimately came together to form a cohesive and beautiful room. It serves as a powerful reminder that anyone can embark on transforming their space, no matter how daunting it may seem, with just a little hard work, a sprinkle of creativity, and a willingness to find solutions in unexpected places. Solutions are truly available everywhere we look, often hidden within constraints.
If you’ve been following my journey, you know I’ve always emphasized the importance of cultivating a calm and cheerful living space. This ambitious renovation was my heartfelt attempt to ward off the dreaded winter blues. Even here in sunny Greece, those of us accustomed to abundant sunshine often struggle with the onset of rainy, dreary months. Did I succeed in creating that cheerful sanctuary? I certainly hope so! This small space renovation, with its blend of practicality and personal touches, has truly infused our home with a renewed sense of warmth and functionality, proving that even with the unexpected twists of Murphy’s Law, a beautiful outcome is always within reach.
Thank you all sincerely for sticking with me until the very end of this detailed account. As many of you know, I’ve been passionately working on this particular space for quite some time. Despite the frequent interventions of Murphy’s Law, we managed to successfully install that IKEA kitchen and finish the entire living/kitchen area just in the nick of time! The satisfaction of overcoming each hurdle and seeing our vision come to life is truly immense.
I still have a few more exciting projects to show you from the bedroom, and then, believe it or not, we will be completely done with this small apartment… forever. Or at least until I decide it’s time to re-decorate again, which, let’s be honest, is always a possibility for a DIY enthusiast!
If you truly enjoy my content, I invite you to subscribe to my blog and receive my latest DIY adventures and insights directly in your mailbox once a week. You can find the subscription form on the sidebar or at the top of the page. Rest assured, your email will never be shared with any third party.
More Inspiring DIY Projects:
<<Sweet Inspiration Link Party #78
HOME
Easy and Thrifty Halloween Vignette>>
Linking up to these Link Parties
This blog is for entertainment purposes only; my DIY tutorials are not professional advice. Read my full disclaimer here.
I love receiving your comments and will do my best to reply to them or visit you on your blog. Please do not add a hyperlink to your comment, otherwise, we cannot publish it.