
Transforming Treasures: How to Effortlessly Revive an Old Wood Mirror with a Simple Paint Makeover
There’s an undeniable thrill that comes with transforming something old and discarded into a beautiful, functional piece for your home. This sentiment perfectly captures my current excitement as I embark on the journey of decorating my girls’ bedroom. Every day brings a new addition, a fresh touch, and a step closer to creating their dream space. Among these carefully selected pieces is a true hidden gem: an old wood mirror that my son rescued from oblivion. He found it just as a friend was about to throw it out – a testament to my successful “training” of my kids to spot these wonderful treasures. And so, it arrived home, a thoughtful gift with immense potential.
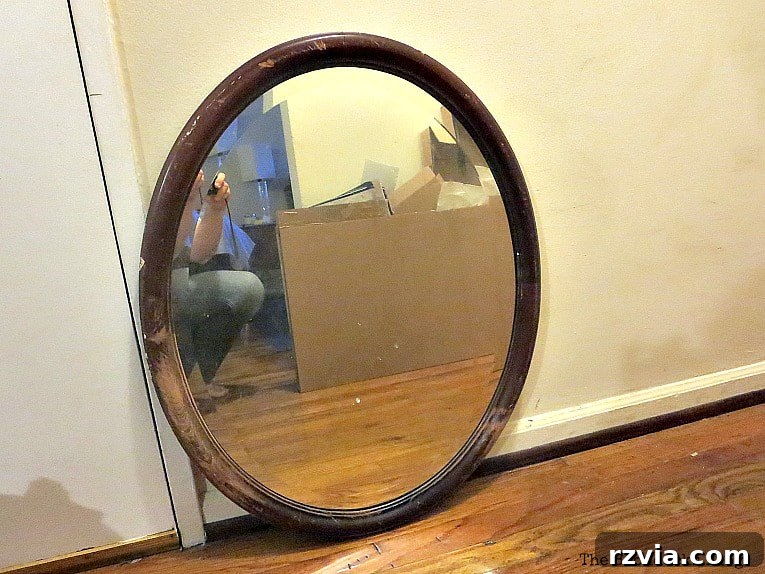
As you can see from the initial photographs, this vintage mirror had certainly seen better days. Its wooden frame was deeply scratched, bearing the marks of time and neglect. It was evident that this piece desperately needed a new lease on life, a revival that I was confident I could achieve with nothing more than a fresh coat of paint and a little bit of creative vision. This project was not just about fixing a mirror; it was about honoring its history and giving it a vibrant future within our home.
Taking a closer look at the mirror’s condition truly highlighted the extent of the work ahead. The worn patches and deep abrasions on the frame were unmistakable. After bringing it home, I consulted with the girls about their preferences for the room. Their immediate response? They wanted the mirror, but it absolutely had to be painted black. This decision perfectly aligned with the overarching black and white theme we had meticulously planned for their bedroom. A sleek, black mirror would not only conceal its imperfections but also introduce a sophisticated contrast, adding depth and modern elegance to their bright and clean space.
Gather Your Toolkit: What You’ll Need for Your Mirror Makeover
Before diving into any DIY project, proper preparation is key. Gathering the right tools and materials upfront ensures a smooth and enjoyable process. For this incredibly simple yet impactful mirror transformation, you won’t need an extensive array of supplies. Here’s a concise list of everything required to get started on your own mirror revival:
- Masking Tape: Essential for achieving crisp, clean lines and protecting the mirror glass from paint splatters. Choose a good quality tape that adheres well but removes cleanly.
- American Decor Satin Enamels in Black: This specific paint is a personal favorite due to its durability and beautiful finish. The satin enamel provides a subtle sheen that is both elegant and easy to maintain.
- Paintbrush: A high-quality paintbrush designed for smooth application is crucial. A brush with synthetic bristles will provide the best finish with water-based enamel paints. Consider having a smaller detail brush for intricate areas if your mirror frame has carvings.
- Fine-Grit Sandpaper (Optional but Recommended): For smoothing out rough patches and ensuring optimal paint adhesion.
- Clean Cloth or Tack Cloth: To wipe away dust and debris after sanding, ensuring a pristine surface for painting.
- Drop Cloth or Old Newspaper: To protect your work surface from any accidental paint drips or spills.
Having these items ready will set you up for a successful and stress-free mirror makeover. Let’s transform that tired mirror into a statement piece!
The How-To: Bringing Your Old Mirror Back to Life
Sometimes, the most impressive transformations come from the simplest processes. This mirror makeover is a perfect example – it’s so straightforward, I almost feel a bit silly writing a detailed ‘how-to’. Yet, the results speak for themselves, and sharing these easy steps means you can achieve a similar stunning outcome. Here’s how to turn a tired old mirror into a dazzling decor piece:
Step 1: Preparation is Key – Protect and Clean
The first crucial step is to protect the mirror glass. Carefully apply masking tape along all the edges where the frame meets the glass. Take your time with this to ensure a neat, straight line. This simple act genuinely saves a tremendous amount of effort later on, preventing you from having to painstakingly scrape paint off the reflective surface. Once taped, give the entire wooden frame a thorough cleaning. Use a mild all-purpose cleaner and a damp cloth to remove any dust, grime, or oils that may have accumulated over the years. A clean surface is paramount for optimal paint adhesion and a smooth finish.
Step 2: Smooth the Way – Light Sanding
With the glass protected and the frame clean, it’s time for a light sanding. I used a fine-grit sandpaper (around 220-grit) to gently smooth out any rough patches and worn areas on the wood. The goal here isn’t to remove all the original finish, but rather to create a slightly textured surface that the new paint can “grip” onto. This ensures better adhesion and a more durable, long-lasting finish. After sanding, wipe down the frame thoroughly with a tack cloth or a slightly damp cloth to remove all dust particles. Any dust left behind will compromise the smoothness of your paint job.
Step 3: The Magic of Paint – Application and Curing
Now for the fun part: painting! Using the American Decor Satin Enamels in black, I applied the first coat. Aim for thin, even strokes to avoid drips and ensure consistent coverage. Don’t worry if the first coat looks a bit patchy; it’s simply laying the foundation. Allow it to dry completely according to the manufacturer’s instructions – usually a couple of hours. Once dry, apply a second coat. This is where the magic truly happens, as the rich black color comes alive, creating a beautiful, hard finish. I really love this particular paint; I’ve used it before on my lamp project and it never disappoints. Not only is it incredibly easy to work with, but it also dries to a remarkably hard, durable finish, eliminating the need for a separate top coat. This makes it an absolute winner in my book, saving both time and effort.
The entire painting process, including drying time between coats, took only a couple of hours. Once the final coat was applied and dry to the touch, I removed the masking tape gently. To ensure maximum durability and a rock-solid finish, I let the mirror cure for a full week before placing it in its final spot. This curing period is crucial, especially for furniture or decor pieces that might be handled frequently, as it allows the paint to fully harden and reach its maximum strength.
Disclosure:
The items below are affiliate links. If you purchase any of these products through the links, I receive a small commission. This helps support my blog and allows me to continue providing you with lovely content and inspiring DIY projects. There is no extra charge to you for purchasing through my affiliate links – it’s a win-win!
Initially, I captured some photographs of the newly painted mirror in our foyer. It looked striking there, an immediate testament to the power of a simple paint job. The transformation was so profound that it instantly elevated the space it occupied, even temporarily. However, the mirror’s true destination was always clear, and it felt only right to showcase its final glory within the very room it was destined to adorn.
…but I think it is only fitting to show it in the girls’ bedroom. This is where it truly belongs, where its elegant black frame adds the perfect contrast and sophistication we envisioned for their black and white themed haven. The mirror doesn’t just reflect light; it reflects the careful planning and personal touch that went into creating their personalized space. Its journey from a forgotten piece to a cherished focal point is now complete.
Such an easy project, indeed, if not my easiest paint job yet! The simplicity of this transformation truly underscores the power of a little paint and a clear vision. It’s incredibly satisfying to achieve such a dramatic and elegant result with minimal effort and time, proving that you don’t need to be an expert to create beautiful things for your home.
I’ve purposefully placed this revitalized black mirror strategically between the two Ikea Billy bookcases in the girls’ bedroom. Its substantial size, measuring approximately 12 by 30 inches, allows it to command attention and create a focal point within the room. The dark frame against the light bookcases provides a striking visual contrast, making the mirror truly stand out. It adds an element of architectural interest and makes the space feel more intentional and sophisticated. This placement also enhances the sense of balance and symmetry, contributing to the serene and organized atmosphere we aimed for.
Directly below the mirror, a dresser awaits its own transformation. This piece will soon have its day on the blog, as it too is slated for a refreshing makeover. The girls’ room is all about bright and clean furniture, and the dresser will perfectly complement the mirror and the overall aesthetic. In fact, I’m planning to use the very same American Decor Satin Enamel paint, but this time in a crisp white shade! This continuity in paint quality will ensure durability and a cohesive look throughout the room, maintaining that fresh, modern appeal.
Looking at the completed arrangement, with the elegant black mirror flanked by the bookcases and sitting above the soon-to-be-painted dresser, I am convinced that the mirror was meant to be in this exact spot. It feels perfectly integrated, adding character, depth, and a touch of sophisticated charm that transforms the entire wall into a deliberate and beautiful vignette. It’s a true testament to how repurposing old pieces can bring unique personality to a space.
The Enduring Joy of Upcycling: A Simple Fix, A Grand Impact
I am incredibly grateful that my son possessed the foresight and keen eye to recognize the hidden potential in this old mirror and bring it home to me. It serves as a wonderful reminder that so many times, we possess old items that we might consider discarding, simply because we overlook their inherent value or the ease with which they can be revitalized. This mirror transformation was such an effortless fix; it truly would have been a shame to let it go to a landfill. Reviving an old mirror like this with just a bit of paint is an incredibly rewarding and accessible project for anyone, regardless of their DIY experience.
Especially when undertaken with a high-quality product like the American Decor Satin Enamels I used, the process becomes even more enjoyable and foolproof. The paint’s excellent coverage, durable finish, and quick drying time make it ideal for quick transformations. I wholeheartedly encourage you to give this project a try. Go ahead and order some of this fantastic paint (remember, the affiliate link is provided above) – I promise, you’ll be thanking me once you see the incredible results you can achieve! Embracing upcycling not only breathes new life into forgotten pieces but also adds unique character and a personal touch to your living spaces, all while being kind to your budget and the environment.
If you truly enjoy what you’ve seen and want to stay updated on all my latest DIY adventures and home decor tips, be sure to subscribe to my blog! By joining our community, you’ll get all my creative journeys delivered straight to your mailbox, ensuring you never miss a new project or inspiring idea. The subscription form is conveniently located on the sidebar and at the top of the page. Rest assured, your email address will always remain confidential and will never be shared with any third party.
More Inspiring Paint Projects:
If you enjoyed this mirror makeover, you’ll love exploring some of my other paint-based transformations. Discover how a little color can completely redefine furniture and decor:
These projects demonstrate that with a little creativity and the right materials, you can transform almost any forgotten item into a cherished piece that adds character and charm to your home.
<< Decorating with DIY Home Planner
HOME
Using Wreaths to Decorate >>
Linking up to these Link Parties
This blog is for entertainment purposes only; my DIY tutorials are not professional advice. Read my full disclaimer here.
I love it when I receive your comments and I will do my best to reply to every single one of them. Please avoid adding a hyperlink to your comment, otherwise, it may not be published to ensure a spam-free community. Thank you for your understanding and engagement!