
Easy & Thrifty Halloween Vignette: Spooktacular Decor on a Budget
Autumn has always held a special place in my heart, and with it comes the enchanting thrill of Halloween! It’s a season brimming with creative possibilities, especially when it comes to transforming our living spaces. Last year, while still soaking up the Greek sun, we celebrated Halloween with immense joy, complete with a delightful Mr. Pumpkin Man and even a memorable Halloween party.
Now that we’ve settled in the States, the excitement for Halloween is palpable, and we’re ready to embrace the festivities wholeheartedly. What better way to kick off the spooky season than by crafting a charming, budget-friendly Halloween vignette? This year, our focus is on sustainable and smart decorating, utilizing the art of repurposing to create unique, eye-catching displays that won’t break the bank.
Join me today as I share my step-by-step guide to assembling this delightful vignette. Plus, I’m thrilled to be part of a special Fall/Halloween blog hop with some incredibly talented friends. Don’t forget to explore their amazing creations linked at the end of this post!
Gather Your Halloween Crafting Essentials: What I Used for This Vignette
- A captivating Himalayan Salt Lamp (the secret to our “Lava Pumpkin”)
- One plastic jar (ideal for ghostly glow effects)
- One glass jar (perfect for an ethereal ghost)
- A set of twinkling fairy lights (for adding magical ambiance)
- One battery-operated candle (a safe alternative to real flames)
- An old ceramic plate (serving as a rustic base)
- Two upcycled tin cans (versatile for countless projects)
- Various ribbons (to add texture and color)
- A few trusty fake pumpkins (reused from previous seasons)
- Natural pine cones (for an autumnal touch)
- A simple cardboard box (transformed into a spooky gravestone)
The beauty of this project lies in its flexibility. Don’t have a specific item? No problem! Look around your home – you’ll be amazed at what forgotten treasures can be given a new lease on life for your Halloween decor. This list is merely a starting point to spark your imagination for budget-friendly, repurposed crafts.
Crafting Your Spooky Showcase: The How-To Guide
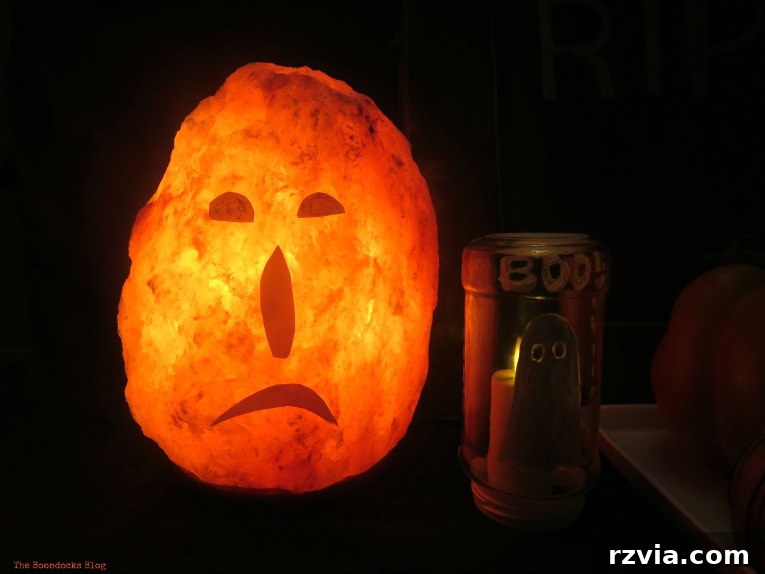
Let’s dive into the creative process, starting with a true showstopper. Can you guess what the captivating glow in the photo above is? It might not be immediately obvious, but zoom in a little closer, and the mystery unfolds in the image below!
Yes, that magnificent, glowing orb is none other than a Himalayan Salt Lamp! My son owns a few, and its natural orange hue instantly sparked a brilliant idea: a “Lava Pumpkin.” I simply couldn’t resist the temptation to transform it. (Don’t worry, I checked with him first – mostly!) To create the pumpkin’s face, I cut out eyes, a nose, and a mouth from a piece of paper or vinyl. The real magic, however, happens when the lamp is switched on, casting a warm, pulsating orange glow that mimics molten lava – a truly unique and captivating Halloween centerpiece. It offers a soft, eerie glow that’s perfect for a spooky evening.
Next to our glowing Himalayan Pumpkin, we have a wonderfully simple yet effective ghost decoration. I took a plain glass jar and, with a steady hand, painted a charming little ghost on its surface. The trick here is to turn the jar upside down. This allows you to place a battery-operated candle underneath, creating a delightful ethereal glow that brings your ghostly friend to life. The inverted jar technique provides a sturdy base and elevates your spectral design.
And voilà! The result is not only enchanting but also significantly safer than using an open flame. Many battery-operated candles even feature a rotating “flame” effect, which adds an extra layer of realism and beauty to your spooky setup without any fire hazard concerns. This makes it an ideal choice for households with children or pets, or simply for peace of mind.
These adorable ghostly figures were painted onto a plastic jar, showcasing how versatile everyday containers can be. Whether you have plastic or glass jars, the possibilities for transforming them into festive decor are endless. We all accumulate jars from food items, and giving them a second life as Halloween decorations is both eco-friendly and fun. A simple coat of paint can completely change their purpose and aesthetic.
In fact, I painted an entire family of ghosts all around the plastic jar, creating a charmingly spooky scene from every angle. To enhance the magical effect, I tucked some delicate fairy lights inside the jar, allowing them to twinkle through the painted ghosts. A finishing touch of a pretty black and white ribbon tied around the top adds a touch of elegance to this simple yet effective DIY. Fairy lights are incredibly versatile and can be used in almost any clear container to create instant ambiance.
These delightful pumpkins are old friends from many Halloweens past. There’s absolutely no reason to discard seasonal decor when it can be reused year after year! By thoughtfully incorporating them into upcycled crafts and fresh arrangements, they look vibrant and new. Surrounding them with unique, handmade elements breathes new life into them, making them feel like a cherished part of a constantly evolving display rather than tired old decorations. Repurposing isn’t just about saving money; it’s about extending the life and story of your beloved items.
And what about those charming twine-covered globes? I acquired a whole package of them, along with some wonderfully fragrant pine cones, from Michael’s several years ago. They surprisingly carry a lovely cinnamon scent, which adds another sensory layer to our fall vignette. The vibrant orange leaves scattered throughout the display were a gift from Mother Nature herself, simply collected from the street outside. Incorporating natural elements not only saves money but also brings an authentic, organic feel to your decor, truly grounding your spooky setup in the beauty of the season.
Got some tin cans lying around? Of course you do! They are a crafter’s best friend. For this vignette, I painted mine a sleek black and then wrapped a piece of vibrant orangey fabric around them. This fabric was lovingly repurposed from an old blouse – you know how much I enjoy giving my old clothes a new purpose. Repurposing fabric for crafts is incredibly easy, exceptionally thrifty, and a fantastic way to practice sustainable living. To secure the fabric, I simply added some decorative ribbon over it, holding it firmly in place without any glue. This no-glue method is genius because it means next month, I can easily remove the fabric and repurpose the tin cans for a completely different holiday or project, offering endless versatility.
Arranged on an old platter dish, these fabric-wrapped tin cans create a wonderful focal point. Scattered around them are the small, natural pine cones, adding texture and an organic touch. The combination of varied heights, textures, and natural elements forms a visually appealing and cohesive grouping. This simple arrangement demonstrates how humble, repurposed items can come together to create a sophisticated and festive display, proving that beautiful decor doesn’t require a hefty price tag.
Disclosure: The items below are affiliate links and link to Amazon.com. If you purchase any of these products through the links, I receive a small commission, which helps me continue to provide you with lovely content. There is no extra charge to you for purchasing through my affiliate links.
This charming chalkboard dish was another wonderfully easy repurposing project. I stumbled upon this forgotten dish in my dad’s basement (shhh, he still doesn’t know I “borrowed” it!). It originally featured a rather generic fall landscape scene, but I envisioned it serving a much more dynamic purpose. To achieve this, I painted it with two coats of black chalkboard paint, ensuring full coverage. After allowing it to dry completely, I prepped it by rubbing chalk all over the surface and then wiping it clean the next day. This conditioning step ensures the chalkboard is ready for use without ghosting. My daughter eagerly grabbed it and brought Jack Skellington to life with her artistic touch.
The best part? To change the design for the next holiday or season, all it takes is a good wipe down with a damp cloth, and it’s a fresh canvas, ready for new inspirations!
Our spooky gravestone is actually just a simple cardboard box, originally used to package a picture frame. It once had a brief stint as a wall art piece in another of my repurposing adventures – I truly believe in never letting anything go to waste! When the wall art had served its purpose, we realized its potential for a Halloween transformation. My daughter, with her boundless creativity, simply painted a convincing gravestone design onto it. It was incredibly easy and cost absolutely nothing. Because it’s a box rather than just a flat piece of cardboard, it has a more substantial, three-dimensional presence, adding depth and authenticity to our Halloween vignette.
And here it is, our entire Halloween vignette, all beautifully lit up! The combination of the glowing salt lamp, the twinkling fairy lights in the ghost jars, and the soft flicker of the battery-operated candle creates an enchanting and perfectly eerie atmosphere. The warm, inviting glow transforms simple repurposed items into a captivating display that truly embodies the spirit of Halloween. It’s amazing how strategic lighting can elevate even the most humble crafts.
Creating this fun and easy vignette truly cost us nothing but a bit of time and imagination. The greatest challenge might have been deciding which delightful photos to share with you all, as every angle offered a new charm! This project is a testament to the power of looking at everyday items with a fresh, creative perspective. The joy of turning discarded objects into seasonal treasures is incredibly fulfilling, both for the environment and for your wallet.
I must admit, this little painted ghost fella on the inverted jar has stolen my heart – he’s definitely my favorite element in the whole display! His simplicity and the warm glow from within make him irresistibly charming and a perfect example of how a minimal effort can yield maximum Halloween impact. It’s often the simplest ideas that bring the most joy.
Ultimately, this entire project was a cost-free endeavor, requiring only a little bit of my time and a keen eye to scout out available items around the house. The satisfaction of knowing I was able to repurpose all those jars, tin cans, and even a cardboard box brings me immense joy. It’s a testament to sustainable crafting and the beauty of giving everyday objects a new, festive purpose.
I sincerely hope these simple yet effective ideas inspire you to create your own easy and thrifty Halloween vignette this season. And if you happen to have a Himalayan Salt Lamp, you’re already one step closer to making your very own “Lava Pumpkin” masterpiece!
If you enjoyed this thrifty Halloween craft, please consider sharing it with your friends or saving it to your favorite Pinterest board. The image above is perfectly sized for pinning!
For more creative adventures, decorating tips, and repurposing ideas delivered straight to your inbox once a week, be sure to subscribe to my blog. You’ll find the subscription form conveniently located on the sidebar and at the top of the page. Rest assured, your email address will always remain private and will never be shared with any third party.
Now, don’t miss out on more fantastic fall and Halloween inspiration! Make sure to hop on over and visit all my special friends who are also participating in this exciting blog hop.
Welcome to our monthly Creative Blog Hop!
This month, we’re celebrating all things Halloween and Fall, offering a plethora of inspiring DIY projects to keep your crafting spirit alive for months to come! Meet your wonderful hosts:
Tammy @ Hey Fitzy | Mary @ The Boondocks Blog | Janine @ Happy Happy Nester | Carolann @ Sassy Townhouse Living | Norma @ Paint Me Pink | Sarah @ Creative Ramblings | Tara @ Lehman Lane | Michelle @ Our Crafty Mom | Sam @ Raggedy Bits | Amanda @ Life On The Bay Bush | Leanna @ Faeries and Fauna | Ashly @ Modern Glam | Katrin @ KreativK | Jodie & Julie @ The Design Twins | Kellie @ Gratefully Vintage
Grab some Halloween/Fall Inspiration
An InLinkz Link-up
Looking for more Halloween ideas to spark your creativity? Explore these other spooktacular projects:
<<New Kitchen with Room Reveal HOME Sweet Inspiration Link Party #79 >>
Linking up to these Link Parties
This blog is for entertainment purposes only; my DIY tutorials are not professional advice. Read my full disclaimer here.
I genuinely appreciate your comments and always try to reply or visit your blog. Please ensure you do not add a hyperlink to your comment, as this prevents us from publishing it.