
Welcome back, fellow craft enthusiasts! It’s that exciting time of the month again when I gather with my amazing friends from the International Bloggers Club (IBC) to unveil our latest unique projects. Each month, we embark on a creative journey guided by a specific theme, and this year, our inspiration comes from anniversary years. Last month, we dove into the versatile world of paper crafts, showcasing its incredible potential. For our current challenge, we’re exploring the soft, comforting, and surprisingly adaptable material of cotton, and let me tell you, this project was quite the adventure!
My inspiration for this month’s cotton-themed project struck while browsing the aisles of Marshall’s. I spotted the most adorable gnome, perched charmingly on a shelf. My immediate thought was to buy it – it was truly irresistible. But then, a familiar voice, the inner DIYer, piped up: “What kind of self-respecting crafter buys something they can make themselves?” It was a fair point, especially knowing our IBC theme for the month centered around cotton. That’s when it hit me: I would make my own gnome, using cotton as the primary material. But did I succeed in creating a charming replica? Or did my ambition lead me down a path of comical errors? You, my dear readers, will be the judge. Join me as I share my journey, detailing how I managed to spectacularly stumble through the art of gnome making, only to emerge with a unique, if slightly portly, character.
Filled with enthusiastic determination, I gathered my supplies. I carefully selected some lovely fabric, and even found a piece of plastic that I envisioned would serve as the sturdy base, or perhaps the ‘butt,’ of my soon-to-be gnome. However, my initial excitement quickly turned into palpable frustration. Despite my best efforts, I simply couldn’t figure out a coherent way to connect the fabric body to the plastic base. It seemed like a simple task, yet it proved to be an insurmountable hurdle. After what felt like an eternity – a grueling half-hour spent wrestling with fabric and plastic, punctuated by a much-needed Grey’s Anatomy binge-watching break – I had to admit defeat. The first attempt at gnome construction was an epic fail.
My spirits were significantly dampened by this early setback. I was so dejected that I seriously considered abandoning the gnome project altogether. My mind wandered to an alternative blog post, perhaps one detailing how I cleverly saved money by purchasing inexpensive cotton curtains and transforming them into a stylish valance for my kitchen. It was a perfectly viable, and frankly, much less frustrating, idea. But a small part of me, the persistent crafter, refused to give up on the gnome dream just yet.
As often happens with creative blocks, a new path revealed itself when I least expected it. While aimlessly browsing the internet, I found myself inundated with images of pumpkins. Everywhere I looked, there were pumpkins of all shapes and sizes! And that’s when a lightbulb moment occurred. I exclaimed to myself, “Self, why not give your gnome a pumpkin-shaped body?” The idea was so unconventional, yet so perfectly fitting for the season, and it offered a brilliant solution to my previous structural woes. Why not, indeed? And just like that, my frustrated gnome project morphed into a delightful pumpkin gnome, embracing a new, rounder destiny.
Disclosure: The items listed below are affiliate links. Should you choose to purchase any of these products through the provided links, I will receive a small commission. This commission helps me continue to bring you engaging and lovely content at no extra cost to you. Your support is greatly appreciated!
Crafting Your Unique Gnome: Materials You’ll Need
To embark on your own gnome-making adventure, especially if you’re keen on embracing the cotton theme, here’s a comprehensive list of materials. Many of these can be repurposed or found at local craft stores, making this a budget-friendly and sustainable project:
- One XL white cotton jersey T-shirt: Ideal for its stretch and soft texture, perfect for creating a plump gnome body.
- Yarn: For stitching and potentially for crocheting a custom hat.
- A feather boa: The secret ingredient for a luxuriant gnome beard.
- Polyester filling: To give your gnome its plump, huggable form. Recycled stuffing works wonders!
- Velvet fabric: For the hands and feet, adding a touch of elegance and contrasting texture.
- A knit hat or yarn to crochet one: For the iconic gnome hat – you can adapt or make your own!
- Cotton balls: Essential for crafting the gnome’s distinctive nose.
- Knee-high pantyhose: A clever trick for shaping the nose.
- Needle and thread: Your essential tools for assembly.
- Cardboard paper: For creating a supportive structure for the hat.
Step-by-Step: How to Make Your Pumpkin-Bodied Gnome
Given my previous struggles with a rigid base, I decided to fully lean into the “cotton” theme by creating a soft, rounded, pumpkin-like body for my gnome. For this, I specifically chose cotton jersey due to its excellent elasticity, which is far more forgiving than regular woven fabric when creating a stuffed, rounded form. Initially, I was unsure where to source a suitable piece of cotton jersey. However, during a trip to Michael’s to purchase supplies for the gnome’s beard, I serendipitously discovered their range of gigantic white cotton T-shirts. An XL tee offered the perfect amount of fabric and the ideal stretch for my project, proving that inspiration can strike from the most unexpected places!
Since I only needed a portion of the T-shirt for the gnome’s body, I carefully cut the back half of the shirt into a manageable square shape. This initial cut doesn’t need to be perfectly precise, as we’ll be shaping it further.
Next, to create a symmetrical circle for the gnome’s body, I folded the square piece of fabric twice. This resulted in four neatly stacked sections, making the subsequent cutting process much easier and more uniform.
With the fabric folded, I then proceeded to loosely cut out a quarter-circle from the corner. The beauty of this method is that when unfolded, it reveals a complete, albeit not perfectly geometric, circle. Remember, homemade charm often lies in these delightful imperfections.
Upon unfolding, I was left with a circular piece of cotton fabric. As anticipated, it wasn’t a mathematically perfect circle, but for the purpose of creating a fluffy, pumpkin-shaped gnome body, its organic form was absolutely ideal. This laid the foundation for our gnome’s delightfully plump physique.
To transform this circle into a functional pouch for stuffing, I took a thick needle and sturdy yarn and sewed a loose running stitch all around the entire edge of the circle. This technique is simple and effective, creating a channel for our drawstring.
This continuous stitch, when pulled, would act as a drawstring, allowing me to gather the fabric and enclose the stuffing, forming the round shape of the gnome’s body. It’s a fundamental step for creating any stuffed fabric item.
The next crucial step was to add the stuffing. Here’s where a bit of serendipity, and perhaps a touch of my “diligent recycler” tendencies, came into play! My playful pup, Tatoo, has, over time, managed to “redistribute” the contents of quite a few pillows since he joined our family. Always one to save useful materials, I had carefully collected this poly-fill, knowing instinctively that it would eventually come in handy. Lo and behold, this gnome project was its destiny! It felt good to repurpose something that would otherwise have been discarded. You’ll be pleased to hear that since then, Tatoo has new, chew-proof pillows and hasn’t bitten them once – what a good boy!
Once stuffed to a pleasing plumpness, I tightened the drawstring securely, shaping the fabric into a soft, round form that strongly resembled a mini pumpkin. This “pumpkin” would be the sturdy, yet cuddly, foundation for our whimsical gnome. The transformation from flat fabric to a dimensional body was truly satisfying.
To craft the gnome’s adorable hands and feet, I followed a simple, repetitive process. I cut rectangular pieces of velvet fabric – the velvet adds a lovely, tactile contrast to the cotton body. By folding each rectangle in half and then sewing along two of the open sides, I created small fabric pockets. These pockets were then filled with polyester stuffing, giving them a soft, rounded shape, perfectly mimicking tiny limbs. The velvet’s slight stretch made them easy to stuff and shape.
The legs were intentionally made longer than the hands to provide a grounded look for the gnome. Once stuffed, they were securely sewn onto the bottom of the pumpkin-shaped body. By this point, the vision of a pumpkin was rapidly fading, replaced by the burgeoning form of a charming gnome. With the limbs attached, the character was truly starting to emerge, no longer just a simple stuffed sphere, but a creature with personality! Right?
Finally, it was time for the gnome’s distinctive hat. Now, I must confess, by this stage of the project, my enthusiasm was waning significantly. I wasn’t exactly brimming with creative energy, and the thought of meticulously crafting a brand-new hat felt like an uphill battle. Let’s just say, the “gnome vibe” was thoroughly escaping me! What did I do? I had a moment of inspiration (or perhaps desperation!). I remembered my daughter had recently purchased a new hat; surely, she wouldn’t miss her old purple beanie? It was the perfect quick fix. However, simply placing the beanie on the pumpkin-shaped head wouldn’t give it the desired structure. The hat needed substance underneath to maintain its iconic pointed shape. This led to a brief, yet impactful, moment of clever problem-solving (a welcome change, as I hadn’t felt particularly clever throughout this project so far!).
Using a piece of sturdy cardboard, I fashioned it into a cone shape, as you can see in the image below. This would provide the necessary internal support for the beanie.
|
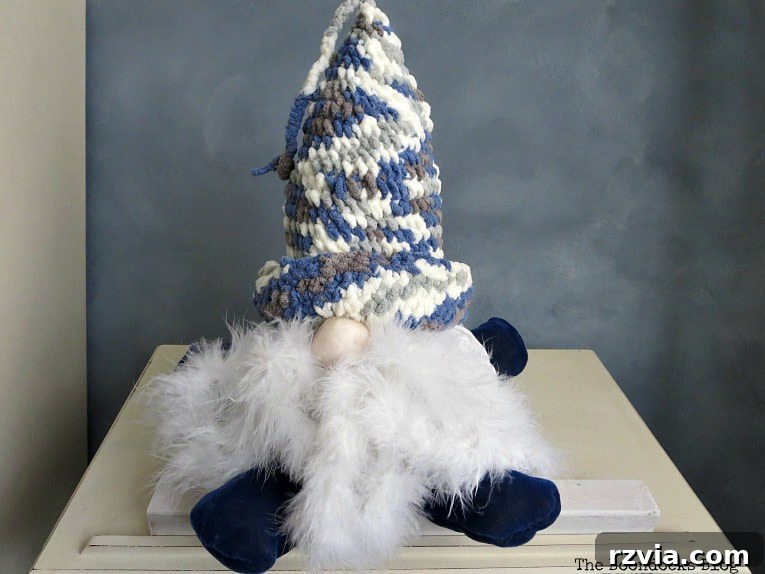
I secured the cardboard cone directly inside the gathered drawstring opening of the gnome’s body. Simply by placing it inside and pulling the yarn thread tightly, the cone was held firmly in place, providing the structural integrity needed for the hat. With the cone in position, I then added a generous amount of additional stuffing inside the beanie itself before carefully placing it over the cone and onto the pumpkin body. This ensured a full, well-shaped hat. Here’s the rather embarrassing, yet honest, result of my gnome’s current appearance. The purple beanie, while functional, wasn’t quite hitting the mark in terms of aesthetic charm. It looked… well, it looked like a beanie on a pumpkin. But we were getting there! To create the gnome’s characteristic lush beard, I utilized a feather boa. This material provides instant volume and a wonderfully soft, flowing texture. I folded the boa four times to achieve the desired thickness and length for the beard, then sewed the top end together to keep the layers unified and provide a neat edge for attachment. And for the final touch on the face – the nose! This was a quick and clever solution. I took about six cotton balls and stuffed them firmly into the toe of a knee-high stocking. Tying the open ends of the stocking together created a perfect, round little nose. I then simply tucked the tied ends into the drawstring opening of the gnome’s body, right beneath the hat and above where the beard would be. It’s stayed perfectly in place ever since, adding a cute, distinct feature to our gnome. This is how my gnome looked yesterday. It wasn’t terrible, certainly an improvement from my initial failures, but I still wasn’t quite “feeling the gnome vibe.” Something was missing, a certain polish. So, I had another internal conversation. I told myself, “Self, you have already eaten the donkey; all that is left is the tail now!” For those unfamiliar, this is a Greek expression that essentially means, ‘You’ve come this far, you might as well go all the way and finish what you started, no matter how arduous.’ And go all the way I did! I decided to take up crocheting again, something I hadn’t done since my teenage years. It felt like a daunting task, but the vision of a perfectly matched hat spurred me on. It took me the better part of an entire day, but I persevered, reacquainting myself with stitches and patterns, and ultimately crafted this small, custom-fit hat for my gnome. You might even recognize this particular yarn from my blanket project from last year, adding a lovely touch of continuity to my crafting journey. Finally, my gnome was complete! This new hat, with its harmonious colors, perfectly matches the velvet hands and legs, lending a far more polished and intentional look to the entire creation. The effort was undoubtedly worth it. If we compare him to my initial inspiration from the store, well, let’s just say my DIY fella gained a few happy pounds in the process. But, in true gnome fashion, it’s all wonderfully hidden behind his magnificent, fluffy beard! So, what profound lessons have I gleaned from this entire, often comical, crafting fiasco? The journey to this final gnome was certainly filled with unexpected twists and turns, leading to some valuable insights:
All those lessons and more, but the most rewarding outcome of this entire process? I actually remembered how to crochet! A skill long dormant, now happily revived. And that, in itself, is a little victory. As you can see, creating this gnome took me an unexpectedly long time, and truthfully, I later discovered a much easier method here—but that was, of course, after I had already finished my own convoluted project! I sincerely hope you’ve enjoyed reading about my adventurous, sometimes challenging, journey into gnome making. More importantly, I hope you can learn from my mistakes so that your own gnome-making endeavors are far less “miserable” and far more joyful. Now for the questions of the day: Was all the effort I poured into this project truly worth it in the end? And how do you think my unique, round-bodied gnome compares to the sleek, store-bought inspiration that started it all? And now, be sure to scroll down and discover what delightful cotton-themed projects my talented pals from the International Bloggers Club have created this month. For a peek at our past challenges, simply click here. Happy crafting! If you truly enjoy the content you see, I invite you to subscribe to my blog and receive all my latest creative adventures directly in your mailbox. You can find the subscription form conveniently located on the sidebar and at the top of the page. To review my privacy policy, please click here. I absolutely cherish receiving your comments and will do my best to reply to each and every one of them. Your feedback and engagement mean the world to me! |