
Transform Your Space: The Secret to Warming Up Any Room with DIY Fabric Decor
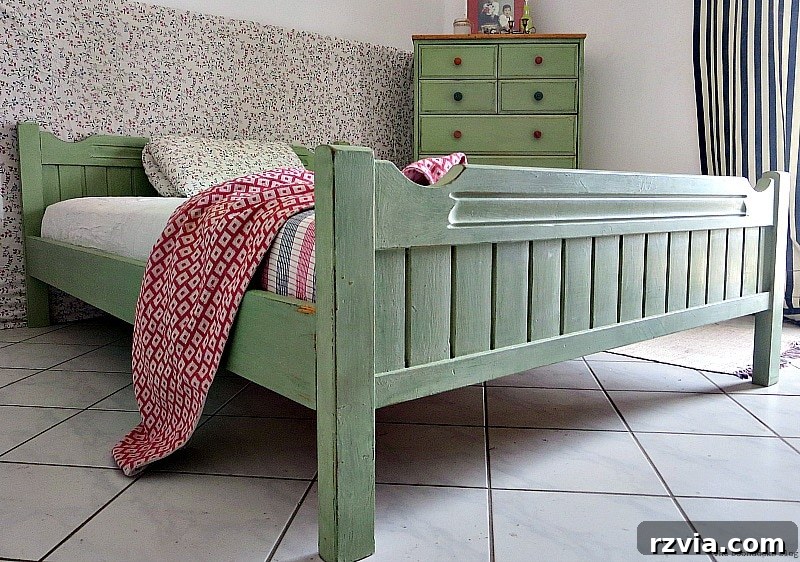
A few months ago, I unveiled the exciting journey of my wooden bed frame makeover, a project that breathed new life into an often-overlooked piece of furniture. While many of you admired the refreshed bed, a common thread in your comments was the enchanting “wallpaper” adorning the wall behind it. Its vibrant pattern and inviting texture seemed to complete the room’s newfound charm. Well, it’s time for a friendly confession: that captivating backdrop wasn’t wallpaper at all!
Today, I’m thrilled to pull back the curtain and reveal the true identity of that decorative element and, more importantly, share an incredibly simple, budget-friendly, and versatile method to infuse warmth and personality into any room using the humble power of fabric. If you’ve ever dreamt of transforming a bland space without the commitment or mess of paint, this innovative approach to fabric decor is about to become your new favorite DIY secret.
From Stark to Inviting: The Evolution of a Spare Room
For years, this particular room served as a spare guest bedroom, functional but undeniably stark. It lacked the cozy embrace and visual interest that makes a space truly welcoming. At its heart was a “headboard” that was, in reality, a simple piece of plywood. To soften its harsh edges and inject some much-needed character, I had previously wrapped it with an old comforter for padding, securing it firmly with staples. Over this, I draped and stapled a classic red plaid fabric, aiming to give the room a burst of color and a touch of warmth.
This initial fabric headboard served its purpose, attempting to unify a pair of beds that weren’t originally a set, creating a more cohesive look. The goal was always to make the room feel more inviting, less like an afterthought. You might wonder why I didn’t simply paint the room to achieve this warmth. While paint is often my go-to solution for an instant refresh, in this instance, the walls were already clean and a neutral shade. There was no practical reason to embark on another painting project, especially with a long list of other DIY painting endeavors awaiting my attention. I needed a solution that was quick, impactful, and didn’t involve cracking open another paint can.
The Great Reveal: A Staging Secret Uncovered
Fast forward a few days ago, as the bed frame makeover was nearing completion, I took some photos of the room. It was then that the “pretty fabric” you admired in the first photo made its appearance. Here’s another blogger secret: it was actually a beautiful duvet cover, strategically draped and used solely for staging purposes. While it certainly looked stunning in the photographs, adding a layer of sophisticated charm, in reality, it had no long-term business being there. Its temporary nature highlighted a crucial point: the power of fabric to instantly transform a space, even if just for a moment.
The Color Conundrum: When Old Favorites Clash with New Beginnings
Once the bed frame and dresser received their fresh coat of soft green paint, the old red plaid headboard simply didn’t work anymore. What was once a source of warmth now created an unwelcome clash. The vibrant red, while charming in its own right, stood in stark contrast to the serene green, jarring the eye and disrupting the calm ambiance I sought to create. I realized that this particular combination could probably only be “gotten away with” during the festive Christmas season, certainly not for everyday tranquility.
My clear solution was to change the cover of the headboard. However, finding the right fabric proved to be the most challenging part of the entire process. It’s not just about finding a pretty pattern; it’s about finding one that harmonizes with the existing elements, evokes the desired mood, and feels truly right for the space. This is where many DIY enthusiasts can get stuck, but with a little perseverance and an open mind, the perfect fabric always reveals itself.
The Fabric Hunt: A Journey of Trial and Error
My search began by rummaging through my extensive fabric stash, a treasure trove of textiles accumulated over years of crafting and DIY projects. I stumbled upon a lovely floral fabric that, at first glance, seemed promising. Its delicate pattern and soft hues were appealing, but upon closer inspection and a quick test drape, I realized the green tones in the fabric were subtly different from the newly painted furniture. It was the wrong green, creating a near-miss rather than a perfect match, and I knew it wouldn’t achieve the seamless integration I was after.
Undeterred, I explored other options. I even considered a bold geometric fabric that I had previously used to stage my fabulous IKEA desk makeover. This fabric had made a strong statement in that context, adding a modern and dynamic edge. However, a bedroom, by its very nature, demands a sense of calm and repose. With its vivid colors and energetic pattern, the geometric fabric felt far too bold for a space intended for rest and relaxation. Who could possibly get a good night’s sleep with such an impactful design staring back at them? It became clear that the choice of fabric profoundly influences the entire mood of a room, especially one dedicated to tranquility.
The “A-Ha!” Moment: Repurposing with Ingenuity
And then, it clicked! A memory from my early blogging days resurfaced – a time when I had created a beautiful fabric wall hanging to place directly over my bed. Living in earthquake-prone Greece necessitates careful consideration of anything mounted on walls above sleeping areas, making lightweight fabric a safe and stylish alternative to heavy framed art. I knew I had some of that original, lovely fabric tucked away, and it instantly felt like the perfect solution for the headboard. However, upon retrieving it, I discovered I didn’t have enough to cover the entire plywood piece. This could have been a setback, but necessity, as they say, is the mother of invention.
Not to worry! This minor challenge led to an even more ingenious and practical solution. I decided to first cover the entire plywood base with a neutral wool fabric, of which I had an ample supply. This served several purposes: it provided a clean, uniform canvas, added an extra layer of soft padding, and most importantly, extended the life of my precious decorative fabric by allowing me to use it more sparingly. This layering technique is a fantastic tip for anyone working with limited quantities of a favorite fabric or wanting to add extra plushness to their upholstered projects. It’s a clever way to achieve a high-end look with fewer resources, all while ensuring the structural integrity and comfort of your DIY piece.
A Step-by-Step Guide to Your DIY Fabric Headboard
The beauty of this project lies in its simplicity. Here’s how you can replicate this cozy transformation:
- Prepare Your Plywood Base: Start with a piece of plywood cut to your desired headboard dimensions. If you don’t have existing plywood, a local hardware store can cut it for you. Consider the height and width that best suits your bed and room scale.
- Add a Comfort Layer: Just like I used an old comforter for my initial headboard, you can wrap your plywood with batting, foam, or even an old blanket. This adds softness and depth, making the headboard more comfortable and visually appealing. Secure this padding firmly to the back of the plywood using a staple gun.
- Attach the Base Fabric (If Needed): If you’re using a secondary, decorative fabric, or if your main fabric is limited, this step is crucial. Drape your neutral base fabric (like my wool fabric) over the padded plywood. Ensure it’s smooth on the front and pull it taut around the edges. Staple it securely to the back of the plywood. Don’t worry too much about perfection on the back; as I always say, “No one will know what goes on in the back!” This foundation ensures a clean, consistent color underneath your top layer and provides extra resilience.
- Drape Your Decorative Fabric: Now for the star of the show! Take your chosen decorative fabric and carefully drape it over the newly covered plywood. The key here is centering it precisely to showcase its pattern or design. Since I didn’t have enough fabric to cover the entire piece, I allowed it to float as a central panel, creating a lovely focal point without requiring excessive material. This technique is particularly effective for patterned fabrics you want to highlight.
- Secure with Staples: Once you’re happy with the placement and tautness, secure the decorative fabric. A few staples on the back of the plywood will hold the top edge firmly. For the bottom front, I used just a couple of discreet staples, carefully placed where they would be hidden by the mattress or bedding, ensuring a clean and seamless finish. And just like that, the transformation was complete! This simple method requires minimal tools and skill, yet yields remarkably professional-looking results.
The Calming Oasis: A Room Reborn with Fabric
And this is how it looks in the bedroom now. The difference is truly remarkable. The new fabric, with its subtle pattern and harmonious colors, instantly creates a calming effect. It no longer clashes with the soft green furniture but rather complements it beautifully, weaving together a cohesive and tranquil aesthetic.
The subtle texture of the fabric adds an inviting softness that paint alone simply cannot achieve, transforming the once-stark spare room into a truly cozy haven. It’s a testament to how thoughtfully chosen textiles can dramatically alter the mood and perceived temperature of a space, making it feel more comfortable and lived-in. Guests will now step into a room that feels intentionally designed for relaxation and warmth.
The Versatility of Fabric: A Decorator’s Best Friend
One of the greatest advantages of this DIY fabric headboard is its incredible versatility. You know me – if I get bored with something, I love the option to switch it out! With this fabric-covered plywood, I can easily change the look of the headboard simply by removing a few staples and draping a new piece of fabric. This means the room’s aesthetic can evolve with seasons, trends, or my changing preferences, all without major redecorating efforts or expense. It’s the ultimate commitment-free design solution.
This same philosophy extends to other elements in the room. Just like I can update the headboard, those striped curtains are next on my list for a potential refresh. Fabric allows for such fluid design changes, empowering you to continuously tweak and personalize your space with minimal fuss. It’s a dynamic approach to home decor that embraces creativity and adaptability, ensuring your home always feels fresh and reflective of your current style.
Harmonizing Elements: Fabric with Wood
The transformation doesn’t stop at the bed itself. The fabric headboard also integrates seamlessly with other elements in the room, like the classic wooden chair. The softness of the fabric beautifully contrasts with the solid structure of the wood, creating a balanced and aesthetically pleasing vignette. This interplay of textures—soft fabric against hard wood—is a fundamental principle in interior design for creating depth and visual interest.
By simply updating one key element with fabric, the entire room feels more cohesive, curated, and utterly inviting. It goes to show that you don’t need extensive renovations or a huge budget to make a significant impact on your home’s atmosphere. Sometimes, the simplest solutions, like a well-chosen piece of fabric, can be the most transformative, allowing your personal style to shine through in every detail.
Your Turn: Embrace Fabric for Instant Home Warmth!
And there you have it – a simple, effective, and endlessly customizable way to add a burst of color and a profound sense of warmth to any room, all without the need for a single paint brush. This DIY fabric headboard project proves that sometimes, the most impactful changes come from the most unexpected materials.
Now, I’d love to hear from you! Do you think I picked the right fabric for this particular space, or were my earlier selections more appealing? What is your personal go-to solution when you’re looking to infuse a room with fresh color, texture, and a welcoming ambiance without embarking on a full-scale renovation? Share your tips and tricks in the comments below – I always learn so much from your creative ideas!
For more DIY adventures, home makeovers, and creative decorating tips delivered straight to your inbox twice a week, consider subscribing to my blog. You’ll find the subscription form conveniently located on the sidebar, and rest assured, your email address will always remain private and never be shared with any third party.
You May Also Like These Creative Projects:
<< Sweet Inspiration Link Party #50 HOME Facebook Photos for March >>
Linking up to these Link Parties
This blog is for entertainment purposes only; my DIY tutorials are not professional advice. Read my full disclaimer here.
I love reading your comments and will do my best to reply to them or visit your blog. Please ensure you do not add a hyperlink to your comment, as we cannot publish comments containing them.