
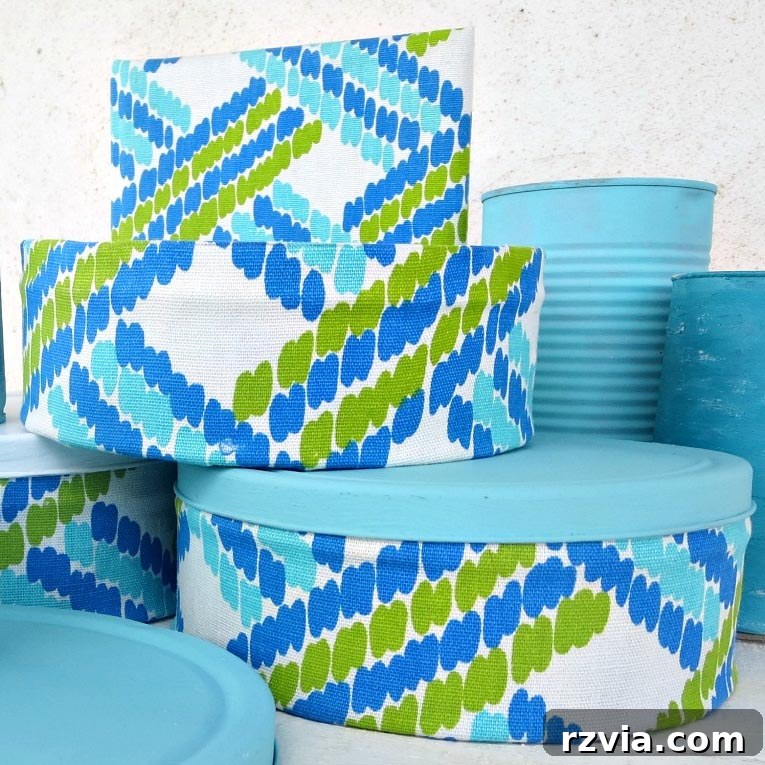
Transform Old Cookie Tins into Charming Fabric-Covered Storage: An Upcycling Guide
Do you have a collection of old cookie tins gathering dust, perhaps tucked away in a cupboard, waiting for a purpose? Instead of discarding them, embark on a creative journey to transform these forgotten containers into beautiful, functional storage solutions. This simple yet rewarding craft project offers an ingenious way to upcycle tin cans and simultaneously make use of those beloved scrap fabric pieces you’ve been saving. Prepare to give new life to your tins and add a touch of personalized charm to your home decor!

Every month, my fellow international bloggers and I eagerly anticipate the Int’l Bloggers Club Challenge, a fantastic opportunity to connect, share ideas, and showcase our unique creative approaches from different corners of the globe. This collaborative spirit allows us to explore diverse crafting techniques and inspire one another with innovative DIY projects. From repurposing a tire rim into a melodic wind chime to reflecting on our most memorable crafting successes and learning experiences, each challenge brings fresh perspectives to the world of handmade creations.
Creative Upcycled Tin Can Craft Ideas for Your Home
This month, the spotlight is on the humble tin can – a household item we all possess in abundance. Rather than consigning these versatile containers to the recycling bin, imagine the endless possibilities for transforming them into practical and pretty storage. Upcycling tin cans not only reduces waste but also provides an affordable way to add custom touches to your home. Today, I’m thrilled to guide you through the process of taking plain, utilitarian cookie tins and elevating them into exquisite, fabric-covered decorative pieces.
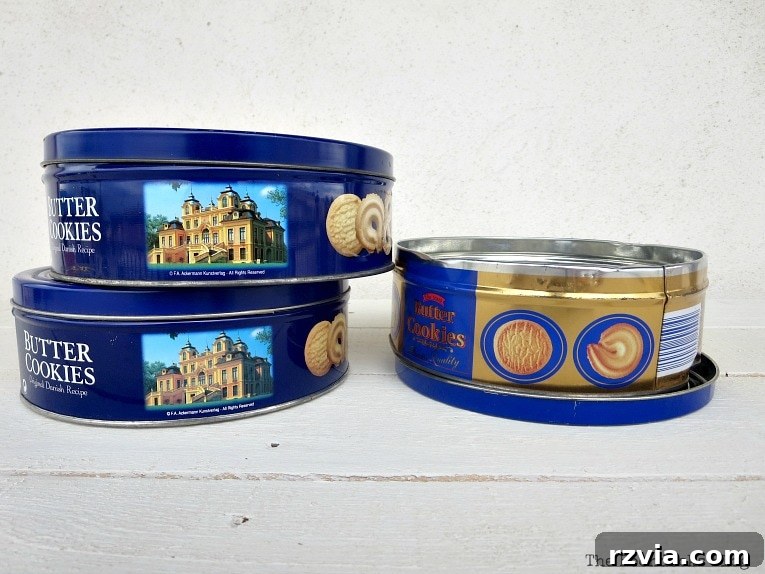
I had accumulated several old cookie tins over time, knowing they held great potential for organizing various odds and ends. However, their drab appearance didn’t quite match my aesthetic vision for functional yet beautiful storage. This realization sparked the idea to infuse them with character and charm using fabric, turning them from simple containers into elegant decorative accents that would enhance any room.
Essential Materials for Your Cookie Tin Craft Project
Disclosure: This post contains affiliate links for your shopping convenience. Should you choose to purchase any of these products through the provided links, we may receive a small commission at no additional cost to you. For our full disclosure policy, please refer to our privacy policy here.
Gathering your materials before you begin will ensure a smooth and enjoyable crafting experience. Here’s everything you’ll need to create your stunning fabric-covered cookie tins:
- Empty Cookie Tin Cans: Any size or shape will work, just ensure they are clean and dry.
- Fabric: This is where you can truly personalize your project! Choose a fabric that inspires you, perhaps a favorite pattern, a vibrant color, or even sentimental scrap fabric.
- Sharp Scissors: Essential for clean, precise cuts through your chosen fabric.
- Mod Podge (Matte or Gloss Finish): This incredible product acts as an all-in-one adhesive, sealer, and finish, making it perfect for fabric decoupage projects.
- Chalky Finish Paint: Ideal for giving the tin lids a smooth, matte, and vintage-inspired look.
- Cardboard: A piece of thin cardboard will be used to create a neat bottom insert for the interior of the tin.
- Paintbrush: For applying Mod Podge and chalky paint smoothly.
- Pencil & Ruler/Measuring Tape: For accurate measurements and marking.
Step-by-Step Guide: How to Make Decorative Cookie Tins with Fabric
Let’s dive into the creative process! This tutorial is broken down into easy-to-follow steps, ensuring you achieve a professional and beautiful finish.
1. Choosing Your Fabric and Initial Cuts
The fabric you select truly sets the tone for your upcycled tin. For this project, I chose a vibrant, playful fabric that, with its aqua blue accents, beautifully reminded me of the serene Greek seas from my homeland. Don’t be afraid to pick patterns and colors that speak to your personal style or complement your existing home decor. Using fabric scraps is a fantastic way to utilize remnants from other projects, making this craft both economical and eco-friendly.
Once you’ve chosen your fabric, it’s time to measure and cut. For the width, I cut the fabric approximately three times the height of the side of the tin. This generous width ensures ample fabric for wrapping around the exterior, folding over the top rim, and covering a portion of the interior. For the length, wrap the fabric around the entire circumference of your tin, then add an extra allowance of about four fingers (roughly 3-4 inches or 8-10 cm) for overlap and a clean seam.
After cutting, take your fabric strip and fold one-third of its width over lengthwise. Press this fold down firmly to create a crisp crease. This particular fold is crucial as it will form the neat, finished edge that sits on the top rim of your cookie tin, providing a professional and clean look.
2. Applying Fabric to the Exterior with Mod Podge
Now, let the decoupage magic begin! With your fabric prepared, it’s time to adhere it to the tin using Mod Podge. Ensure you have a clean brush and a steady hand.
Start by brushing a thin, even layer of Mod Podge onto a small section of the cookie tin’s exterior. Work in small sections because Mod Podge can dry quickly, especially in warmer climates. Immediately after applying the Mod Podge, carefully align the folded edge of your fabric with the top rim of the opened tin. Press the fabric down firmly onto the glued section, smoothing out any air bubbles or wrinkles with your fingers or a flat tool as you go. Slowly work your way around the entire exterior of the tin, applying Mod Podge to small sections and pressing the fabric into place, using the top fold as your continuous guide. This method ensures a smooth and perfectly aligned application along the tin’s upper edge.
As you continue around the tin, you’ll see the fabric gradually covering the entire exterior surface. At this stage, most of the tin’s side will be covered, with the exception of the raw edge where the fabric overlaps. Ensure the fabric is smoothly adhered, and any initial bubbles are gently pushed out towards the edges.
To create a clean, finished seam, fold the remaining raw edge of the fabric over itself, ensuring a neat line. Before pressing it down, apply a fresh line of Mod Podge underneath the fold. This ensures the fold is securely glued to itself, preventing fraying and giving you a crisp, tidy finish. Think of it as creating a small hem on the fabric directly on the tin.
With the edge folded, apply another thin layer of Mod Podge over the folded seam and press it firmly against the side of the tin. This final step secures the fabric overlap, creating a seamless and professional appearance. Take your time to smooth it down thoroughly, ensuring no lifted edges or air pockets. The result is a beautifully covered exterior with a clean, unnoticeable seam.
3. Covering the Interior of the Tin
The Interior
Once the exterior is complete, turn your attention to the inside. Generously apply Mod Podge to the inner walls of the empty tin can. Unlike the exterior, you can work a bit faster here, as the outer fabric is already securely in place. Focus on achieving an even coating without excessive puddling of adhesive.
Now, take the second third of your prepared fabric (the middle section of your initial lengthwise fold). Gently press this fabric section down onto the Mod Podge-covered interior walls of the tin. Work your way around, smoothing the fabric against the tin’s surface. Ensure it’s evenly pressed, extending down towards the bottom interior of the tin, leaving the excess fabric at the very bottom unglued for now.
Continue pressing the fabric all around the interior, tucking it snugly to the bottom edges. Don’t worry about perfect neatness at the very base of the interior yet; simply ensure the fabric covers the side walls completely and smoothly, leaving the remaining excess fabric pooled at the bottom.
4. Finishing the Exterior Bottom
The Exterior Bottom
Next, we’ll tackle the often-overlooked exterior bottom of the tin. This step uses the last third of your fabric allowance. Begin by carefully cutting the excess fabric extending from the tin’s side into even strips, approximately 1 to 1.5 inches wide. This technique allows the fabric to conform neatly to the circular bottom.
Working one strip at a time, apply Mod Podge to a section of the tin’s bottom and press the fabric strip down firmly. As you move around the circumference of the tin, overlap each subsequent strip slightly over the previous one. This overlapping method ensures complete coverage and a smooth transition around the curved edge. Continue this process until the entire bottom, apart from the very center, is covered.
To cover the small round hole or the exposed center section of the bottom, cut a small piece of fabric into a circular shape that is slightly larger than the area to be covered. Apply Mod Podge to the center, place the fabric circle over it, and smooth it down. This creates a neat and fully covered exterior bottom, leaving no metal exposed.
5. Crafting the Interior Bottom Insert
For a truly polished finish on the interior, we’ll create a separate fabric-covered cardboard insert. Take a piece of cardboard and place your cookie tin on top. Trace the tin’s base accurately to draw a perfect circle. Carefully cut out this cardboard circle. Test its fit inside the tin; if it’s a little too snug, gently trim the edges until it slides into the tin’s bottom with ease. This removable insert provides a clean, flat surface and protects the tin’s base.
Next, take a square piece of your chosen fabric, larger than the cardboard circle. Apply Mod Podge to one side of the cardboard circle and center it onto the fabric. Press firmly to adhere. Once the fabric is glued, cut the excess fabric around the cardboard into strips, similar to how you treated the exterior bottom of the tin. Apply Mod Podge to these strips and fold them over the edge of the cardboard, gluing them down onto the back side. Don’t worry if these folds aren’t perfectly uniform, as they will be hidden once inserted into the tin.
Once the fabric is completely adhered and dried, flip the fabric-covered cardboard over and carefully place it into the bottom of the tin. It should fit snugly, creating a seamless and beautiful fabric-lined interior base. This step elevates the look of your tin, making it appear professionally finished.
Below, you can see the satisfying result: a beautifully finished interior, where the raw edges of the fabric from the side walls are neatly hidden beneath the fabric-covered cardboard insert. This thoughtful detail truly completes the transformation.
6. Finishing Touches: Painting the Lids and Beyond
Finally, to complete the aesthetic, I painted the covers of the tins with a lovely chalky finish paint. This type of paint offers a soft, matte appearance that beautifully complements the fabric. You can choose a color that matches or contrasts with your fabric for a unique look. Since I had a few other plain tin cans, I extended the project to paint those as well, creating a cohesive set. And for an extra touch of creativity, I even covered an old telephone book with the same fun fabric, demonstrating how this technique can be applied to a variety of items around your home for a truly coordinated decor theme.
While this tutorial might seem extensive, detailing every step, the actual crafting process is surprisingly quick and straightforward. My aim was simply to provide comprehensive instructions to ensure your success. You’ll likely find that the entire transformation takes no more than an hour or so, making it a perfect weekend project.
The effort invested in this cute cookie tin craft is undoubtedly worthwhile. My once ordinary cookie tins now stand as elegant, decorative storage boxes that beautifully complement my home. It’s a testament to how a little creativity and a few simple supplies can completely revolutionize the look and feel of everyday items.
Through this upcycling project, I was able to tap into my stash of fabric scraps and other common household supplies, transforming them into something truly pretty and functional. It’s incredibly satisfying to contribute to a more sustainable lifestyle by giving items a second life instead of sending them to landfills.
I hope you thoroughly enjoyed this guide on how to create pretty cookie tin cans with fabric. What about you? Do you typically reuse and upcycle your old tins for new purposes, or do you simply send them off for recycling? Share your thoughts and creative upcycling ideas in the comments below!
If this project has sparked your creativity, please share it with your friends or save it to your Pinterest boards! The image above is perfectly crafted for Pinterest sharing.
For more inspiring DIY adventures and crafting tips delivered right to your inbox twice a week, consider subscribing to my blog. You’ll find the subscription form conveniently located on the sidebar, and rest assured, your email address will always remain private and never shared with third parties.
And now, I invite you to hop over and explore the wonderful tin can craft creations shared by my four talented friends. Simply click on their images below my name to discover more innovative projects. If you’re eager to delve into past challenges and see more of our collective work, you can always click here.
The Int’l Bloggers Club: Tin Can Crafts
More Int’l Blogger Projects:
Cordial Glass Pedestal
Nautical Lantern from a Grill
Please note: This blog content is provided for entertainment and informational purposes only; my DIY tutorials should not be considered professional advice. You can read my full disclaimer here.
I truly value your comments and will do my best to reply to them or visit your blogs. To ensure your comments can be published, please refrain from including hyperlinks within your message. Thank you for being a part of our crafting community!