
Transform Your Bedroom: Easy No-Sew Bed Skirt DIY with Canvas Drop Cloth for Stylish Under-Bed Storage
The sweltering summer heat has certainly put a damper on my motivation lately. If you’ve ever experienced New York humidity, you know exactly what I mean! Despite my best intentions and even creating a mood board, progress on our bedroom makeover has been painstakingly slow. With our energetic puppy, Tatou, constantly on the move, finding the time and energy to paint or tackle bigger projects feels like a monumental task.
However, amidst the heat and puppy chaos, I did manage to conquer one area: the bed. Our bedroom, like many, suffered from a bit of an identity crisis. The bed, in particular, was functional but far from fabulous. It was time for a transformation that was both practical and aesthetically pleasing. Today, I’m thrilled to share how I created an effortless, no-sew bed skirt using a canvas drop cloth, along with a few other clever tricks to elevate the entire space!
Disclosure: I was compensated for this post with product. However, all the opinions stated here are my own. I only use products I love and would recommend to my viewers.
The Catalyst for Change: Discovering Melca Drop Cloths
Sometimes, all it takes is a little nudge to get a project moving. For me, that came in the form of an email from Melca, expressing their interest in collaboration. It was the perfect wake-up call to finally tackle the bedroom! When I learned they specialized in canvas drop cloths, I knew it was meant to be. This was precisely the material I needed to transform our rather messy and uninspired bed area.
Before I knew it, a beautiful 4 by 12-foot 100% cotton canvas drop cloth arrived at my doorstep. What truly impressed me was its quality: it was expertly stitched all around, and, crucially, there were no seams running through the middle. This detail was a game-changer! I recall a previous project where I used drop cloth to make curtains. While I was delighted with the outcome, that particular piece had a central seam that required careful planning and workarounds. This seamless Melca drop cloth promised an even easier DIY experience, making it ideal for a seamless, no-sew bed skirt.
The items below are affiliate links. If you purchase any of these products through the links, I receive a small commission, that way I can continue to provide you with lovely content. There is no extra charge to you for purchasing through my affiliate links.
Essential Supplies for Your No-Sew Bed Skirt Project
Gathering the right materials is the first step to any successful DIY. For this project, simplicity is key, ensuring a quick and easy transformation:
- Melca canvas drop cloth 4 x 12 feet: The star of our project, offering durability and a clean aesthetic.
- Stapler: A heavy-duty stapler is recommended for securely attaching the fabric to the bed frame.
- (Optional but highly recommended) Bed Risers: To add height and maximize under-bed storage space.
- (Optional) Under-bed storage containers: For organizing items neatly beneath the bed.
The How-To: Elevating Your Bed with Canvas and Creativity
Before diving into the project, I gave the canvas a thorough wash. This not only cleans the fabric but also softens it significantly, making it more pliable and giving it a lovely, lived-in feel. Once it was fresh and dry, I was ready to begin our five-minute bedroom transformation!
Addressing the Bed’s Original State
Our bed, in its original form, was quite basic. It consisted of a simple metal frame topped with a piece of plywood, and then the mattress. While functional, it lacked any visual appeal and felt uncomfortably low to the floor. This “rudimentary” setup was practical for a while, but it certainly didn’t contribute to a relaxing or stylish bedroom ambiance. The exposed frame and low profile created an unfinished look that I was eager to remedy.
Adding Height and Maximizing Under-Bed Storage
My first step to improving the bed’s functionality and aesthetics was to invest in a set of bed risers. I found a pack of eight, utilizing four for the main corners and two smaller ones for crucial central support points. This simple addition instantly raised the bed to a much more comfortable and visually appealing height. Not only did it improve the overall proportion of the bed within the room, but it also opened up a whole new world of storage possibilities underneath.
With the newfound vertical space, I was able to slide several plastic under-bed storage containers beneath the frame. These became the perfect hideaway for my ever-growing collection of fabrics. As any DIY enthusiast knows, you can never have too much fabric, because you never know when inspiration will strike! The challenge, however, quickly became apparent: how to beautifully conceal these practical but not-so-pretty storage bins. This is precisely where the canvas drop cloth came into its own.
Crafting the No-Sew Bed Skirt: My Simple Method
I had previously seen a similar concept a few months ago on My Wee Abode, where Julie demonstrated a beautiful pleated bed skirt. Her craftsmanship was fantastic, but I confess, I was looking for an even simpler solution. With my “too lazy for intricate sewing” mindset, I devised my own streamlined version.
Given that our bed is conveniently pushed against a wall, I only needed to conceal two visible sides. This simplified the process immensely. My first step was to take the Melca canvas drop cloth and fold it neatly in half lengthwise. This instantly created a double layer of fabric, offering a slightly fuller drape and ensuring opaque coverage for the storage underneath.
Next, I positioned the folded drop cloth along the bottom edge of the bed’s plywood base. Carefully, I began to staple the fabric directly onto the plywood. The trick here is to ensure the fabric just barely grazes the floor, creating a tailored and clean line without puddling or appearing too short. I worked my way along the entire length of the exposed sides, making sure to pull the fabric taut enough for a smooth finish, but not so tight that it distorted the drape. This method truly makes it “easy peasy,” requiring minimal effort for maximum impact.
The Stunning Result: A Transformed Bedroom
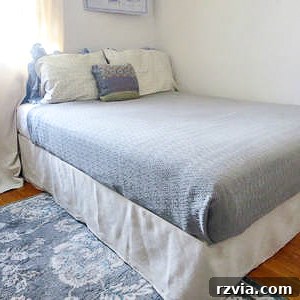
And just like that, the transformation was complete! The generous 12-foot length of the drop cloth was more than enough to perfectly cover the two visible sides of the bed with ease. A fantastic bonus of this simple design is its adaptability: should I ever decide to rearrange the room and expose the other sides of the bed, all I would need to do is cut the folded canvas lengthwise and use the other 12-foot section to cover the remaining exposed areas. This clever trick ensures future flexibility without needing to start from scratch.
A closer look reveals the subtle beauty of this DIY. The soft, neutral color of the canvas perfectly complements the grey summer blanket, adding a serene and sophisticated touch to the bedroom. And did I mention how incredibly soft the canvas becomes after a good wash? It drapes beautifully, giving the bed a polished, inviting look that was completely absent before.
This simple bed skirt project has completely elevated the room. It feels infinitely more put-together and sophisticated than before, when all the under-bed storage was exposed for the world to see. The clean lines and flowing fabric create an immediate sense of calm and order, turning a previously overlooked area into a design feature.
The new bed skirt also harmonizes beautifully with the rug (a similar style) that I purchased a few months ago. The cohesive color palette and textures create a unified and inviting atmosphere in the bedroom, making it feel like a truly intentional and well-designed space.
Beyond simply hiding unsightly storage bins, this project delivered multiple benefits. The addition of bed risers significantly increased the bed’s height, and the solid, light color of the canvas drop cloth further enhances this effect, making the entire room appear taller and more spacious. It’s a fantastic visual trick for smaller rooms or those with lower ceilings, creating an airy and open feel.
The best part? This entire project was incredibly easy and took me a mere five minutes to complete! The fact that the Melca drop cloth already had sewn edges was a huge time-saver, eliminating the need for any hemming. This truly is the perfect DIY for anyone looking for a quick, impactful, and beginner-friendly bedroom upgrade.
Final Thoughts on My No-Sew Bed Skirt Creation
I can honestly say I am absolutely thrilled with this bed skirt! It was super fast, incredibly easy, and delivered exactly the aesthetic and functional improvements I was hoping for. Now, I have so much more space to store all my “goodies” (and maybe a little “junk,” let’s be honest!). The ultimate convenience? I accomplished all of this without even having to leave my house, a true win for any busy homeowner.
Truly, it was a stroke of luck that Melca reached out to me when they did, providing me with such a great product. Not only do I now have a beautifully pulled-together bed that exudes style and comfort, but I also gained a significant amount of much-needed storage space. This simple, no-sew project has truly transformed our bedroom.
Speaking of creative solutions, be sure to visit Julie’s blog, My Wee Abode, to explore her fantastic projects. She’s a true expert in making the most of small home living, and her ideas are always inspiring!
If you loved this project, consider subscribing to my blog to get more DIY adventures delivered straight to your inbox. The subscription form is located on the sidebar and at the top of the page. To learn more about my privacy policy, click here.
More Fabric Projects for Your Home
Linking up to these Link Parties
This blog is for entertainment purposes only; my DIY tutorials are not professional advice. Read my full disclaimer here.
I love it when I get your comments and I will try to reply to every one of them. Please do not add a hyperlink to your comment, otherwise it cannot be published.