
Transform Your Old Velour Blanket: A Simple DIY Fringe Makeover for a Cozy Home
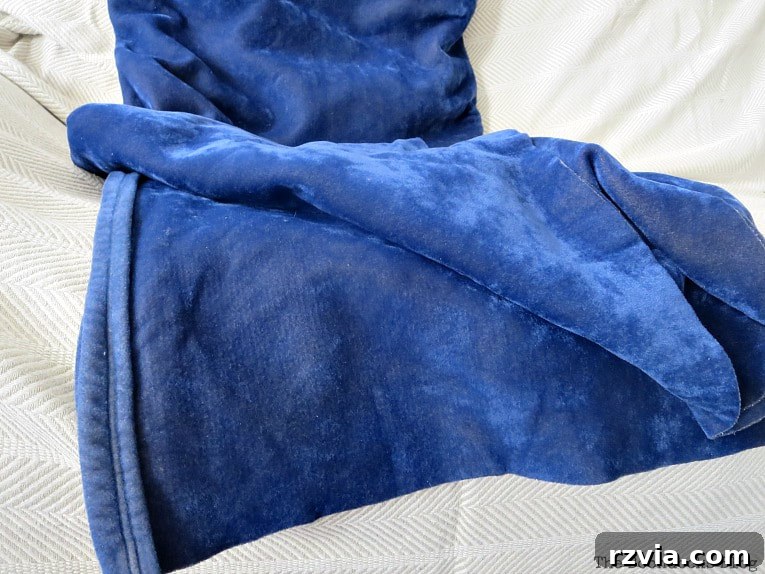
Every home has those hidden gems—items tucked away, perhaps out of sight, because they’ve lost their luster or simply don’t fit the current aesthetic. For me, it was an old velour blanket, once soft and comforting, but over the years, its dark, uninspiring appearance condemned it to the back of my closet. It was comfortable, yes, but definitely not something I’d display with pride.
A warm welcome to all who are joining me from Ashley’s blog Modern Glam! I’m thrilled you’re here to share in this cozy adventure. Recently, a few of my fellow blogging friends and I decided to host a blog hop centered around creating a cozy atmosphere in our homes. Instantly, my mind went to that neglected blanket. I realized it wasn’t destined for the discard pile; it was a perfect candidate for a fun, creative transformation. I envisioned adding a playful element, something to inject personality and warmth. And that’s exactly what we’re going to do today! I’m excited to share how I easily transformed this plain old blanket into a vibrant, fringed throw using just a single ball of yarn. It’s a project that proves you don’t need to be a master crafter to create something beautiful and functional for your home.
Stay with us until the very end, and you’ll not only see the complete transformation of my blanket but also discover what cozy wonders my friends have been crafting for their own homes!
Rescuing a Forgotten Favorite: The Problem with an Aging Blanket
Describing this blanket as “threadbare” might be an understatement. While it might not be immediately obvious from a glance, as we delve into its story, you’ll understand precisely what I mean. Many blankets, especially those loved for years, eventually show their age. This particular velour blanket had finished hems on two of its ends, common for manufactured throws. However, upon closer inspection and a gentle tug, I found that these hems were incredibly fragile, tearing away with virtually no effort. This revelation sparked the idea for a complete overhaul, turning a flaw into an opportunity for creative embellishment.
Instead of seeing these imperfections as a reason to discard the blanket, I saw them as an invitation to give it a new lease on life. The fragility of the edges meant a traditional re-hemming wouldn’t be sufficient. It needed a more robust, yet stylish, solution. This project wasn’t just about adding fringe; it was about reimagining a functional item, turning its weaknesses into unique design features. It’s amazing how a simple DIY project can not only refresh an item but also add a touch of personal flair that off-the-shelf items often lack. By embracing its age and character, we can transform it into something truly special.
What You’ll Need for Your Blanket Makeover
One of the best aspects of this project is its simplicity and minimal material requirements. You likely already have some of these items at home, making this an incredibly budget-friendly way to refresh your decor. Here’s what I gathered for my cozy blanket transformation:
- An old velour blanket (or any blanket in need of a refresh!)
- One ball of yarn (choose a color and texture that complements your blanket and home decor)
- A sharp pair of scissors
This was genuinely a straightforward project that required very little in terms of special tools or expensive supplies. The star of the show, besides the blanket itself, was the yarn. I picked up a beautiful ball of soft, chenille-style yarn from Michael’s. When selecting your yarn, consider the overall look you’re going for. A bulky yarn will create a more substantial, plush fringe, while a finer yarn will result in a delicate, flowing fringe. Think about colors that will pop against your blanket or blend harmoniously. The beauty of DIY is making it uniquely yours!
The How-To: Crafting Your Stylish Blanket Fringe
Now for the fun part – transforming that old blanket! Follow these easy steps to add beautiful, custom fringe to your beloved throw. Patience and careful measuring will ensure a professional-looking finish, even for beginners.
Step 1: Prepare the Blanket Edges
The first step is to address those problematic, threadbare hems. Using your sharp scissors, carefully cut off the existing hemmed edge from the blanket. It’s important to cut cleanly and as straight as possible. Don’t worry if it’s not absolutely perfect; the fringe will help to disguise minor irregularities. The goal here is to create a clean, raw edge that will be the foundation for your new fringe. This also removes any weakened fabric that might further unravel.
Step 2: Create Blanket Strips
Once you have a clean edge, you’ll start cutting strips from the bottom part of the blanket. I aimed for strips approximately 8 inches (20 cm) in length. The width of these strips isn’t crucial as they will be wrapped by the yarn, but try to keep them relatively consistent for a uniform look. The length of these strips will determine how far the blanket fabric extends into your fringe, adding to the textural appeal. Use a ruler or a measuring tape and a fabric marker if you want extra precision, though eyeballing it works well for a relaxed, bohemian vibe.
Step 3: Cut Your Yarn Strands
Next, you’ll prepare your yarn for the fringe. Cut individual strands of yarn to a length that is double the length of your blanket strips. In my case, since my blanket strips were 8 inches, I cut my yarn strands to about 18 inches (46 cm). The extra length allows for the folding and knotting process, ensuring a generous, visible fringe. You can experiment with different lengths here to achieve your desired fringe drop – longer strands will create a more dramatic, flowing fringe, while shorter ones will be subtler. It’s often better to cut a little longer than you think you need, as you can always trim them down later for a perfectly even finish.
Step 4: Knot the Yarn Ends for Security
To prevent the yarn from unraveling and to give the fringe a polished look, knot the ends of each yarn strand. A simple overhand knot or a small double knot will suffice. The particular chenille-style yarn I chose was made of polyester, which is naturally soft and velvety to the touch, and held knots well. If you’re interested in purchasing similar yarn, you’ll find a link at the bottom of this post. Knotting the ends is a small but crucial step that contributes to the durability and longevity of your new fringe.
Step 5: Loop the Yarn onto the Blanket Strips
Now, let’s attach the yarn to the blanket. Take one of your cut yarn strands and fold it in half, creating a loop at the fold. Then, gently slide this looped yarn underneath two of the blanket strips you cut in Step 2. This technique, often called a lark’s head knot or cow hitch, is widely used for attaching fringe and is incredibly secure. Ensure the loop is centered under the strips for an even look. The number of blanket strips you loop under can vary; using two provides a good balance of coverage and ease of attachment.
Disclosure: This post contains affiliate links. If you purchase any of these products through the links, I receive a small commission, that way I can continue to provide you with lovely content. There is no extra charge to you for purchasing through my affiliate links.
Step 6: Secure the Fringe
With the looped yarn positioned under the blanket strips, take the two loose ends of the yarn and thread them through the loop you created. This creates the initial knot. Pull the ends of the yarn firmly to tighten the loop, securing it around the blanket strips. You’ll feel it snug into place, creating a neat, sturdy attachment point. For added durability and to ensure the fringe remains firmly in place, I recommend pulling the yarn ends further down and tying them again, creating a second, reinforcing knot. This double knot method makes the tie much sturdier, especially for a blanket that might see frequent use.
Step 7: Repeat and Admire Your Progress
Continue this process, working your way across the entire edge of the blanket. Space your fringe pieces evenly for a cohesive look. It’s incredibly satisfying to see them all lined up, each one adding to the evolving charm of your blanket. This repetitive action can be quite meditative, transforming your blanket piece by piece. As you progress, you’ll start to see your old, drab blanket taking on a completely new character, full of texture and personality. Take a moment to appreciate your handiwork as you complete each row!
Overcoming Challenges: Learning from Imperfections
As with many DIY projects, sometimes you encounter unexpected challenges. My transformation was no exception! After proudly completing one end of the blanket, I noticed that it wasn’t as aesthetically pleasing as I had hoped. The culprit? Those aforementioned “threadbare” spots. When I pulled on the blanket strips to attach the yarn, the old, weakened fabric simply came apart, detaching from the binding. It was a momentary setback, but an important learning curve.
Instead of being discouraged, I viewed it as an opportunity to refine the design. I ended up cutting off another 10 inches of that visibly threadbare section, discarding the damaged material. This adjustment meant my finished blanket would be a bit smaller than originally intended, but significantly more robust and attractive. When I redid this section, I decided to enhance the fringe for a fuller, more luxurious look. This time, I placed twice the number of yarn pieces for each wrapped strip of velvet, meaning four strands of yarn dangled from each attachment point instead of two. This simple change made for a much fluffier, more abundant fringe, adding a rich texture that beautifully concealed any remaining imperfections.
Of course, once my eyes were opened to these imperfections, I inevitably discovered similar threadbare spots on the other end of the blanket as well. This meant redoing that side too, applying the same double-yarn technique for a consistent, fluffy fringe throughout. What was initially conceived as a quick afternoon project leisurely stretched into a few days of focused cutting, knotting, and troubleshooting those tricky threadbare sections. But every moment was worth it, as the final result far exceeded my initial expectations.
Thank goodness the threadbare spots were conveniently located only on the ends of the blanket and not smack-dab in the center! Had they been, I might not have had anything at all left to show you for my efforts, and this cozy project would have ended before it truly began.
The Grand Reveal: A New Life for an Old Favorite
Honestly, what I anticipated would be a charming afternoon craft project truly evolved into a multi-day endeavor, filled with careful cutting, precise knotting, and the unexpected challenge of managing those “threadbare” areas. However, every minute spent was an investment in transforming something forgotten into something fabulous. The finished blanket, while admittedly a bit smaller than its original size due to the necessary trimming, is now absolutely exquisite. It has been elevated from a relegated closet item to a beautiful, inviting throw that proudly graces the living room couch.
The addition of the yarn fringe has completely revitalized its look, adding texture, softness, and a playful touch that perfectly aligns with a cozy aesthetic. It’s no longer just a blanket; it’s a statement piece, reflecting a bit of handmade charm and a lot of renewed purpose. The transformation is so complete that it feels like an entirely new item, ready to provide warmth and style for many more years.
And speaking of cozy additions, let’s talk about those delightful pillows! The vibrant pink pillow was lovingly crafted from fabric salvaged from one of my dresses from the 80s – a fantastic example of upcycling personal history into new home decor. The charming “peace” pillow was a thoughtful gift from my wonderful friend Nikki, whose creative spirit always inspires me. You can find more about her handmade creations and how she infuses personality into home accessories on her blog here. Together, these elements create a welcoming, personal, and undeniably cozy nook in my living room.
Embrace the Cozy: Your DIY Journey Awaits!
I absolutely adore how my newly fringed blanket turned out! It’s incredible to see such a significant transformation achieved with nothing more than a simple ball of yarn, a pair of scissors, and a little bit of creative persistence. To think this beautiful piece was once relegated to hiding in the closet for so long! This project is a testament to the power of DIY – how easily you can breathe new life into old items, personalize your home, and create truly unique pieces that reflect your style.
I hope this tutorial inspires you to look at your own forgotten textiles with fresh eyes and consider the endless possibilities for transformation. Giving an old blanket a fresh fringe not only enhances its aesthetic appeal but also contributes to a more sustainable lifestyle by reducing waste. It’s a win-win for both your home and the environment!
Now, I invite you to continue your journey through our cozy blog hop! Hop on down and check out all the other wonderfully creative and cozy projects that my talented blogging friends have put together. You’re sure to find even more inspiration to make your home a haven of comfort and style. Alternatively, you can start by heading over to Kellie’s blog, Gratefully Vintage, to discover her favorite cozy spaces and immerse yourself in her charming ideas.
If you really like what you see and want to stay updated on all my latest DIY adventures and home decor tips, please subscribe to my blog! You can find the subscription form conveniently located on the sidebar and at the top of the page. Rest assured, your email will never be shared with any third party.
Welcome to Our Monthly Creative Blog Hop: Cozy Home Edition
Join us on a journey through beautifully crafted cozy spaces and inspiring DIY projects from our talented community of bloggers. Each link below leads to a unique take on creating warmth and comfort in your home:
Kellie | Gratefully Vintage
Michelle | Our Crafty Mom
Leanna | Of Faeries and Fauna Crafts
Janine | Happy Happy Nester
Katrin | Kreativ K
Sam | Raggedy Bits
Ashley | Modern Glam
Mary | The Boondocks Blog
Explore More Cozy DIY Projects from The Boondocks Blog:
If you loved this blanket makeover, you might enjoy these other projects designed to add comfort and charm to your home:
<<Easy Cover for Clothes Rack HOME Sweet Inspiration Link Party #90 >>
Linking up to these Link Parties
This blog is for entertainment purposes only; my DIY tutorials are not professional advice. Read my full disclaimer here.
I love it when I receive your comments and I will do my best to reply to every single one of them. Please do not add a hyperlink to your comment, otherwise, it cannot be published.