
Crafting Love: How to Make a Rustic Natural Clay Valentine’s Heart Garland
It’s that cherished time of the month once again when I connect with my talented friends from across the globe as part of the International Bloggers Club. This month, we’re diving into projects that capture the spirit of affection, and I’m thrilled to share a charming DIY that combines natural elements with heartfelt design: a beautiful natural clay Valentine’s heart garland.
For several months now, our club has been embarking on creative journeys inspired by anniversary themes. We’ve explored crafting with paper and experimented with cotton. Our last festive challenge saw us creating enchanting Christmas decorations, and now, as Valentine’s Day approaches, we’re shifting our focus to a project that brings warmth and rustic elegance to your home: a handmade clay heart garland that’s perfect for celebrating love.
This natural clay garland offers a unique blend of simplicity and charm, making it an ideal decoration not just for Valentine’s Day but for year-round display. The organic texture of the clay, combined with a subtle wax finish, creates a timeless piece that will effortlessly complement any decor style, from farmhouse to minimalist. Join me as I guide you through each step of crafting these adorable, textured clay hearts. And be sure to scroll to the very end of this post to discover what other incredible projects my fellow International Bloggers Club members have conjured up this month!
Disclosure: This website contains affiliate links. If you purchase any of these products through the links provided, I receive a small commission. This helps support my blog and allows me to continue sharing lovely content and creative projects with you, at no extra cost to you for purchasing through my affiliate links. Your support is greatly appreciated!
Embracing Natural Beauty: Why Choose This Clay Heart Garland Project?
The inspiration for this project came from a simple package of clay my daughter brought home. I immediately saw it as the perfect opportunity for us to engage in a creative activity together. There’s something incredibly satisfying about crafting with natural materials, and oven-bake clay lends itself beautifully to creating pieces with an earthy, rustic appeal. This project isn’t just about making a decoration; it’s about the process, the shared experience, and the joy of bringing a unique, handmade item into your home.
Beyond the sentimental value of a mother-daughter craft, this natural clay heart garland offers numerous benefits. It’s an affordable DIY project, allowing you to create stunning decor without breaking the bank. The neutral tones of the clay and wax finish ensure it blends seamlessly with a variety of home aesthetics. Furthermore, by adding subtle textures from natural elements like pine sprigs, we infuse each heart with character and a touch of the outdoors, making your garland truly one-of-a-kind. It’s a simple craft with a significant impact, adding a touch of personalized warmth to any space.
Essential Materials for Your Clay Heart Garland:
Gathering your supplies is the first exciting step in any DIY project. For this natural clay Valentine’s heart garland, you’ll need a few key items that will help you achieve that beautiful rustic finish. Most of these can be found at your local craft store or ordered online. Here’s a detailed list of what we used:
- Sculpey Oven Bake Clay: We opted for a neutral color to enhance the natural, rustic aesthetic. Any good quality polymer clay will work.
- Modeling tools for clay crafting: Plastic or metal tools are great for cutting and shaping. A simple knife can also be used.
- Paper and cardboard: For creating your heart-shaped templates.
- Sprigs of pine: To add unique natural textures to your clay hearts. Feel free to experiment with other leaves or textured items.
- Craft Mat Sheet for baking clay: Essential for preventing your clay from sticking during the baking process and ensuring even heat distribution.
- Baking tray: To support your craft mat and clay hearts in the oven.
- Daddy Van’s Furniture Polish (Clear Wax): This will serve as our initial protective layer and base for other waxes.
- Daddy Van’s Dark Wax: For adding depth and highlighting textures.
- Daddy Van’s White Wax (similar): To lighten, soften, and achieve that perfect oatmeal shade.
- Twine: For stringing your finished hearts into a beautiful garland.
The How-To: Crafting Your Natural Clay Heart Garland
Step 1: Creating Your Heart Templates
Since our project is all about Valentine’s Day, a heart shape was the obvious choice. We began by creating a simple paper template. This is easily done by folding a piece of paper in half and cutting out half of a heart shape along the fold. When unfolded, you’ll have a perfectly symmetrical heart. The beauty of handmade items often lies in their slight imperfections, so don’t stress too much about achieving absolute precision here.
To ensure consistency and ease when cutting the clay, we then replicated this paper heart onto a piece of sturdy cardboard. This cardboard template provides a firm edge that is much easier to trace and cut around than a flimsy paper one, especially when working with soft clay. This step makes the subsequent clay cutting process much smoother, allowing for more uniform heart shapes throughout your garland.
Step 2: Rolling and Cutting the Clay
With our sturdy template ready, it was time to prepare the clay. My daughter took charge, rolling out the clay on a clean cutting board. We aimed for a thickness of about 1/4 inch (approximately 6-7 millimeters). This thickness is ideal for creating durable hearts that aren’t too heavy, ensuring they hang nicely as a garland. You want the clay to be even across the surface for uniform baking.
Once the clay was rolled out evenly, she carefully placed the cardboard heart template on top. Using the template as a guide, she cut out the heart shapes. While we used plastic clay tools, a sharp knife or even a craft blade would work just as well. If you have heart-shaped cookie cutters, they would make this step even faster and ensure perfectly uniform hearts.
Our goal was a rustic look, so we weren’t overly concerned with perfectly smooth edges, embracing the natural charm of handmade items. However, if you prefer a more refined finish, this is the perfect time to gently smooth out any rough edges using your fingers or a damp sponge before proceeding. The beauty of clay is its malleability, allowing you to achieve various aesthetics.
Once cut, we had our initial batch of beautiful, rustic clay hearts. Each one, a testament to the simple joy of creating. This rustic approach means that minor imperfections add character, rather than detracting from the overall appeal. It’s all part of the charm of handmade items.
Step 3: Adding Unique Texture and Preparing for Hanging
As an afterthought, but one that proved to be brilliant, I decided to add some texture to our clay hearts. I took small sprigs of pine and gently pressed them into the surface of the clay. This left subtle, beautiful impressions, giving each heart a unique, organic pattern. The goal was to achieve a bit more visual interest and depth, moving beyond a plain surface. You could use anything with a distinct pattern – lace, textured fabrics, other leaves, or even stamps – to create a similar effect. This step truly elevates the “natural” aspect of our natural clay Valentine’s heart garland.
Before baking, it’s crucial to prepare the hearts for stringing. We used a small tool to poke holes near the tops of the hearts. These holes need to be large enough for your twine to pass through easily once the clay is baked and hardened. Make sure the holes are positioned symmetrically and are not too close to the edge to prevent breakage. This forethought ensures a smooth assembly process later on.
Step 4: Baking Your Clay Hearts
With all the hearts shaped and textured, it was time to harden them. We carefully placed the clay hearts on a non-stick sheet specifically designed for baking clay, which was then placed on a baking tray. We baked them in the oven for approximately 15 minutes, following the clay manufacturer’s instructions for temperature (typically around 275°F or 130°C). Always refer to your specific clay package for precise baking times and temperatures to ensure proper curing. Once baked, we removed them from the oven and allowed them to cool completely. While I let ours rest for a few days, it’s not strictly necessary; they can be worked on once fully cooled.
After baking, the clay hearts emerge hardened and ready for their finishing touches. The natural color of the baked clay provides an excellent base, and you’ll already be able to see the subtle textures impressed into them. This stage marks the transition from raw material to a durable, craftable piece.
Step 5: Experimenting with Waxes for the Perfect Finish
Now, here’s where the real fun and creative experimentation begin! To achieve a specific rustic, aged look, I decided to use a combination of Daddy Van’s waxes. I had three different waxes to choose from: a clear furniture polish, a dark wax, and a white wax. This process is all about trial and error, allowing you to discover the finish that truly speaks to you and complements your aesthetic.
I started by applying the clear furniture polish (the one in the center of the image) to all the baked clay hearts. This clear wax acts as a protective sealant and provides a smooth base for the subsequent layers. After applying, I gently wiped them with a soft, clear cloth to remove any excess, leaving a subtle sheen and a sealed surface. This initial layer ensures the clay is protected and creates a beautiful foundation.
Next, I began experimenting. On one heart, after the clear wax, I applied the dark wax. At first, it looked a bit messy and too dark. But don’t despair if your first application isn’t perfect; the magic of wax is in the buffing! The dark wax settles into the textured impressions, instantly highlighting them and adding an antiqued look. It brings out all the details we pressed into the clay with the pine sprigs, creating a beautiful contrast.
Once the dark wax is thoroughly wiped back, the true beauty of the texture emerges. You can clearly see all the intricate markings and indentations on the heart, giving it a weathered, fossil-like appearance. This technique is fantastic for bringing out depth and character in textured surfaces. The clear wax underneath helps to control the dark wax, preventing it from staining the entire surface and allowing you to achieve a subtle, antiqued effect.
Then, I took another heart and applied white wax on top of the clear coat. This yielded a lighter, slightly chalkier finish. When compared side-by-side with the dark-waxed heart, the difference was striking. The white wax offers a more distressed, washed-out look, while the dark wax provides rich, aged depth. Both are beautiful, but for my natural clay Valentine’s heart garland, I was aiming for something in between – a perfect neutral.
Neither the purely dark nor the purely white wax finish was exactly what I envisioned. The dark was perhaps a touch too intense, and the white a bit too bland. My ideal was a soft, neutral “oatmeal” tone that still highlighted the beautiful pine texture. To achieve this, I applied white wax on top of a dark-waxed heart. This layering technique softened the dark tones beautifully, creating a nuanced, subtle finish. This trial-and-error approach is common in crafting; it’s how you truly customize your pieces and find what you love.
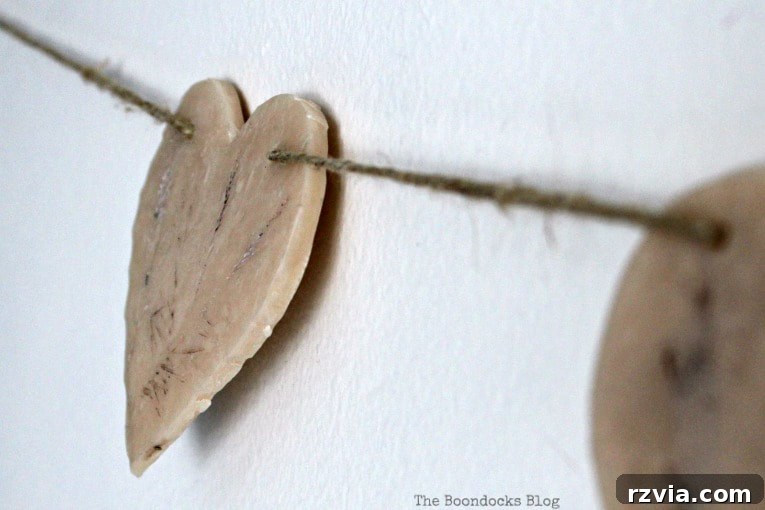
And there it was – the perfect balance! I had finally found a finish that made me happy. The combination of clear, dark, and white wax resulted in a lovely oatmeal color, smooth to the touch, almost like a well-worn river rock, yet with all the textural details beautifully preserved. The slight sheen from the wax added a touch of sophistication to the rustic hearts, making them feel truly special and refined. This bespoke finish is what truly sets this natural clay Valentine’s heart garland apart.
Step 6: Assembling Your Rustic Heart Garland
You may have noticed that we thoughtfully made holes in the hearts before baking them. This foresight was intentional, as my ultimate goal was to create a beautiful, cohesive garland. Once all the hearts were baked, cooled, and beautifully waxed to perfection, the final step was to string them together. I used natural twine, which perfectly complements the rustic, organic feel of the clay hearts. Threading the twine through the pre-made holes was quick and easy, allowing me to arrange the hearts at even intervals to form a flowing garland. This simple assembly brings the entire project together, transforming individual clay hearts into a charming decorative piece.
The finished garland turned out just right, a perfect blend of rustic elegance and understated charm. It strikes the ideal balance, being neither too stark nor too dark, but rather a comforting, earthy neutral. The smooth, rock-like finish and the subtle oatmeal color ensure that the garland feels both natural and sophisticated.
The beauty of this natural clay Valentine’s heart garland lies in its understated presence. It’s not overly flashy, but rather exudes a quiet beauty that draws you in. The layered waxing technique allowed us to achieve a perfect hue that complements the raw clay, making each heart a tiny work of art.
Upon closer inspection, I’ve noticed how much the textured impressions resemble ancient fossil indentations, adding another layer of intriguing character to each heart. This unexpected detail reinforces the organic and natural appeal of the garland, making it truly unique. It’s a wonderful example of how simple materials can yield profound results.
I hope you’ve enjoyed this detailed tutorial on how to make a natural clay Valentine’s heart garland. Spending a delightful afternoon crafting with my daughter and creating something beautiful and lasting was a true win-win experience. What makes this garland particularly special is its versatility; its neutral colors and rustic charm mean it can easily remain a lovely piece of decor in our home all year round, not just for Valentine’s Day.
How do you approach decorating for Valentine’s Day? Do you go all out with vibrant reds and pinks, or do you, like me, prefer a more subtle, natural approach? Share your thoughts in the comments below! And now, I invite you to scroll down and explore the incredible creations from my fellow International Bloggers Club members. For more past challenges and inspirational projects, click here.
If you truly enjoy what you see, consider subscribing to my blog to receive all my crafting adventures directly in your mailbox. You’ll find the subscription form conveniently located on the sidebar and at the top of the page. To review my privacy policy, please click here.
More Inspiring Valentine’s Day Ideas:
<< Coffee Table Makeover with Paint HOME Bryant Park >>
Linking up tothese Link Parties
This blog is for entertainment purposes only; my DIY tutorials are not professional advice. Read my full disclaimer here.
I love it when I get your comments and I will try to reply to every one of them.