
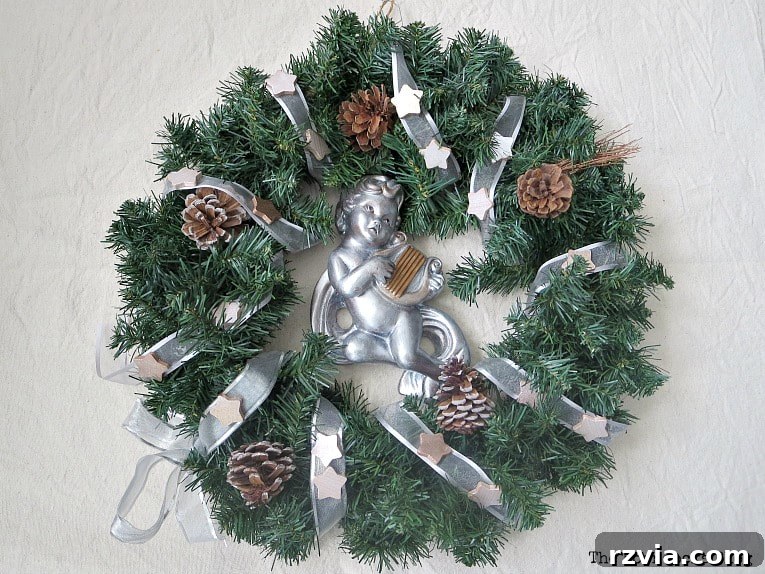
Crafting a Dazzling DIY Metallic Christmas Wreath: A Step-by-Step Guide
A joyous November to everyone! As the crisp air signals the true arrival of autumn and the last remnants of Halloween decorations are packed away, a delightful thought often sparks in our minds: Christmas. While some might consider it too early, the seasoned holiday decorator knows that November is, in fact, the perfect time to begin planning your festive decor. In our home, Christmas isn’t just about a tree; it’s a grand affair, a symphony of sparkle and charm that requires thoughtful planning and execution. And let’s be honest, that planning usually falls to me, the designated holiday enthusiast!
This year, let’s kick off the holiday season with a creative project that promises to add a touch of elegance and shine to your home: a stunning DIY Christmas wreath adorned with beautiful metallic accents. Get ready to transform simple materials into a magnificent statement piece that will welcome guests with festive cheer.
Disclosure: The items below are affiliate links and link to Amazon.com. If you purchase any of these products through the links, I receive a small commission, which helps me continue to provide you with lovely content. There is no extra charge to you for purchasing through my affiliate links.
Inspiration Strikes: Discovering Your Holiday Theme
My creative journey for holiday decor often begins with leisurely strolls through store aisles. It’s fascinating how early retailers start showcasing their Christmas collections – did you know Costco had trees up as early as late September? These early displays are not just about shopping; they’re fertile grounds for inspiration, helping to shape the vision for the upcoming festive season.
Just last week, a trip to Michael’s ignited the spark for this year’s color scheme. I envisioned something that would truly pop against the backdrop of the blue cloudy wall I recently painted. My decision for this year’s theme? To let the sophisticated elegance of super neutrals and dazzling metallics do all the talking. This combination promises a look that is both modern and timeless, creating an inviting and luxurious feel for our holiday celebrations.
Choosing a cohesive theme like neutrals and metallics offers immense versatility. These colors complement almost any existing home decor, adding a touch of understated glamour without overwhelming the space. Imagine soft silver, shimmering gold, warm bronze, and elegant pearl white dancing together, creating a beautiful interplay of light and texture. This approach allows for subtle variations while maintaining a sophisticated, unified aesthetic throughout your Christmas decorations.
Essential Supplies for Your Metallic Christmas Wreath
Creating a beautiful metallic Christmas wreath is not only satisfying but also surprisingly simple with the right materials. Here’s a comprehensive list of what you’ll need to gather to bring this festive vision to life:
-
A faux pine wreath: This will serve as the sturdy base for your creation. Choose one that is full and lush, typically between 20-24 inches in diameter for a standard door. If you’re upcycling an old wreath, ensure it’s clean and structurally sound.
-
Pine cones: These natural elements add texture and a rustic touch. You can use pre-attached pine cones if your wreath has them, or purchase a bag of various sizes to strategically place for visual interest. Consider natural or slightly frosted ones.
-
Mini wood stars: These charming wooden cutouts will be the canvas for your metallic magic. Look for a pack with multiple stars to scatter throughout the wreath, adding consistent sparkle.
-
Metallic paint: You’ll need two distinct metallic shades to create depth and contrast. I recommend a rich metallic brown and a radiant pearl white to achieve that luxurious neutral and metallic effect. Consider acrylic metallic paints for good coverage and quick drying.
-
Ribbon: A shimmery or sheer organza ribbon in a complementary neutral tone (like grey or silver) will add elegant texture and serve as a base for your painted stars. The width should be suitable for wrapping around your wreath without overpowering it.
-
Vintage sculpture of a harp-playing cherub (similar): This unique, upcycled focal point will personalize your wreath. Keep an eye out for similar vintage finds at thrift stores, antique shops, or even forgotten treasures in your own home. The beauty of upcycling is giving new life to something old.
-
Strong craft glue: Essential for securely attaching the stars and any other embellishments to the wreath. A multi-purpose craft glue or even a hot glue gun would work well, depending on the weight of your additions.
My wreath, a faithful companion from last year’s project, already came with its pine cones firmly glued in place, which saved a step! You can even spot my adorable pup’s paw in the upper right corner of the photo below – he loves to supervise my crafting endeavors. Having a sturdy, pre-embellished base often jumpstarts the creative process, allowing you to focus on the exciting metallic details.
These charming miniature wood stars were a delightful find at Michael’s. They are the perfect size to add delicate metallic touches without overwhelming the wreath’s natural beauty.
And here are the stars of our show: the metallic paints in rich brown and luminous pearl white. These paints will transform simple wooden stars and a vintage cherub into sparkling focal points, perfectly aligning with our sophisticated metallic theme.
Finally, this little beauty! I unearthed this vintage cherub sculpture in the basement, a forgotten treasure my dad had held onto for reasons unknown. It was a bit tacky in its original burnt gold and even had a small chip on the elbow, but I immediately saw its potential. With a fresh coat of metallic paint, I knew I could give it a new lease on life and transform it into a stunning centerpiece for our wreath.
The Step-by-Step Guide: Crafting Your Metallic Masterpiece
Now that you have all your materials, let’s dive into the creative process of assembling your gorgeous metallic Christmas wreath. Follow these simple steps to bring your festive vision to life.
Step 1: Painting the Wooden Stars
Begin by giving your miniature wooden stars a glamorous makeover. Using the two metallic paint colors – the rich brown and the lustrous pearl white – carefully paint each star. Apply thin, even coats to ensure full coverage and a smooth, radiant finish. You might need two coats for optimal opacity and shine. Allow ample drying time between coats and before moving to the next step. The goal is to create a delightful mix of metallic stars that will shimmer and catch the light from every angle.
Step 2: Preparing the Ribbon
Next, it’s time to add a layer of soft elegance to your wreath with the chosen ribbon. I was fortunate to have a stash of this beautiful organza ribbon, acquired years ago at a yard sale, proving that treasures can be found anywhere! This delicate, shimmery ribbon will provide a lovely contrast to the rustic pine and the metallic stars.
Step 3: Wrapping the Wreath with Ribbon
Carefully wrap the organza ribbon around the entire wreath. The goal is not necessarily to cover every inch of the pine needles but to create a graceful spiral that weaves through the greenery. Secure the beginning and end of the ribbon with a dab of strong craft glue or by tucking it into the wreath form. This step adds a soft, ethereal quality and provides a perfect base for attaching your metallic stars.
Step 4: Attaching the Metallic Stars
Once the ribbon is securely in place, it’s time to strategically glue your freshly painted wooden stars onto the ribbon and directly onto the pine needles of the wreath. Distribute them evenly, creating a sense of balance and flow. Don’t be afraid to cluster some stars together for added visual impact, while scattering others individually. Use your strong craft glue, applying a small amount to the back of each star and pressing it firmly onto the ribbon or pine needles until secure. Allow sufficient drying time.
Take a closer look at how wonderfully the brown metallic color complements the natural pine cones. The subtle shimmer adds a touch of sophistication without detracting from the organic beauty of the cones. It’s a perfect blend of rustic charm and modern glam.
Equally enchanting is the pearl white metallic color. It adds a luminous glow, creating a beautiful contrast against the darker elements of the wreath. The interplay of these two metallic shades creates a dynamic and visually appealing texture.
Step 5: Upcycling Your Vintage Cherub
Now for the transformation of our vintage cherub! I painted the entire sculpture with the pearl white metallic paint. The result is striking – in the photo, it almost appears silver, exuding an elegant, ethereal quality. This pearl white effectively covered the “tacky” burnt gold and minimized the visibility of the chip on its elbow, breathing new life into this forgotten piece.
Even with the new coat of paint, the original gold subtly peeks through in certain areas, adding a lovely dimension and hinting at its vintage charm. This slight transparency contributes to its character, making it look so much better than before!
To further enhance its appeal, I painted the cherub’s harp with the metallic brown paint and lightly brushed the curls of its hair with the same shade, adding definition and a touch of warmth. The contrast between the pearl white body and the brown accents beautifully highlights the intricate details of the sculpture. For an upcycled piece, doesn’t it look absolutely magnificent?
This little cherub, despite its delicate appearance, is surprisingly heavy! This raises a practical concern: if I hang it directly on the wreath, will it stay securely in place? This leads us to a crucial decision point for the final look of our metallic Christmas wreath.
Step 6: Final Assembly and The Cherub Dilemma
Now comes the moment of truth for the cherub. Do I hang the wreath simply adorned with the elegant ribbon and metallic stars, showcasing a minimalist yet sophisticated charm?
Or do I incorporate the beautifully upcycled cherub, adding a unique, whimsical, and deeply personal focal point to the design? Attaching a heavier item like the cherub would require very strong adhesive or wire to ensure it remains safely secured, especially if the wreath will be hung on a door that opens and closes frequently. It’s a balance between aesthetic preference and practical considerations.
Your Festive Creation Awaits!
And with that, our metallic Christmas wreath tutorial brings the festive season officially to my home! This project is a testament to how simple materials, a bit of creativity, and a touch of metallic paint can transform ordinary items into extraordinary holiday decorations. Whether you choose to add a cherub or let the stars shine on their own, this DIY wreath will undoubtedly add a touch of elegant sparkle to your entryway or mantel.
Now, I’m eager to hear from you! Have you started brainstorming your Christmas decor yet? What enchanting theme will grace your home this year? And the burning question for my wreath: with the cherub or without? Share your thoughts and inspire fellow crafters!
Explore More Christmas Wreath Ideas:
<< Painting your front door HOME 10 Handmade gifts under $10 >>
Linking up to these Link Parties
This blog is for entertainment purposes only; my DIY tutorials are not professional advice. Read my full disclaimer here.
I love receiving your comments and will do my best to reply to every one of them.