
The chill of winter often lingers longer than we’d like, and sometimes, a subtle nudge is all it takes to prompt a seasonal refresh. Just the other day, my son pointed to our front door and declared, “Christmas is over!” I chuckled, a tad defensively, explaining, “Yes, darling, but this is a winter wreath you see here.” I had diligently removed the “Merry Christmas” sign, so to my eyes, it looked perfectly appropriate for the snowy landscape we still found ourselves in – I even had to shovel snow just yesterday! Yet, his skeptical gaze was a clear sign. He wasn’t entirely wrong; while it was technically still winter, his comment sparked a realization: what I truly needed was a change in attitude, a vibrant shift towards spring, and a new focal point for our home’s entrance.
This lighthearted interaction became the perfect inspiration for this month’s “Ten on the Tenth” challenge. I decided it was high time to craft a brand new spring wreath for our front door, embracing the theme: “things we love to decorate with all the time.” Wreaths, for me, embody that sentiment perfectly.
For those new to our creative community, “Ten on the Tenth” is a delightful gathering of blogging friends. On the tenth day of each month, we come together to share a unique DIY project or decorating idea that costs us less than ten dollars. It’s a wonderful way to inspire budget-friendly creativity and demonstrate that beautiful home decor doesn’t have to break the bank. Last month, we explored an array of quick spring projects, and the month before, we shared heartwarming Valentine’s Day ideas. This month, it’s all about our enduring love for decorative accents, particularly those that welcome a new season.
If you’ve followed my blog for any length of time, you’ll know my deep affection for wreaths. In fact, they have a dedicated page all their own here on the blog, showcasing a diverse collection of my creations. However, most of those cherished wreaths currently reside in Greece, where my previous home was. Now that I’ve settled into a new space, it’s the perfect opportunity to craft new pieces that reflect my current surroundings and the changing seasons. This need for new decor, combined with my son’s gentle prodding, provided the ideal impetus to create a fresh, vibrant spring wreath for our new front door, breathing life and color into our entry with minimal effort and cost.
Materials You’ll Need for Your Frugal Spring Wreath
Creating a stunning, budget-friendly spring wreath is surprisingly simple, especially when you know where to find affordable supplies. For this project, I focused on maximizing impact while minimizing expense, ensuring it fit perfectly within our “Ten on the Tenth” challenge. Here’s a detailed list of what I used:
- Wire wreath form from the Dollar Tree (cost: $1). This is the foundational element, providing the structure for your wreath, making it an incredibly economical starting point for any DIY wreath project.
- Two white flower bunches from the Dollar Tree (cost: $2 total). These faux flowers offer a beautiful, neutral base and contribute significant volume, allowing the more colorful elements to truly shine.
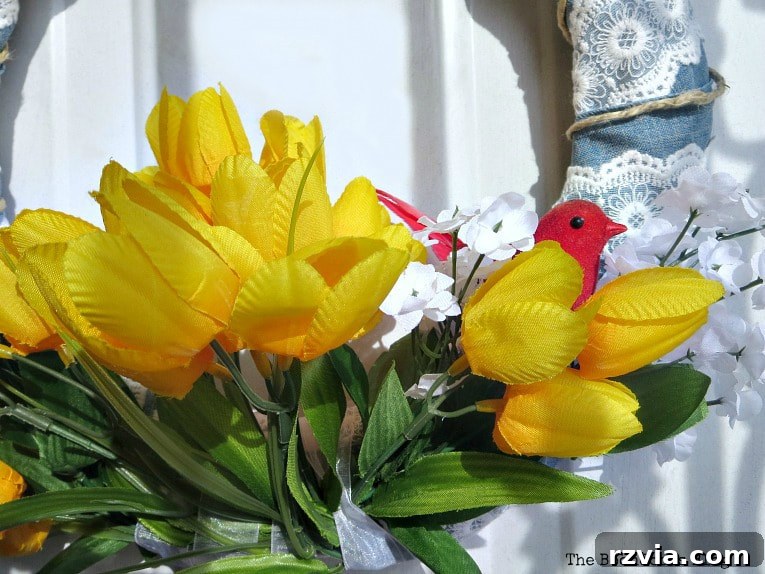
- One spool of lovely ribbon, purchased on sale at Michael’s for $4. I opted for a chambray ribbon with a delicate lace overlay, which immediately added a layer of instant rustic charm and visual interest to the wreath form.
- One bunch of bright yellow tulips, also from Michael’s, for $2. These cheerful flowers are the quintessential symbol of spring, injecting a crucial and vibrant pop of color that instantly lifts the mood.
The total cost for these primary supplies was a mere $9, leaving a dollar to spare from our challenge budget! In addition to these new purchases, I also incorporated a few items I already had on hand, demonstrating how you can easily personalize your wreath without incurring extra cost:
- Some natural twine: This versatile material is perfect for adding an extra layer of rustic texture, enhancing the farmhouse aesthetic, and can also be used to discreetly secure elements.
- A transparent ribbon: Handy for subtly tying and arranging flowers to achieve the desired spread and ensure they remain in place without being overtly visible.
- A charming red bird figurine: This little detail adds a whimsical touch and a delightful splash of contrasting color, acting as a charming focal point.
Gathering these affordable materials is the first exciting step toward transforming your front door into a welcoming spring beacon. Remember, while I used these specific items, feel free to substitute with what you have or find on sale – the true beauty of DIY lies in its flexibility, allowing for personalized creativity and resourcefulness!
Step-by-Step Guide: How to Craft Your Easy & Frugal Spring Wreath
This spring wreath project is not only incredibly affordable but also remarkably quick to assemble. I truly mean it when I say it took me approximately 5 minutes from start to finish! The beauty of this design lies in its simplicity and the fact that no glue is needed, making it easy to repurpose components later and adjust elements as you go. Follow these simple steps to create your own:
Step 1: Wrapping the Wreath Form with Ribbon
The first step sets the aesthetic tone for the entire wreath and forms a cohesive base. I took the beautiful chambray ribbon, which already featured a delicate lace overlay – a detail I absolutely adore for its instant rustic yet elegant appeal – and began to wrap it snugly around the entire wire wreath form. This process should be neat and continuous, ensuring the wire form is fully covered. To secure the ribbon, I simply tucked the ends firmly into the back of the wreath form itself. No adhesive was necessary, which is a fantastic advantage for future redecorating projects and makes the wreath easily deconstructible for material reuse. Ensure the ribbon is wrapped evenly, maintaining consistent tension, as this will be the foundational layer for all subsequent floral additions.
Step 2: Adding the White Base Flowers
Next, I took the two bunches of white faux flowers from the Dollar Tree. To give them a natural, flowing appearance that complements the wreath’s circular shape, I gently bent their stems into graceful curved forms. The goal here is to create a sense of organic movement and generous volume, establishing a soft backdrop. I then tucked the bottoms of these bent stems securely into the wrapped ribbon, ensuring they are firmly anchored without the need for glue. I arranged the white flowers to face in opposite directions, creating a beautiful, balanced, and symmetrical look that forms an elegant and voluminous base upon which the vibrant yellow tulips will later be added. Take your time to adjust them until they look aesthetically pleasing and feel securely nestled within the ribbon layers.
Step 3: Integrating the Cheerful Yellow Tulips
Now for the star of the show and the quintessential symbol of spring: the bright yellow tulips! To position these lovely faux blooms prominently in the center, nestled amongst the white flowers, I bent their stems, just as I did with the white bunches, and carefully tucked them into the ribbon. However, faux flower stems, especially those made of plastic, can be quite stubborn; they might not always stay bent or spread out as gracefully as desired. To counteract this common challenge and achieve a beautiful, fanned-out effect that maximizes their visual impact, I employed a clever trick.
I took a piece of transparent ribbon, which I conveniently happened to have on hand, and wound it carefully around the bottom section of the wreath, specifically where the tulip stems were concentrated. This serves a dual purpose: it helps to gently separate the individual tulip blooms, preventing them from clumping together and looking unnatural, and most importantly, it holds them firmly in place, ensuring they maintain that lovely, outward-spreading, fan-like appearance. Adjust the tulips until they radiate outward with cheerful energy, bringing a burst of pure sunshine to your spring wreath.
Disclosure: The items below are affiliate links. If you purchase any of these products through the links, I receive a small commission, which helps me continue to provide you with lovely content. There is no extra charge to you for purchasing through my affiliate links.
Step 4: Adding a Touch of Rustic Charm with Twine
To enhance the rustic aesthetic already established by the chambray ribbon, I decided to incorporate a piece of natural twine. This step adds another layer of texture and visual interest. I carefully wound the twine all around the central chambray part of the ribbon, strategically layering it over the existing material. This simple addition instantly introduces a more homemade, organic, and truly unique feel that beautifully complements the faux flowers and the overall spring theme. It’s these small, thoughtful details that elevate a simple craft into a personalized piece of decor that looks far more expensive than it actually was.
Step 5: The Final Whimsical Addition – A Red Bird
The final, delightful touch for this cheerful spring wreath was a small, felt red bird figurine that I serendipitously had lying around the house. This little cardinal, with its vibrant hue, provides a lovely focal point and a delightful pop of contrasting color against the blue ribbon, white flowers, and yellow tulips. It also beautifully symbolizes the return of nature, warmth, and life in spring, adding a layer of charm and narrative to the wreath. Simply nestle or attach your chosen embellishment securely within the foliage, ensuring it’s visible and adds that perfect finishing flourish.
There’s an undeniable joy that a beautiful wreath brings to a home’s entrance! It truly brightens the spirits and sets a welcoming, inviting tone for anyone who approaches. As I’ve just demonstrated with this simple and elegant creation, it doesn’t have to be overly elaborate, and it certainly doesn’t need to be expensive. This entire project, from start to finish, cost me approximately $9, proving unequivocally that stunning seasonal decor is well within reach for any budget, without sacrificing style or charm. An added bonus: because nothing was permanently glued down, all the materials can be easily removed and reused for different themes or future DIY projects, offering fantastic value, creative flexibility, and a sustainable approach to decorating.
Once my new spring masterpiece was hung on the front door, I made sure to proudly present it to my son, the initial skeptic whose astute observation had kickstarted this project. “See here,” I announced with a triumphant smile, “the wintry wreath is gone!” His immediate approval, marked by a satisfied nod and a decidedly less skeptical glance, confirmed its success. It’s always rewarding when the little ones acknowledge your efforts, proving that even their candid “grumblings” can lead to wonderful new creations and a positive, refreshing shift in seasonal decor. This simple change transformed not just the door, but also the overall mood of our entryway, truly ushering in the brighter days of spring.
I find immense joy in crafting wreaths whenever the opportunity arises, regardless of the season. It’s a wonderfully simple, fun, and impactful way to decorate, allowing for endless creativity and seasonal expression without demanding a significant time or financial investment. Over the years, I’ve experimented with countless designs, some more successful than others – I’ve even made some “silly wreaths” in my time that I’d rather forget! However, one of my absolute favorites remains this particular creation, which was crafted entirely from elements found in nature, highlighting the beauty of free, organic materials. The cost for that natural masterpiece? Absolutely zero, showcasing the ultimate in frugal and eco-friendly decorating possibilities.
Ultimately, you don’t need a thoughtful (or perhaps slightly grumpy) son to spur you into a delightful springtime mood. All it truly takes is the simple act of creating a beautiful, budget-friendly wreath like this one. It’s an instant and effective way to infuse your home with vibrant color, a fresh aesthetic, and the joyful, renewing spirit of the season. So why not grab some affordable supplies and embark on your own wreath-making adventure this spring? It’s a small effort with a huge impact!
Now, be sure to scroll down and explore the wonderful creations from my fellow blogging friends, who are also sharing their favorite things to decorate with this month as part of our “Ten on the Tenth” collaboration. You’ll find a plethora of inspiring ideas to ignite your own seasonal home refresh and discover new ways to bring beauty into your space, all on a budget!
If you really like what you see and want to stay updated on all my adventures and DIY projects, please subscribe to my blog! The subscription form is conveniently located on the sidebar, and rest assured, your email address will always remain private and will never be shared with any third party. Join our growing creative community for more inspiration and home decorating tips!


Explore More “Ten on the Tenth” Creations from My Friends:
Discover even more incredible, budget-friendly decorating ideas from my talented blogging friends who also participated in this month’s “Ten on the Tenth” challenge. Click through to explore their inspiring projects:
- Patina and Paint
- The Boondocks Blog (You are here!)
- Pandora’s Box
- Exquisitely Unremarkable
- Cottage at the Crossroads
- My Heart Lives Here
- At Home With Jemma
- Bluesky at Home
- The Purple Hydrangea
- Let’s Add Sprinkles
- Poofing the Pillows
More Spring Wreath Inspiration from The Boondocks Blog:
If you’ve enjoyed this project and are looking for even more ways to add natural beauty and charm to your home for spring, you might also love these other spring wreath ideas from my archives:
<< Sweet Inspiration Link Party #97 HOME Saint Andrew’s Cathedral in Greece >>
I often link up to these fantastic Link Parties to share my projects and discover new inspirations within the crafting and blogging community.
Please note: This blog is intended for entertainment purposes only; my DIY tutorials are not professional advice. For more comprehensive details regarding the use of this blog and its content, please read my full disclaimer here.
I genuinely love hearing from you, and I will always do my best to reply to every single comment and engage with our wonderful community. To ensure your comment can be published and seen by all, please do not include any hyperlinks within your message. Thank you for being a thoughtful and valued part of our creative community!