
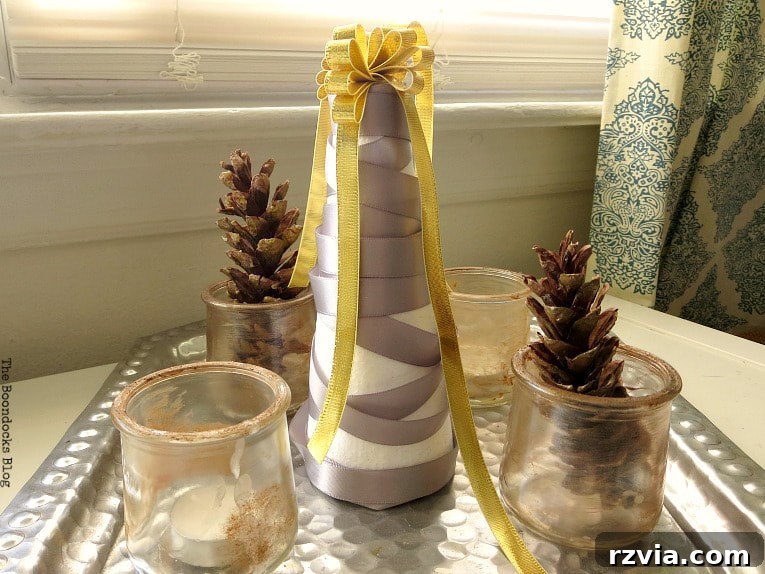
Craft Your Own Sparkle: A DIY Mini Christmas Tree with Ribbon
The holiday season always ignites a special kind of magic, and the internet, especially the bustling blogosphere, becomes a dazzling source of inspiration. Everywhere you look, there are breathtaking home tours, innovative DIY projects, and an abundance of creative talent. This year, I’ve noticed a delightful trend: an explosion of metallic accents and, perhaps even more charmingly, an array of mini crafted Christmas trees. These pint-sized wonders are perfect for adding a touch of festive cheer to any nook or cranny, making them ideal for small spaces, office desks, or as thoughtful handmade gifts.
Inspired by this enchanting trend, I decided to embark on my own mini tree crafting adventure. My goal was to create a simple yet elegant mini Christmas tree using ribbons, a project that promised to be both fun and rewarding. This first iteration focuses on a straightforward design, proving that beautiful holiday decor doesn’t have to be complicated. Join me as I share my journey, including the initial hiccups and the satisfying breakthrough that led to this charming ribbon-adorned creation.
Disclosure: The items below are affiliate links. If you purchase any of these products through the links, I receive a small commission, which helps me continue to provide you with lovely content. There is no extra charge to you for purchasing through my affiliate links.
Essential Materials for Your Ribbon Tree
Crafting this elegant mini Christmas tree requires just a few basic supplies. You might even have some of these lying around your craft stash! Gathering your materials beforehand ensures a smooth and enjoyable crafting process. Here’s what you’ll need to create your own shimmering mini masterpiece:
- Foam cone used for floral projects: This will serve as the base structure for your tree. A standard size (e.g., 6-inch or 9-inch) works well for a mini tree.
- Ribbon in contrasting or complementary colors: I chose classic gold and silver satin ribbons for a metallic holiday sparkle. The width of your ribbon can greatly affect the outcome, as I would soon discover!
- Dressmaker pins: These small, sharp pins are perfect for securely attaching the ribbon to the foam cone without needing glue.
The Creative Process: How to Craft Your Ribbon Tree
The Initial Hurdle: When Expectations Meet Reality
Like many enthusiastic DIYers, I started this project with a clear vision in mind, having seen numerous examples of beautifully wrapped mini trees online. My initial thought was to simply wrap the ribbon around the foam cone, much like one would wrap a gift. However, this seemingly straightforward approach proved to be anything but. The ribbon, particularly the wider gold ribbon I first attempted, simply refused to conform to the cone’s tapered shape. It wrinkled, gapped, and no matter how I adjusted it, the elegant, smooth finish I envisioned seemed unattainable.
It was a genuine struggle! I tried pulling it tighter, loosening it, and even attempted to scrunch the ribbon to encourage it to lie flat. You can see my frustrating attempts in the image below. Each effort resulted in a messy, unappealing look that bore no resemblance to a charming Christmas tree. The ribbon would not hold its shape, creating unsightly bulges and revealing too much of the foam cone underneath. This initial setback was disheartening, but true to the spirit of DIY, it only fueled my determination to find a solution.
So, what does a determined DIY enthusiast do when faced with a stubborn craft project? Instead of simply giving up – a thought that admittedly crossed my mind for a fleeting moment – I decided to pivot. My next attempt involved using a thinner ribbon, hoping its flexibility would make it more cooperative. However, this only introduced a new set of challenges. The thinner ribbon was even harder to control; it slipped, slid, and refused to stay in place, making the wrapping process even more frustrating.
Did I surrender? Absolutely not! The essence of DIY lies in creative problem-solving and adapting your approach. It was clear that a traditional wrapping method wasn’t going to work for achieving the clean, elegant look I desired. I needed to think beyond conventional techniques and find an alternative that would embrace the ribbon’s properties rather than fight against them. This realization was the turning point in my crafting journey.
The Breakthrough: Embracing the Crisscross Method
Instead of attempting to tightly wrap the ribbon around and fully cover the cone, I opted for a completely different aesthetic: a stylish crisscross pattern. This method not only solved the problem of the ribbon not conforming but also added a unique texture and visual interest to the tree. Here’s how I achieved this elegant look:
- Start at the Base: Begin by taking one end of your chosen ribbon (I started with silver) and secure it to the bottom edge of the foam cone using a few dressmaker pins. Make sure it’s firmly attached to prevent slipping as you work your way up.
- Create the First Crisscross: Bring the ribbon diagonally up the cone, creating a gentle slant. Secure it with another pin a few inches higher, ensuring the ribbon lies flat against the cone’s surface. Don’t pull it too taut; a slight looseness allows for better draping.
- Form the Pattern: Continue this diagonal movement, crisscrossing the ribbon back and forth as you ascend the cone. Each time the ribbon changes direction, secure it with a pin. The key is to create an even, overlapping pattern, allowing some of the cone (or previously pinned ribbon) to show through, which adds depth.
- Alternate Colors (Optional but Recommended): For a more dynamic look, I alternated between silver and gold ribbons. Once you’ve created a section with one color, trim it and start with the next, overlapping slightly at the base or where you began the previous ribbon. This creates beautiful metallic layers that catch the light.
- Secure All Ends: Ensure all ribbon ends, especially at the bottom and where you transition between colors, are neatly tucked and secured with pins. The pins should be pushed in deeply enough to be invisible or minimally noticeable.
- Work Your Way to the Top: Continue the crisscross pattern until you reach the very top of the cone. The spacing of your crisscrosses can be adjusted to your preference – closer for a denser look, wider for a more open, airy feel. This method creates a lovely texture that perfectly mimics the layered branches of a real tree.
This method not only proved much easier but also yielded a far more appealing result. The pins provide the necessary structure, holding the ribbon in place without forcing it into an unnatural shape. It’s a wonderful testament to how a simple shift in perspective can transform a challenging craft into a delightful success.
The Perfect Topper: A Simple Ribbon Bow
Every Christmas tree, no matter how mini, deserves a crowning glory! For the topper, I decided to continue with the ribbon theme, creating a simple yet elegant bow. This adds a finished touch and allows the metallic ribbons to truly shine. Here’s how to make it:
- Prepare Your Ribbon: Take a length of your gold ribbon (or your preferred color for the topper). The length will depend on how large and full you want your bow to be. For a mini tree, a shorter length works best to maintain proportion.
- Form the Bow Loops: Pinch the ribbon in the middle to create a small loop on either side, resembling a classic bow shape. You’re essentially folding the ribbon back on itself to form two “bunny ears.”
- Secure with a Pin: Once you have the desired bow shape, use a dressmaker pin to secure the pinched center to the very top of your foam cone. Push the pin deeply into the foam, ensuring the bow is firmly attached and stands upright.
And secured with a pin! To give the topper more balance and a fuller appearance, I actually made two of these small ribbon bows and placed them close together at the peak. This allowed the ends to drape elegantly down the sides of the tree, adding a touch of whimsy and movement. The result is a simple yet sophisticated embellishment that perfectly completes the mini Christmas tree.
The Finished Mini Christmas Tree: A Touch of Holiday Charm
This little mini ribbon tree makes the perfect addition to any festive display. It looks particularly stunning next to a freshly painted lamp base or surrounded by metallic frames, reflecting the light and adding a wonderful sparkle to your holiday decor. What initially seemed like a tricky endeavor, once I overcame my initial ineptness and adapted my approach, only took a few minutes to complete. The satisfaction of creating something beautiful with your own hands, especially after a bit of creative problem-solving, is truly unmatched.
It’s interesting to note that others have tackled similar projects with different techniques. For example, Jennifer of Busy being Jennifer also made a ribbon mini tree, but her method involved creating a lovely ruffled effect. This just goes to show the endless possibilities within DIY!
Reflections on DIY and Creative Problem-Solving
So, what’s the overarching lesson from this little crafting adventure? Is it to never trust what you see on the internet, or that if something looks easy, it’s probably not? Should we just avoid ribbons altogether, or perhaps simply buy a pre-decorated mini tree?
Of course not! The true takeaway is much more empowering: always think outside the box. When a project doesn’t go as planned, don’t be afraid to experiment, adapt, and come up with your own version – one that is doable and enjoyable for you. This journey taught me the value of persistence and the joy of discovering a unique method that works. And that, in essence, is my version of how to make a Simple Mini Christmas Tree with ribbon, a testament to creative resilience.
Have you ever encountered similar struggles with what seemed like a straightforward craft? Share your experiences and tips in the comments below! I love hearing about how others overcome crafting challenges.
If you enjoy inspiring DIY projects and creative home decor ideas, consider subscribing to my blog! You’ll receive my latest adventures and tips directly in your mailbox. The subscription form is available on the sidebar and at the top of the page. To review my privacy policy, click here.
More Christmas Ideas to Inspire You:
<< Mini Snowflake Ornaments HOME Dollar Store Fabric Mini Tree >>
Linking up to these Link Parties
This blog is for entertainment purposes only; my DIY tutorials are not professional advice. Read my full disclaimer here.
I love it when I get your comments and I will try to reply to every one of them.