
Craft Easy Snowflake Mini Canvas Ornaments for a Sparkling Christmas
As December unfurls its festive charm, the air fills with the joyful anticipation of Christmas. There’s no better time to embrace the spirit of the season than by diving into delightful holiday decorating and craft making. If you’re looking for a simple, yet stunning DIY project to personalize your Christmas tree or create thoughtful handmade gifts, you’ve come to the right place.
Today, we’re thrilled to share a super easy and incredibly charming craft: how to make beautiful snowflake mini canvas ornaments. I crafted these subtle sparkling beauties for my tree a few weeks ago, and they’ve already become a cherished part of our holiday display. This project is perfect for beginners, requires minimal supplies, and comes together in mere minutes (excluding drying time), making it an ideal activity for busy crafters or a fun family project.
Get ready to add a touch of handmade magic and unique shimmer to your Christmas tree with these adorable and easy-to-create snowflake ornaments!
Disclosure: The items below are affiliate links. If you purchase any of these products through the links provided, I receive a small commission at no extra charge to you. This support helps me continue to bring you engaging content and creative DIY inspiration. Thank you for your understanding and support!
What You’ll Need: Essential Supplies for Your Snowflake Ornaments
Gathering your materials is the first exciting step in any crafting adventure. For these charming mini canvas snowflake ornaments, you’ll find that the list is short, sweet, and budget-friendly. Most of these items can be found at your local craft store or even around your home. Let’s make sure you have everything ready before we begin creating your unique holiday decor.
- Snowflake Cookie Stamp: While a cookie cutter is perfect for this, any snowflake stamp or stencil with a distinct raised pattern will work wonders. The intricate design of a snowflake cookie stamp makes achieving a detailed impression incredibly easy, even for beginners. Look for one with a good depth to ensure the paint transfers well. If you don’t have a snowflake, consider other festive shapes like stars, bells, trees, or even simple initial stamps to personalize your ornaments further.
- Mini Canvases (2×2 inches): These small stretched canvases are the perfect miniature base for our ornaments. Their compact size makes them ideal for hanging on a Christmas tree without overwhelming other decorations. You can find them in multi-packs at most craft stores, offering great value for creating a set of matching or varied ornaments. While 2×2 inches is recommended for a true “mini” look, feel free to experiment with slightly larger or different shaped canvases if you wish.
- Metallic Paint (Champagne or similar): The choice of metallic paint is crucial for achieving that beautiful, subtle shimmer reminiscent of glistening snow. I highly recommend a “Champagne” shade for its elegant, warm glow that complements various holiday color schemes. However, silver, gold, pearl white, or even an icy blue metallic paint would also create stunning effects. The key is to select a high-quality acrylic metallic paint for vibrant color and good coverage.
- Strong Craft Glue: Whether you prefer liquid craft glue, a hot glue gun, or super glue, a reliable adhesive is essential for securely attaching the twine hanger. If using liquid glue, ensure it’s a quick-drying, strong-bonding formula. Hot glue guns offer instant adhesion, which can be a time-saver, especially if you’re making multiple ornaments. For this project, I used liquid glue, but feel free to use your preferred strong adhesive.
- Thin Twine (or ribbon): Natural jute or hemp twine provides a rustic, charming look that beautifully complements the snowflake design. You’ll need thin twine to ensure it doesn’t overpower the small canvas. Alternatively, you could use thin ribbon in a coordinating color (gold, silver, or cream) for a more elegant touch. Aim for a length that allows the ornament to hang gracefully from your tree branches.
The How-To: Crafting Your Festive Snowflake Ornaments
Now that you have all your supplies ready, let’s dive into the fun part: creating your enchanting snowflake mini canvas ornaments! This process is delightfully simple and remarkably quick, making it an excellent project for crafters of all skill levels. Follow these easy steps to bring your vision to life and add a personalized sparkle to your holiday decor.
Step 1: Preparing Your Snowflake Stamp
You might be surprised to learn that my snowflake “stamp” was actually a cookie cutter I’d purchased from TJ Maxx ages ago. It just goes to show that inspiration can strike from the most unexpected places! The key is finding a tool with a distinct, raised pattern that can hold paint effectively.
Begin by generously applying your chosen metallic paint onto the raised surface of your snowflake cookie stamp. Don’t be shy with the paint, but also be mindful not to let it pool excessively. The goal is even coverage across the entire design. I find that using a small paintbrush or even just dabbing the stamp directly onto a small puddle of paint works best to achieve consistent color.
Step 2: Achieving the Perfect Impression
Before pressing the stamp onto your mini canvas, it’s crucial to remove any excess paint. This step prevents the dreaded “blob” effect and ensures a crisp, clean snowflake design. Gently press the paint-laden stamp once onto a paper towel or scrap piece of paper. You’ll see the excess paint transfer, leaving behind just the right amount for a perfect impression. This technique is similar to stenciling, where less is often more for detailed results.
Once the excess paint is removed, carefully center the stamp onto your mini canvas. Apply firm, even pressure directly down onto the canvas. Avoid wiggling or twisting the stamp, as this can smudge your design. Hold it down for a few seconds to allow the paint to transfer completely, then lift it straight up. Marvel at your beautifully stamped snowflake!
Step 3: Drying Time & Embracing Imperfection
After stamping, set your mini canvas aside to dry completely. Metallic acrylic paints often dry relatively quickly, but it’s best to allow at least 30 minutes to an hour, or even longer, depending on the paint’s thickness and humidity levels. Impatience here can lead to smudges, so give the paint ample time to set!
One of the most charming aspects of handmade crafts, especially snowflake designs, is that they don’t have to be absolutely perfect. Real snowflakes are unique; no two are exactly alike, and their beauty often lies in their intricate imperfections. So, if your stamped design isn’t flawlessly sharp or has a slight rustic edge, don’t fret! That subtle variation only adds to the unique character and appeal of your ornament, making it truly one-of-a-kind. Embrace the natural beauty of your creation.
Step 4: Attaching the Hanger
Once your paint is completely dry, it’s time to add the hanger so your beautiful ornament can grace your Christmas tree. Cut a piece of thin twine, approximately 6-8 inches long. This length gives you enough slack to tie a secure loop for hanging and ensures the ornament hangs gracefully.
Form the twine into a loop and carefully glue the two ends onto the back of your mini canvas. If you have a hot glue gun, this is an excellent tool for instant adhesion and strong hold. Simply apply a small dab of hot glue to each end of the twine and press them firmly onto the top edge of the canvas’s wooden frame on the back. If you’re using liquid craft glue, apply a generous amount to the twine ends and hold them in place for a minute or two until the glue begins to set. Allow sufficient time for the glue to dry completely before handling or hanging the ornament – usually several hours for liquid glue, or as per product instructions.
Tip: For extra security and a neater finish, you can cover the glued twine ends with a small piece of decorative paper or felt once dry. This also gives the back a polished look.
The Sparkling Result: Your New Favorite Ornament!
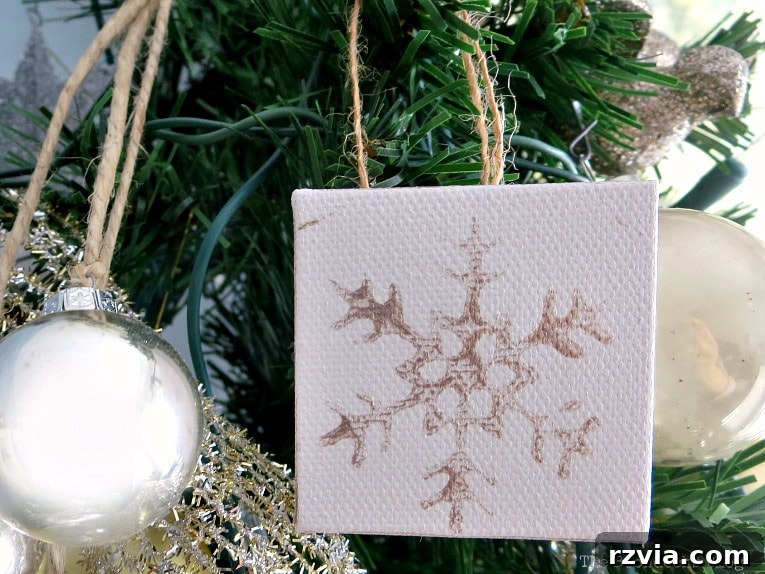
And just like that, you’ve created a stunning, handmade Christmas ornament! The end result is wonderfully subtle, yet incredibly captivating. The metallic champagne paint catches the light beautifully, giving your snowflake a gentle, ethereal glow that perfectly embodies the winter wonderland spirit.
This project truly champions simplicity and elegance. It’s a testament to how easily you can transform basic supplies into unique, eye-catching holiday decor. The understated beauty of these mini canvases ensures they blend seamlessly with any existing Christmas theme, while still offering that special handmade touch that makes your tree truly personal.
Observe closely below, and you can truly appreciate just how beautifully the metallic finish catches and reflects the light. Each little canvas becomes a miniature art piece, shimmering and sparkling as it hangs from your tree branches, mimicking the natural glint of fresh snow under festive lights. This subtle glow adds depth and character to your holiday display, creating a captivating visual effect that enhances the overall magic of Christmas.
As mentioned before, don’t worry if your stencil didn’t come out absolutely “perfect.” The beauty of snowflakes lies in their natural variations and intricate, often asymmetrical, designs. These slight imperfections are what make each ornament truly unique and give it character, lending an authentic, handmade charm that factory-made ornaments simply cannot replicate. Embrace the uniqueness of your creations – they tell a story!
This little ornament looks perfectly at home nestled among all the other white and sparkly decorations on the tree. It adds a wonderful layer of texture and a homemade warmth that truly elevates the overall festive ambiance, making your tree feel more inviting and personal.
It also introduces a lovely, slightly rustic, yet elegant touch that stands out from typical store-bought ornaments. It’s a small detail that makes a big difference, adding character and a personal story to your holiday centerpiece, inviting guests to admire its unique charm.
Honestly, I think this has to be one of the easiest and quickest ornaments I have ever created. The entire hands-on process took maybe all of five minutes, excluding the crucial drying time for the paint and glue. This makes it an ideal last-minute gift idea, a perfect project for when you want to add a homemade touch without dedicating hours to crafting, or a delightful activity for kids and adults alike.
Why You’ll Love This DIY Snowflake Ornament Project
Beyond its charming aesthetics, this mini canvas snowflake ornament project offers numerous benefits that make it a favorite for holiday crafting:
- Incredibly Easy & Quick: Perfect for beginners, children, or anyone short on time. You can craft several beautiful ornaments in a single session!
- Budget-Friendly: Uses readily available and inexpensive craft supplies, making it an affordable way to decorate for the holidays.
- Highly Customizable: Easily change paint colors, experiment with different stamp designs (stars, monograms), or add extra embellishments to match your unique holiday style and home decor.
- Charming & Unique: Adds a personalized, rustic, and elegant touch to your Christmas tree, holiday garlands, or even as festive gift toppers.
- Great for Gifting: Handmade ornaments make heartfelt and cherished presents for friends, family, teachers, neighbors, or as thoughtful hostess gifts during the festive season.
Creative Tips & Variations for Your Snowflake Mini Canvas Ornaments
While the basic method for these snowflake ornaments is wonderfully simple, there are many ways to make them uniquely yours. Here are some ideas to inspire your creativity and take your holiday crafting to the next level:
- Add Glitter: For an extra dose of sparkle, sprinkle fine iridescent or white glitter onto the wet metallic paint immediately after stamping. Once dry, gently tap off any excess for a truly dazzling effect.
- Distressed Look: For a vintage or rustic farmhouse feel, lightly sand the edges of your dried canvases before stamping, or use a dry-brush technique with a contrasting paint color (like brown or gray) around the edges.
- Background Color: Instead of leaving the canvas white, paint the entire canvas with a festive base color (like a soft icy blue, deep navy, silver, or even a subtle glitter paint) and let it dry completely before stamping your snowflake. This can create stunning contrast and depth.
- Varying Sizes & Shapes: Experiment with different sizes of mini canvases and snowflake stamps to create a dynamic and varied collection of ornaments. You could even use small wooden slices or discs as an alternative to canvas.
- Sealing for Longevity: For added protection and durability, especially if you plan to gift these or store them for years to come, apply a thin, even coat of clear craft sealant (matte or glossy finish) once all paint and glue are thoroughly dry.
- Ribbon Accents: Elevate the elegance by tying a small festive bow with satin or velvet ribbon at the top of the twine hanger, or use a thin, patterned ribbon (like a silver or gold lamé) for the hanger itself instead of twine.
- Personalize: Use alphabet stamps or a fine-tipped permanent marker to add a name, initial, or the year to the back or a corner of the canvas. This makes them extra special as keepsakes or gifts.
No matter how you choose to customize them, these easy snowflake mini canvas ornaments are sure to become a beloved part of your holiday traditions, bringing joy and a personal touch to your festive season year after year.
More Christmas Crafting Inspiration
If you’ve enjoyed creating these snowflake ornaments, you’re in for a treat! The holiday season is a wonderful time to explore more DIY projects that add warmth, charm, and personality to your home. Dive into these other festive tutorials for more creative ideas and continue your crafting journey, making this Christmas truly special with handmade touches:
We hope this tutorial has inspired you to create your own beautiful snowflake mini canvas ornaments. They are a simple, fun, and rewarding way to add a personal touch to your holiday celebrations. Happy crafting, and may your Christmas be filled with handmade joy and sparkle!
<< A Walk in the Park with the Dog HOME Mini Christmas Tree with Ribbon >>
Thank you for linking up to these wonderful Link Parties!
Disclaimer: This blog is for entertainment purposes only; my DIY tutorials are not professional advice. Please read my full disclaimer here.
I absolutely love reading your comments and feedback! I make every effort to reply to each one of them. Please feel free to share your thoughts and creations below – I can’t wait to see your unique snowflake ornaments!