

Transform Your Christmas Tree on a Budget: An Upcycling Adventure
The festive season is truly upon us, and after weeks of anticipation, my Christmas tree finally stands adorned! For what felt like an eternity, that festive box sat patiently in the stairwell, a silent reminder of holiday cheer waiting to be unleashed. The delay wasn’t intentional, of course. First, there was the monumental task of stowing away all the Halloween decorations (a chore in itself!), then the joy of Thanksgiving festivities. But now, all the preparations are complete, and I’m thrilled to share how I gave our beloved Christmas tree a fresh, budget-friendly makeover through the magic of upcycling.
Last year, our tree was a vibrant display, featuring what felt like “everything but the kitchen sink.” It was undoubtedly sentimental, laden with ornaments collected over many years, each telling a story. However, as time wears on, sentimentality can sometimes give way to tatters and fading glory. Many of those cherished ornaments were past their prime, and it became clear it was time for a significant change. A new chapter for our Christmas decor was calling, one that emphasized selectivity and a refined aesthetic.
This year, the goal was clear: a fresh, elegant look without breaking the bank. I decided to pivot away from the traditional, often overwhelming, red-heavy palette. Instead, I envisioned a harmonious blend of white, metallics, and subtle greens. I’ve always believed that you don’t need to chase trends or buy a whole new set of decorations every year to achieve a beautiful holiday display. Who’s with me on this journey of mindful decorating and budget-savvy styling?
Embracing a new color scheme meant getting creative with what I already had. The challenge was to transform existing ornaments and decor pieces into something new and exciting, perfectly aligning with my vision for a serene and sophisticated Christmas tree. The journey began with inspiration from a dear friend.
DIY Salt Dough Ornaments: A Lesson in Creative Problem-Solving
My friend Leanna, from Of Faeries and Fauna Craft Co., shared a brilliant idea on her blog: creating garlands from salt dough. Her ornaments were absolutely stunning – pure perfection! Inspired by her success, I eagerly decided to embark on my own salt dough ornament adventure. The idea of crafting unique, handmade pieces filled me with enthusiasm.
However, my initial attempts were, to put it mildly, less than perfect. My salt dough creations emerged from the oven looking decidedly black, and some had even puffed up like balloons! While I’d love to blame it on a recently repaired stove that was perhaps “working too well,” the reality was a collection of rather uninspiring, burnt-looking shapes. This was certainly not the perfection I had envisioned, and with no budget for buying new ornaments, I needed a creative solution.
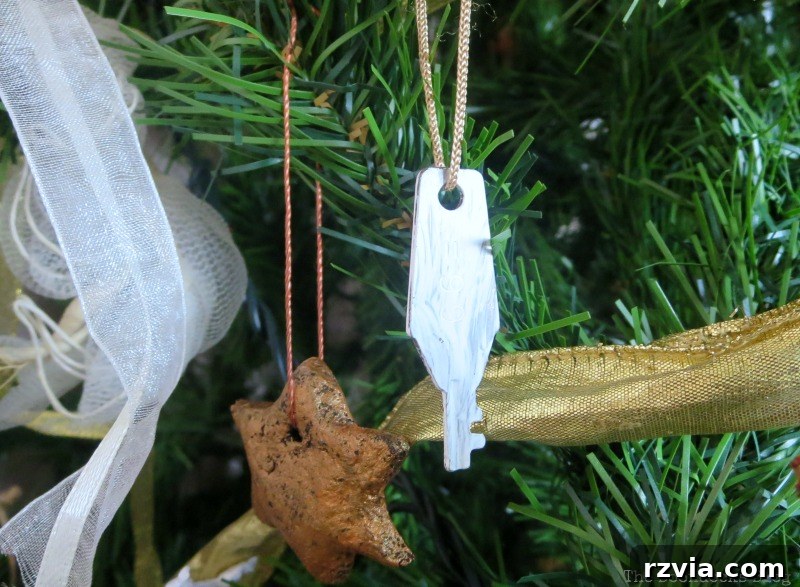
Instead of succumbing to disappointment, I embraced the challenge. The burnt dough provided a unique, textured base, which I decided to transform with paint. My first layer was a beautiful copper color, lending an unexpected metallic sheen to the failed ornaments. This clever pivot saved the project and added a touch of rustic elegance.
Following the copper base, I applied a layer of chalky-type paint, which provides excellent coverage and a matte finish. For the final touch, I painted them crisp white, allowing hints of the copper to peek through, adding depth and interest. The transformation was remarkable – from charred lumps to elegant, bespoke ornaments.
These newly upcycled white ornaments, alongside some vintage keys I painted, now contribute to the cohesive look. I even used some of these keys last year on my mini roasted Christmas tree, proving that versatile pieces can find new life year after year.
Revamping Christmas Globes: From Bold Red to Understated Elegance
Next on my upcycling agenda were the Christmas globes. These spheres have been part of our holiday decor for years, originally in vibrant, shiny blue and pink. As mentioned, my previous decorating philosophy leaned towards maximalism, with “everything but the kitchen sink” adorning the branches.
Last year, to tone down the original bright colors, I decoupaged them with paper in a charming red and beige pattern. While I was quite pleased with the result then, as you can see from a picture of last year’s tree, this year’s vision called for something different – a more toned-down, sophisticated palette with significantly less red. It’s amazing how a shift in aesthetic can completely redefine your approach to decor.
So, how did I banish the red this time? With a familiar technique: paint! I first applied a layer of chalky-type paint for its excellent adhesion and matte finish, followed by regular craft paint in shades of white and metallic. The globes lined up, drying on my makeshift “state-of-the-art assembly line,” a testament to simple, effective DIY. It’s incredibly satisfying to watch old pieces transform into new treasures.
One of the delightful outcomes of this repeated layering is the incredible texture that remained from last year’s decoupaging. Instead of a smooth, uniform surface, the globes now boast a subtle, intriguing tactile quality that adds character and a handmade touch to the overall design. This layering of history makes each ornament unique.
From Wedding Favors to Festive Wreaths: Unexpected Upcycling
Beyond the dough ornaments and globes, I found another unexpected source for upcycling: a collection of old wedding favors. These small, decorative pieces, originally designed for another joyous occasion, were easily reshaped into miniature wreaths. The key was to carefully remove all traces of their original colored ribbons, which clashed with my new palette. This simple adjustment instantly transformed them into elegant, understated ornaments that perfectly complemented the white and metallic theme. It’s a fantastic example of how forgotten items can be reimagined with a little creativity.
Ribbons, the Star, and the Heart of Christmas
To further unify the tree’s new look, I carefully draped thin and thick gold ribbons around its branches. The metallic sheen of the gold adds a touch of sophistication and warmth, harmonizing beautifully with the white and metallic ornaments. Ribbons are such a simple yet effective way to add flow and luxury to your tree without great expense.
And, of course, no Christmas tree is complete without its crowning star. Last year, our star boasted a golden hue with a sponge-like texture. But you know me – I simply couldn’t leave it as is! It, too, underwent a transformation. Now, it’s a beautifully whitewashed star, with subtle hints of its former golden self peeking through, adding a layer of history and character. This whitewashed effect perfectly encapsulates the refined yet antique feel I aimed for.
Nestled at the base of the tree, between the carefully placed empty boxes, rests the Nativity scene. Amidst all the glittering decor and creative endeavors, it’s crucial to remember the true reason for the season. The Nativity serves as a beautiful, humble reminder of the spiritual heart of Christmas, grounding our festive efforts in meaning and reverence. We must never forget this sacred element.
The Final Touches and Sentimental Surprises
Even the smallest details contribute to the overall aesthetic and budget-friendliness. For instance, the string on one of the newly painted ornaments was cleverly repurposed from an old tassel I had. It’s these little touches of super frugality that make the project even more satisfying and uniquely personal.
Despite my concerted efforts to eliminate red from the tree entirely, sentimental pieces have a charming way of sneaking into the decor, here and there. A beloved red Santa, or a small, cherished ornament that simply holds too much history to be put away, finds its place. And that’s perfectly fine. These subtle touches of tradition add warmth and a personal narrative to the carefully curated new look, reminding us that some memories are simply too precious to be hidden away.
Conclusion: A Budget-Friendly Christmas Tree Makeover
And there you have it – the complete journey of how to upcycle a Christmas tree on the cheap. While it retains a lovely array of colors, it’s a significant departure from last year’s “everything but the kitchen sink” aesthetic. I’m learning to embrace downsizing and working with a more focused color palette. The transformation has been a rewarding exercise in creativity and resourcefulness.
I’m still contemplating if a change to all-white lighting would further enhance this elegant scheme, but for now, those new lights will have to wait for next year’s budget. Decorating on a budget often means prioritizing and planning ahead, and that’s part of the fun!
So, what are your thoughts? Did I successfully pull off this metallic and white vision, or do you think it needs another tweak? Don’t be shy – I’d love to hear your honest feedback. And please, tell me what creative decisions you made for your own Christmas tree this year. I’m always on the lookout for fresh ideas and inspiration for the next festive season!
Merry Christmas, everyone! May your homes be filled with joy, warmth, and beautiful, upcycled decorations.
If you enjoyed this upcycling adventure, please share it with your friends or save it to your Pinterest boards! The image above is perfectly sized for pinning.
For more DIY projects and home decorating inspirations, consider subscribing to my blog. You’ll receive my latest adventures directly in your inbox twice a week, and rest assured, your email will never be shared with any third party.
More Christmas Tree Projects & Inspiration:
<< Repurposing Vintage Fabric for Gift Wrapping | HOME | Sweet Inspiration #36 >>
This blog is for entertainment purposes only; my DIY tutorials are not professional advice. Read my full disclaimer here.
I cherish your comments and always try to reply or visit your blog. Please ensure your comments do not include hyperlinks, as we cannot publish them otherwise.