
Revitalize Your Home: Transform a Drab Plastic Mirror into a Shabby Chic Masterpiece
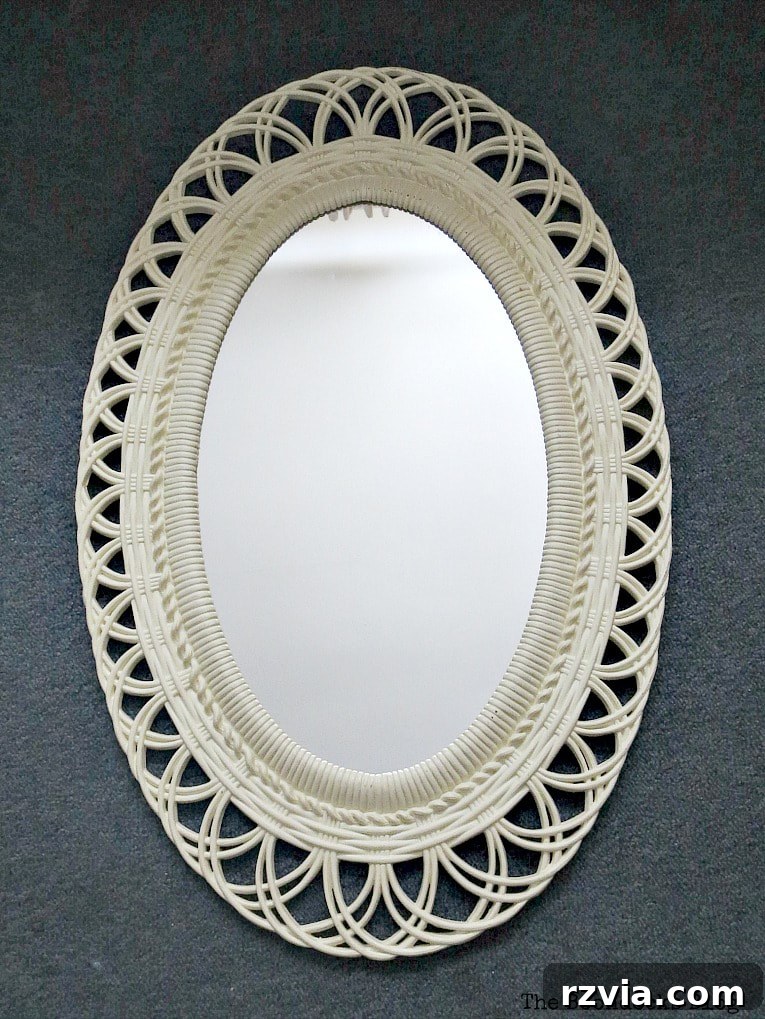
Like many of you, I often find myself with a house overflowing with items I no longer truly need. My recent attempt to organize a yard sale, unfortunately postponed due to relentless torrential rains, left me with an inventory of forgotten treasures and not-so-treasures. Among these accumulated odds and ends—a collection of mismatched cups and saucers, for instance—sat an item that caught my reluctant eye: an uninspiring oval mirror encased in a rather unappealing plastic frame.
To be honest, this mirror was destined for the ‘discard’ pile. I wouldn’t have given it a second glance if it weren’t for a sudden shortage of mirrors in my own room, thanks to my kids’ enthusiastic redecorating. This unexpected void sparked a challenge: could I breathe new life into this sad, neglected mirror? Could I transform this plastic relic into a piece I’d genuinely love, rather than just selling it off? Join me on this creative journey as I attempt to rescue this oval mirror from the clutches of the yard sale and turn it into a statement piece for my home.
Disclosure: I was compensated for creating this post with product. However, all the opinions stated here are my own. I only use products I love and would recommend to my viewers.
The Challenge: Tackling a Faded Plastic Frame
Before its transformation, this mirror’s plastic frame was a rather unfortunate yellowish hue. Not a charming, antique yellow, but the kind that suggests aging plastic and too much exposure to the elements. Perhaps it was always meant to be this way, but regardless, its current state certainly wasn’t inspiring. The goal was clear: eradicate that dismal yellow and lay a fresh foundation for a complete aesthetic overhaul. As you’ll soon see in the photos, even a single coat of white paint made an incredible difference, instantly elevating its appearance and setting the stage for its dramatic upcycle.
Disclosure: The items below are affiliate links. If you purchase any of these products through the links, I receive a small commission, which helps me continue to provide you with lovely content. There is no extra charge to you for purchasing through my affiliate links.
What I Used: Essential Supplies for Your Mirror Makeover
- DecoArt Americana Decor Chalky Finish in Everlasting
- DecoArt Americana Acrylic Paint in Raw Sienna
- DecoArt Americana Acrylic Paint in Neutral Grey
- DecoArt Americana Dazzling Metallics Pearl Black
- Water
- Paint brushes
The DecoArt Americana Decor Chalky Finish paint in Everlasting was instrumental in this project. Its exceptional adhesion and matte finish not only effectively covered the original yellowish tone but also provided the perfect grippy base for the subsequent layers of paint. This chalky paint truly set the foundation for the artistic layering that transformed the mirror.
The How-To: A Step-by-Step Guide to Your Mirror Makeover
Step 1: Preparation and Base Coats
Before applying any paint, it’s crucial to properly prepare your mirror. First, give the entire frame a thorough cleaning with a mild soap and water solution to remove any dust, grime, or oils. Allow it to dry completely. Next, use painter’s tape to carefully mask off the mirror glass to protect it from paint splatters. This step ensures clean lines and saves you from tedious cleanup later.
Once clean and taped, I proceeded with the first application of the Americana Chalky Finish paint in Everlasting. To ensure a completely clean and neutral canvas for the subsequent decorative steps, I opted to apply a second coat of the chalky white paint. This meticulous layering was essential because I planned to introduce significant depth and highlight all the intricate curves and swirls of the plastic frame. A solid, opaque white base allows the layered colors to truly pop and define the frame’s details.
Step 2: Layering Colors for Depth and Character
With our pristine white base established, it was time to introduce the colors that would transform this plain mirror into a piece with personality. My vision was to create a harmonious blend of soft, vintage-inspired tones that would bring out the subtle textures and ornate details of the plastic. This layering technique is key to achieving that desirable shabby chic aesthetic.
Using the Everlasting chalky paint as a foundational white, I mixed in a touch of Raw Sienna. The result was a beautiful, light peach hue that I carefully brushed onto the raised “rope” details of the frame. This subtle color added an immediate warmth and highlighted the three-dimensional aspect of these decorative elements.
Following the peach application, I turned my attention to another defining feature of the mirror. I blended the Neutral Gray acrylic paint into the Everlasting chalky finish, creating a soft, ethereal gray. This subtle shade was then applied to the five distinct rope-like pieces that encircle the oval shape of the mirror. Finally, I used the remaining Raw Sienna mixture to paint over the delicate scallops and the narrow framed piece situated directly adjacent to the glass on the right side of the image below. This strategic use of varying tones begins to build the multi-layered, aged effect we’re aiming for.
Step 3: Mastering the Dry Brush Technique
To achieve that coveted weathered, aged, and textured look characteristic of shabby chic decor, the dry brush technique is indispensable. I repeatedly applied this method throughout the layering process. The principle is simple yet effective: apply a very small amount of paint to your brush, then dab off almost all of it onto a paper towel or scrap cloth. You want just a tiny whisper of paint remaining on the bristles. This minimal amount of paint is then lightly brushed over the raised areas and textures of the mirror frame.
The beauty of dry brushing lies in its ability to allow the underlying colors to peek through. This creates a soft, diffused effect, adding instant character and a sense of history to the piece. It highlights every contour and detail without completely obscuring the previous layers, resulting in a wonderfully nuanced finish. As you can see in the next images, the technique leaves glimpses of the foundational white peeking through the brushstrokes, contributing to the overall depth and charm.
Step 4: Glazing with Metallic Black for an Antiqued Finish
The final step in our artistic transformation was to introduce an element of antiquity and subtle drama with a metallic black glaze. I took the DecoArt Americana Dazzling Metallics Pearl Black and thinned it significantly with water. This created a translucent, wash-like glaze rather than an opaque paint. I carefully applied this thinned metallic black to the five vertical rope sections of the frame, allowing it to settle into the crevices and subtly darken the recesses, enhancing the carved details.
The subtle shimmer of the metallic black, combined with its darkening effect, immediately brought out the depth and texture of the frame. You can truly appreciate this transformation when looking at the top of the oval; it instantly begins to exude a charming shabby chic vibe. The final touch involved thinning the metallic black even more to an almost watery consistency and then brushing it lightly over the entire frame as a final unifying glaze. This last wash helped to blend all the colors, adding a cohesive aged patina across the entire piece.
Typically, when working with chalky finish paints, a dedicated top coat or sealant is recommended to protect the finish. However, in this particular project, the acrylic paints used for layering and the final metallic glaze provided a sufficient level of sealing. Acrylic paints are inherently durable and water-resistant once dry, offering a protective layer that helps to preserve the integrity of the chalky finish underneath, making them a practical choice for this type of upcycle.
The Grand Reveal: A Mirror Transformed
And just like that, what was once an overlooked, yellowed plastic frame has been reborn into a piece of art! Is it shabby chic? Does it have a vintage soul? I’m not entirely sure how to label its new style, but the transformation is undeniable. It now holds a prominent place in my home, reflecting not only its surroundings but also the essence of personalized decor.
You might notice the beautiful drop cloth pleated curtains that I crafted a few months ago, elegantly reflected in its surface, creating a cohesive and inviting atmosphere. Oh, and the piece next to the oval mirror on the right is the farmhouse chippy mirror that I refinished previously. Murphy’s Law decided to make an appearance, and the actual mirror recently detached from its frame after all that work, but I’m determined to find a way to glue it securely back in place!
The oval frame now boasts a very soft, appealing look with a subtle shimmer from the metallic glaze. This newfound elegance truly enhances the room’s aesthetic.
Beyond its aesthetic appeal, this mirror now possesses a much more robust character, allowing all those intricate twists, turns, and delicate scallops to truly stand out. The layered paints and glazes have given it a substantial, almost carved appearance, a far cry from its former cheap plastic look.
Observe how beautifully the gray paint blends into the sienna tones. I achieved this seamless transition by randomly brushing the watered-down gray directly on top of the sienna-painted scallops, allowing the colors to softly meld and create a natural, aged effect.
Creating Cohesion: Why These Colors?
You might be curious why I opted for this specific combination of gray and peach, rather than a different palette. The truth is, this particular room has been a slow but deliberate work in progress. Gray and peach have naturally emerged as the predominant colors, setting a soft, tranquil, and inviting mood. These shades perfectly complement each other, creating an atmosphere that feels both modern and timeless, while also providing a gentle nod to classic shabby chic aesthetics.
As I continue to furnish and style this space, I’ll be sharing more of the furniture transformations with you. Perhaps I’ll even gather the courage to create a mood board for this room, something I’ve never done before. If you have any advice or tips on how to effectively design a mood board, please share your wisdom in the comments below! Your insights would be greatly appreciated as I strive to bring this room’s vision to life.
And lest we forget the humble beginnings, here’s a final look at what a boring, yellow plastic frame it had been before this delightful intervention… The contrast truly speaks volumes about the power of paint and a little creative vision!
Now for the lingering question: Will this beautifully transformed mirror grace my bedroom walls as a new, cherished accent? Or should I make a bold demand and insist that my kids return the old mirror they so gleefully confiscated? The debate continues!
And that, my friends, is how I’ve embarked on saving a plastic mirror from the yard sale fate!
Maybe…
Okay, now I need your honest opinion. Should I definitely keep this newly transformed plastic oval mirror, or should it still find its way to the yard sale? Your input is invaluable!
And while we’re on the subject, would you be interested in seeing a mood board for this emerging gray and peach bedroom scheme? Let me know your thoughts in the comments!
If you really like what you see, subscribe to my blog and get my adventures delivered directly to your mailbox. The subscription form is conveniently located on the sidebar and at the top of the page. To see my privacy policy, click here.
More Inspiring Upcycle Projects
HOME
Dog Command Center >>
Linking up to these Link Parties
This blog is for entertainment purposes only; my DIY tutorials are not professional advice. Read my full disclaimer here.
I love it when I get your comments and I will try to reply to every one of them. Please do not add a hyperlink to your comment, otherwise it cannot be published.