
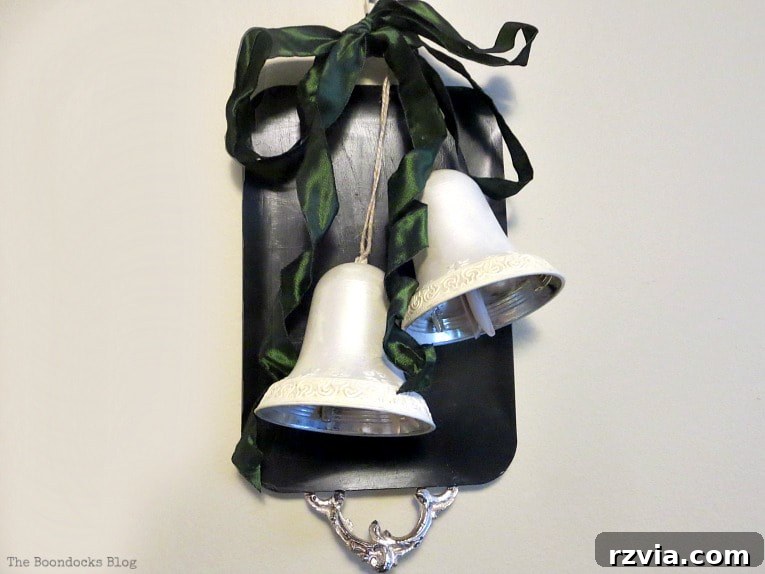
A few weeks ago, I shared the creation of my festive Christmas wreath. It was truly a magnificent piece, overflowing with seasonal charm. However, its abundance, especially those beautiful bells, proved a bit too much for my storm door to close properly. This delightful dilemma led me on a new creative journey: finding a perfect new home for my cherished bells and transforming them into an entirely fresh and enchanting holiday display.
Today, I’m thrilled to unveil the process behind revitalizing these bells, giving them a bright, lovely new look, and showcasing how they found their stunning new purpose as part of a unique holiday decor piece, elegantly paired with an old, forgotten tray. This project is a testament to the magic of upcycling, proving that beloved items can always find new life and beauty.
Disclosure: This post contains affiliate links. If you purchase any of these products through the links provided, I may receive a small commission at no extra cost to you. This helps me continue to bring you inspiring DIY content and lovely decor ideas.
Materials You’ll Need for This Holiday Upcycling Project
Embarking on any DIY transformation requires the right tools and materials. For this particular project, designed to breathe new life into old items and create captivating holiday decor, here’s a list of what I gathered:
This chalky finish paint is a fantastic choice for giving your items a fresh, matte base. Its excellent adhesion means minimal prep work, making it ideal for painting over various surfaces without extensive sanding or priming. The “Everlasting” shade provides a clean, neutral foundation for subsequent layers.
To add a touch of subtle elegance and shimmer, metallic lustre wax is indispensable. The “Frost White” shade provides a delicate, pearlescent glow that catches the light beautifully, enhancing details and adding a sophisticated finish without being overtly glittery. It’s perfect for creating a vintage-inspired holiday look.
This natural decorative wax is excellent for achieving an aged, antiqued look. Applied strategically, it deepens crevices and highlights decorative elements, giving an item the appearance of a cherished antique. It’s a wonderful way to add character and depth to newly painted surfaces, creating a truly unique finish.
Chalkboard paint isn’t just for writing; it’s also a fantastic way to give old items a sleek, modern, and versatile update. The deep “Black Slate” color provides a sophisticated backdrop, perfect for showcasing the bells, and offers the added benefit of being able to write messages or designs on the surface once cured.
And for the rest of the project, focusing on repurposing and assemblage:
- Old plastic bells (the stars of our upcycling show!)
- An old silver tray (your canvas for transformation)
- Twine (for hanging and rustic charm)
- Traditional clothespins (to secure the bells)
- A green ribbon (for a pop of classic holiday color)
These old plastic bells were originally part of a forgotten Christmas decoration, unearthed from a box of accumulated treasures. It’s amazing how over the years, items collect dust and their once-fashionable appeal begins to wane, making them look dated. However, this doesn’t mean they’re destined for the discard pile. With a little creativity and a willingness to upcycle, we can selectively refresh and reuse them, just as I did with these bells. Instead of buying new, consider giving existing items a glorious second act!
As you can observe in the image below, this is where our journey began. The bells were crafted from inexpensive plastic, boasting an unappealing yellowish-gold tint. To be frank, their original state was quite unsightly, lacking any charm or festive appeal.
The How-To: Transforming Old into New Holiday Decor
Let’s dive into the step-by-step process of turning these lackluster items into stunning holiday decor.
Step 1: The Chalk Paint Foundation for the Bells
The initial and most crucial step for the bells was to completely cover their exterior surface with a high-quality chalky type paint. Chalk paint is a fantastic medium for upcycling projects because of its excellent adhesion properties; it sticks wonderfully to various surfaces, including plastic, often without the need for extensive priming or sanding. I applied a few generous coats, allowing ample drying time between each application. This ensured complete coverage, effectively masking the original, uninspiring goldish tinge and creating a uniform, matte base. The “Everlasting” white chalk paint provided the perfect canvas for our subsequent embellishments.
Step 2: Adding a Touch of Shimmer with Metallic Lustre
Once the chalk paint had fully dried and cured, I wanted to introduce a subtle yet elegant shimmer to the bells, moving them beyond a simple matte finish. For this, I carefully applied Metallic Lustre in “White Frost” to the upper, more decorative parts of each bell. This metallic wax is incredibly easy to work with, often applied with just a fingertip or a soft cloth, allowing for precise application and blending. The “White Frost” shade provides a delicate, pearlescent sheen that beautifully catches the light, adding depth and sophistication without overpowering the overall look. You can clearly observe the remarkable transformation in the photograph below, where the bell on the left showcases this lovely, newly added shine, contrasting with the one still in its matte state.
Step 3: Antiquing with Decorative Wax
The final step in transforming my bells into truly “swing-worthy” pieces of art involved adding a touch of decorative wax. I was fortunate enough to win some of Daddy Van’s All Natural Antique Brown Decorative Wax in a giveaway hosted by the incredibly talented Brenda from Unique Junktique. If you haven’t already, I highly recommend checking out Brenda’s blog; her furniture transformations are truly inspiring! This wax has become an instant favorite, and I envision myself using it on countless future projects.
Applying a thin layer of this antique brown wax allows it to settle into the nooks and crannies, accentuating any existing details or textures on the bells. It provides a beautiful, aged patina that gives the bells a sense of history and character. This technique is perfect for creating a vintage-inspired holiday look, making newly painted items appear as though they’ve been cherished heirlooms for generations. It adds a wonderful depth that truly makes the design elements pop.
The decorative wax, meticulously applied, gives a beautiful, aged aesthetic to the bottom rim of the bells. More importantly, it dramatically enhances and makes the intricate designs on the bells stand out much more prominently, transforming them into pieces with true vintage appeal.
Step 4: Repurposing the Old Tray
Once my bells were beautifully transformed, and I had accepted the unfortunate reality that they were simply too voluminous for the storm door, I began rummaging through my collection of forgotten items. My eyes landed on this old tray, a relic from years past. Its design featured a curious mix of diagonal stripes alongside buffed circles, making it difficult to pinpoint its exact aesthetic decade – was it channeling the groovy seventies or the vibrant eighties? One thing was undeniably clear: the tray was in a rather sad state of disrepair and desperately needed a new purpose, a second chance at life.
I reached for my trusty chalkboard paint in “Black Slate.” This paint is not only incredibly durable but also offers a beautifully smooth, matte finish that can elevate almost any item. I applied several coats to the tray, ensuring full and even coverage, completely masking its dated appearance. While I could have proceeded to “cure” the paint to truly function as a writable chalkboard surface, I decided to leave it as a plain, elegant black for this particular project. This allows for a clean, minimalist backdrop that truly lets the bells shine. However, the versatility of chalkboard paint means that future holiday seasons or decor changes could easily see it transformed into a functional chalkboard, ready for personalized messages or seasonal drawings.
I absolutely adore the newfound, distressed beauty of the tray. The matte black finish provides a sophisticated, versatile backdrop that instantly modernizes its look. The beauty of using chalkboard paint is its inherent flexibility: I can always decide to add chalk art to it and cure the surface to fully transform it into a functional chalkboard whenever I desire, adding another layer of personalization and charm to my home decor.
Step 5: Assembling Your Unique Holiday Display
To elegantly finish off the look and bring all the elements together, I threaded lengths of rustic twine through the transformed bells, securing them with traditional wooden clothespins. The twine adds a lovely, natural texture that complements the aged appearance of the bells. Finally, I tied a vibrant green ribbon around the twine, providing a classic pop of festive color that instantly evokes the spirit of the holidays. The simplicity of this arrangement allows the intricate details of the bells and the sleekness of the tray to truly stand out, creating a cohesive and charming display.
While the overall design of the old tray might have been a bit of a mixed bag, oscillating between a seventies and eighties aesthetic, I always appreciated the aged beauty and ornate detailing of its handle. Now, beautifully contrasted against the sleek, matte black of the chalkboard paint, the handle’s antique charm truly stands out and becomes a feature, rather than being overshadowed by the tray’s formerly dated appearance. The transformation is complete, and it’s a delightful fusion of old-world charm and refreshed elegance.
This project truly encapsulates everything I adore about crafting and home decor. It features beautifully upcycled bells, a creatively repurposed tray, and absolutely overflows with holiday spirit. What more could one possibly ask for in a festive DIY endeavor? It’s a perfect example of how a little vision can transform forgotten items into cherished holiday treasures.
And that, my dear readers, is the story of how I was able to successfully upcycle my beloved bells, finding them a fantastic new display spot where they wouldn’t be squished, while simultaneously giving that rather dated tray a chic, new lease on life. I genuinely believe it creates a magnificent and unique piece of DIY holiday decor!
I sincerely hope you’ll take a moment to visit Brenda’s incredible blog, Unique Junktique, and explore her inspiring work. She possesses an extraordinary talent for transforming furniture and has a keen eye for breathing new life into forgotten pieces. Her blog is a treasure trove of creative ideas and expert tips that you won’t want to miss.
If you enjoyed this upcycling adventure and want to discover more creative projects and decor inspirations, please consider subscribing to my blog. You’ll receive all my latest adventures and DIY tips directly in your mailbox! The subscription form is conveniently located on the sidebar and at the top of the page. Rest assured, your email address will never be shared with any third party.
More Ideas for the Holidays:
<< Sweet Inspiration Link Party #87 HOME 12 Holiday Link Party Features >>
Linking up to these Link Parties
This blog is intended for entertainment purposes only; my DIY tutorials should not be taken as professional advice. Please read my full disclaimer here.
I genuinely appreciate your comments and make every effort to reply to each one. Please refrain from adding hyperlinks to your comments, as they cannot be published if included.