
Transform Your IKEA LACK Shelf: A Stunning Book Page Decoupage Makeover
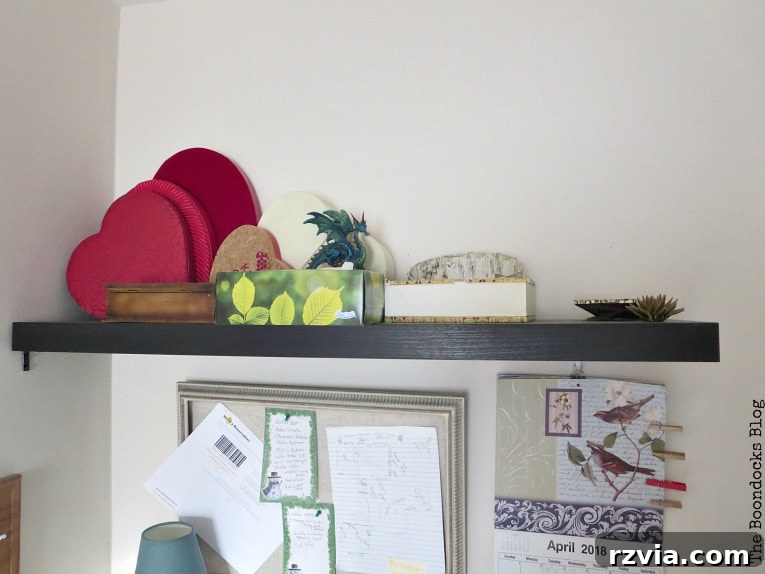
Every home has that one piece of furniture that’s incredibly useful but just doesn’t quite fit the aesthetic you’re aiming for. For me, it was a dark, sturdy shelf inherited from my son when he moved out. Positioned conveniently above his computer desk, it offered ample storage, but its somber color cast a heavy shadow on the vibrant, light-filled atmosphere I envisioned for my space. This wasn’t just any shelf; it was an opportunity for a creative transformation, a chance to infuse personality and charm into an everyday object.
As an enthusiastic upcycler, I knew this shelf was destined for a radical new look, one that truly reflected my style. The question wasn’t if I would change it, but how. Most people might think of reaching for a paintbrush, a common and effective method for furniture makeovers. But after tackling numerous painting projects, I was ready for something different, something with a unique texture and story.
So, did I simply paint it?
Absolutely not! Instead, I chose a more artistic and surprisingly simple technique: decoupage, using old book pages. This method not only offers a distinctive visual appeal but also provides an eco-friendly way to repurpose materials and add a touch of vintage elegance to any piece.
Indeed, the chosen technique was decoupage! This method allowed me to achieve a truly distinctive finish, one that moved beyond the typical painted surface. Plus, frankly, a break from painting felt long overdue after transforming so many other pieces of furniture. This particular shelf, an IKEA LACK, is celebrated for its minimalist design and the illusion of floating on the wall. Measuring a generous 43 inches across, it provides substantial surface area. My clever son had even added a side bracket for extra stability, ensuring it wouldn’t come tumbling down – a smart move that now allows me to load it up to its full potential.
While I might have initially dreamed of acquiring something with a rustic industrial charm or a functional design with baskets and hooks, the reality of DIY is often about embracing what you have and turning it into something extraordinary. This project proves that with a little creativity and effort, even an everyday item like an IKEA LACK shelf can become a focal point, telling its own unique story.
Why Decoupage with Book Pages? The Allure of a Literary Makeover
Decoupage offers a wonderful alternative to traditional painting, especially when you desire a finish that’s rich in texture, character, and visual interest. Using book pages adds a layer of history and charm, transforming a plain object into a conversational piece. It’s also an excellent way to upcycle old, unreadable books, giving them a new purpose and artistic life.
Gather Your Tools: What You’ll Need for This Transformation
Before diving into the creative process, gathering all your materials ensures a smooth and enjoyable DIY experience. For this book page decoupage project, the essentials are surprisingly simple, yet the impact they create is profound.
- Mod Podge: Your Go-To Decoupage Medium – I highly recommend Mod Podge for its versatility. It acts as an adhesive, a sealer, and a finish, all in one. Its quick-drying, non-toxic formula makes it ideal for home projects.
- Alternative Adhesive: Elmer’s Glue – If Mod Podge isn’t readily available, a mixture of Elmer’s Liquid School Glue and a small amount of water (about 3 parts glue to 1 part water) can serve as an effective substitute, offering a similar adhesive quality.
- Book Pages: The Heart of Your Design – Select an old book that you don’t mind repurposing. For this project, I used pages from a book I genuinely disliked, ensuring no literary masterpieces were harmed. The choice of book can significantly impact the final look – consider font size, paper color, and overall aesthetic.
- Application Tool: Foam Brush – A foam brush is perfect for applying Mod Podge smoothly and evenly, minimizing brush strokes and ensuring a clean finish.
The How-To: A Step-by-Step Guide to Your Shelf Decoupage
Step 1: Preparing Your Book Pages
I began by carefully cutting up the book pages. For a softer, more organic edge that blends beautifully when overlapped, I recommend folding the page and then tearing it by hand. This technique eliminates the harsh lines that scissors would create, giving your finished project a more rustic and integrated feel. Remember, the book chosen for this project was truly unredeemable in terms of its content. I’d even repurposed some pages to cover the glass sliding doors on my mid-century cabinet. With plenty of pages remaining, it was a perfect opportunity to give them a new, decorative life. Rest assured, no valuable literature was harmed in this creative endeavor!
Step 2: Initial Application
With your pages ready, it’s time to start the decoupage. Using your foam brush, apply a thin, even layer of Mod Podge directly onto a section of the shelf surface where you intend to place your first page. Avoid applying too much adhesive at once, as it can dry before you place the page or cause excessive bubbling. Gently position a book page onto the wet Mod Podge, taking care to align it as desired. Smooth the page down with your fingers or a clean, dry foam brush, working from the center outwards to remove any air bubbles and ensure firm adhesion. Overlapping pages slightly can create an interesting mosaic effect, enhancing the vintage appeal.
Step 3: Mastering the Edges and Corners
When you reach the edges of the shelf, allow the book page to extend beyond the edge. Apply Mod Podge to the underside of the overhang and carefully fold the page over the edge, smoothing it down firmly. This creates a seamless transition and a clean finish.
Corners can be a bit tricky, but with a simple technique, you can achieve a professional look. When a page meets a corner, cut it diagonally from the outer edge towards the corner point. Then, fold the top piece down neatly, much like you would when wrapping a gift. Next, fold the adjacent piece over it, creating a crisp, overlapping corner. This method eliminates bulk and ensures a clean, sharp corner.
Step 4: Wrapping the Entire Shelf
Continue the process of applying pages over the top, around the edges, and underneath the shelf. For the underside, I found it easiest to start from the inside edge and work my way outwards. This ensures that the most visible top and front surfaces have the cleanest finish, with any necessary overlaps or adjustments hidden beneath.
Step 5: Drying and Sealing for Durability
Once all the book pages are applied, it’s crucial to let the adhesive dry completely. I recommend waiting for several hours, or even overnight, to ensure the pages are thoroughly set. Once dry, apply several coats of Mod Podge over the entire decoupaged surface, especially the top. This acts as a protective sealant, making the shelf durable, easy to clean, and resistant to minor wear and tear. Allow each coat to dry fully before applying the next, creating a strong, lasting finish.
The Grand Reveal: Decorating Your Transformed Shelf
With the decoupage complete and the sealant cured, it was time for the most rewarding part: styling the newly transformed shelf. The contrast between the old dark finish and the new light, text-filled surface was remarkable. My decorative items, which previously blended into the dark background, now truly stand out, almost appearing as if they are floating – much like these elegant wall-mounted cube displays!
What the camera might not fully capture is how perfectly the soft cream tones of the book pages harmonize with the wall color, creating a cohesive and serene backdrop. The entire transformation turned out even better than I had envisioned, adding a subtle touch of vintage sophistication without overwhelming the space.
To the left, you can spot the small bracket my son thoughtfully added. I painted it a matching cream color to ensure it blends seamlessly with the decoupaged shelf and the wall, further enhancing the floating illusion and clean lines.
To my left, a cork board holds various wires for phones and cameras, neatly organized with push pins – simple yet effective. The framed board on the wall, once a festive Christmas decor piece, now serves as a versatile display. I even keep a collection of mini clothes pins on the calendar, always ready for attaching notes or photos. It’s a dynamic, evolving space, constantly adapted to my creative needs.
You can now truly appreciate why I was so keen to lighten up that dark shelf. Its former black presence felt heavy and almost oppressive, as if it might topple over at any moment. Now, adorned with the soft, literary texture of book pages, it feels airy, bright, and utterly delightful. This simple DIY project has completely altered the mood and functionality of this corner of my office, making it a much more pleasant place to work and create.
With simple yet impactful ideas like this decoupage shelf makeover, one might optimistically think these projects will be done in no time. Ha! I sincerely hope you don’t actually believe that – the creative process, while rewarding, often unfolds at its own pace!
Your input is invaluable! Please share your thoughts on what ought to be done with that desk. Every idea helps fuel the next phase of this creative journey.
Linking up to these Link Parties
This blog is for entertainment purposes only; my DIY tutorials are not professional advice. Read my full disclaimer here.
I love it when I get your comments and I will try to reply to every one of them. Please do not add a hyperlink to your comment, otherwise it cannot be published.