
DIY Children’s Wall Art: From Sailboat Keepsake to Treasured Room Decor
Have you ever stumbled upon an old item and immediately seen its potential for a beautiful new life? That’s exactly what happened to me the other day while tidying up my creative stash. It wasn’t tucked away in the deepest corners of the basement, but rather nestled amongst forgotten treasures, waiting for its moment to shine. What was this mysterious item, you ask? A unique, sailboat-shaped piece of wood, brimming with a forgotten story and endless possibilities.
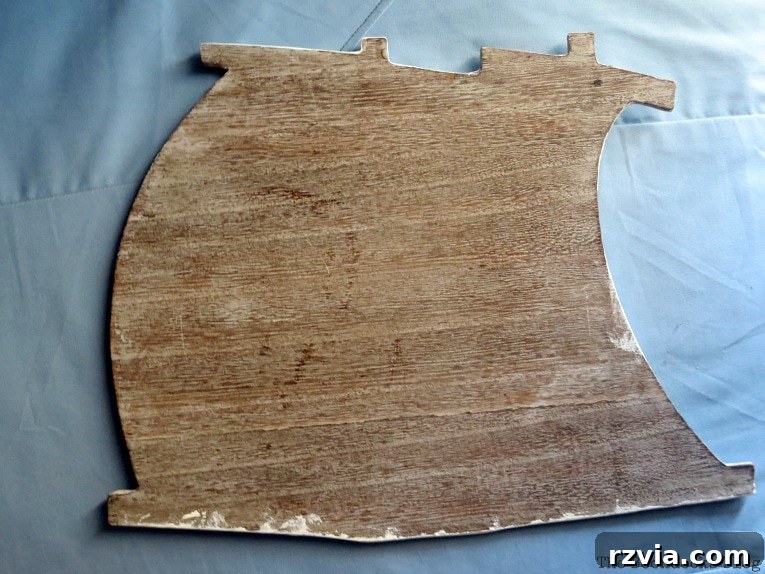
This wooden sailboat holds a whimsical tale from my daughters’ elementary school days. One year, their school pictures took an exceptionally creative turn. Instead of conventional frames, the photos were charmingly affixed to these wooden sailboat bases. While initially a delightful novelty, over the years, these pictures became a source of playful embarrassment for my now-grown girls. With a shared giggle, we carefully peeled away the photos, leaving behind this beautifully shaped wooden silhouette – a blank canvas awaiting a fresh purpose.
As a seasoned enthusiast of creative challenges and sustainable living, I couldn’t resist the urge to repurpose this unique wooden piece. My home embraces the philosophy that nothing truly goes to waste, and every item holds the potential for transformation. Thus, a new mission was born: to convert this sentimental scrap into a charming, easy-to-make children’s wall art. Today, I’m thrilled to guide you through the simple steps of how I transformed this relic into a personalized masterpiece, perfect for adding a touch of whimsy to any child’s room. Get ready to unleash your creativity and give new life to forgotten objects!
To truly appreciate this transformation, let me provide a little more context about the initial form of this unique wooden piece. Originally, the sailboat-shaped ‘sail’ part was designed to be securely wedged into a larger sailboat base. If you look closely at the center of the wooden boat base (which I also repurposed in a previous project, my seaside art project, if you’re curious!), you’ll notice two small wooden protrusions. These were the clever anchors where the ‘sail’ component was snugly fitted. There was also a minor wooden attachment at the very bottom of the sail piece itself, which I thoughtfully removed. My aim was to refine its shape, making it more streamlined and distinctly sail-like, perfectly poised for its artistic voyage.
This piece’s journey from a school photo display to a standalone work of art is a testament to the versatility of wood and the endless possibilities of upcycling. Instead of discarding it, I saw an opportunity to give it a new narrative, a chance to continue its life not as a forgotten keepsake, but as a vibrant, cherished item in a new setting. It’s a reminder that beauty and utility can often be found in the most unexpected places, waiting for a creative eye to unlock their potential.
Gather Your Creative Toolkit: Materials for Your DIY Children’s Wall Art Project
Embarking on any DIY project is always exciting, and gathering your materials is the first step towards bringing your vision to life. For this charming children’s wall art, you’ll find most items are easily accessible, and you likely already have some in your crafting stash. Here’s a detailed list of what you’ll need, along with some helpful tips for selection:
- Wooden Base (Sail or Scrap Wood): The star of our project! While I used my unique sailboat-shaped wood piece, any clean, smooth piece of scrap wood can be transformed. Think about interesting shapes, leftover wood from other projects, or even a simple wooden plaque. The key is a surface that offers a good canvas for your design.
- Acrylic or Chalk Paint: I opted for white chalk paint to give it a soft, matte, and slightly rustic finish, perfect for a child’s room. Acrylic paint works equally well and offers a wider range of vibrant colors. Consider the desired aesthetic and the existing decor of the room where the art will hang.
- Chosen Image: This is where personalization truly begins! I found a delightful image from an old Winnie the Pooh children’s book, but your options are limitless. You could use printouts from the internet, pages from beloved storybooks, magazine cutouts, or even original drawings. Ensure the image is slightly smaller than your wood piece to allow for a border.
- Sharpie Marker (or Acrylic Paint Pen): For adding personalized details like a name, date, or a sweet message. A fine-point Sharpie works wonderfully for clear, crisp lines, but acrylic paint pens offer more opacity and a broader range of colors.
- Mod Podge (Matte or Gloss Finish): This all-in-one glue, sealer, and finish is indispensable for decoupage projects. It will secure your image to the wood and provide a protective, durable layer over the entire piece. Choose matte for a softer look or gloss for a subtle sheen.
- Twine (or Ribbon/Wire): For creating a charming hanger. Natural twine adds to the rustic, handmade feel, but you could also use a decorative ribbon that matches your color scheme or even a thin craft wire for a different aesthetic.
- Paint Brushes: Various sizes for applying paint and Mod Podge smoothly.
- Scissors: For cutting out your chosen image.
- Pencil: For light markings if needed.
- Drill (optional): If your wood scrap needs holes for hanging.
Having all your materials ready before you begin will ensure a smooth and enjoyable crafting experience. Let’s get started on bringing your unique vision to life!
Crafting Your Masterpiece: A Step-by-Step Guide to Children’s Wall Art
Now that you’ve gathered all your supplies, it’s time to dive into the creative process! This project is designed to be straightforward and enjoyable, even for novice crafters. Follow these steps to transform your humble piece of wood into a vibrant, personalized wall decoration.
Step 1: Preparing Your Canvas with a Splash of Color
Our first step involves giving the wooden base a fresh, clean look and a foundation for the artwork. Using a good quality paintbrush, apply two coats of your chosen paint to the entire wooden piece. I opted for white chalk paint, and deliberately applied it with a somewhat “haphazard” technique. This wasn’t laziness; it was a conscious choice to create a charming, slightly distressed, and wind-swept appearance, perfectly complementing the sailboat theme. Don’t worry about achieving perfect, streak-free coverage; embrace the imperfections as they add character and a handcrafted feel.
Ensure each coat of paint dries completely before applying the next. Depending on your paint type and local humidity, this could take anywhere from 15 minutes to an hour. Proper drying time prevents stickiness and ensures an even finish. This base coat is essential not only for aesthetics but also to provide a smooth surface for the next step, allowing your chosen image to truly pop.
Step 2: Choosing and Affixing Your Beloved Image
Once your paint is completely dry, it’s time for the most heartwarming part: selecting and adding your chosen image. For this particular project, I delved into an old treasure trove – a Winnie the Pooh children’s book that hadn’t seen the light of day in years. The moment I saw sweet Winnie, memories flooded back of watching countless Pooh movies with my girls when they were little. Winnie the Pooh holds a special place in many hearts, mine included, making him a perfect, universally loved subject for children’s decor.
Carefully cut out your chosen image. I opted for an elegant oval shape, ensuring it would sit perfectly within the contours of my wooden sail. Before gluing, gently place the cut-out image on your painted wood to confirm its size and positioning. This dry run helps prevent any misplacements. Once satisfied, apply a thin, even layer of Mod Podge directly onto the back of your image. Carefully place the image onto the wood, pressing down gently from the center outwards to smooth out any air bubbles or wrinkles. A credit card or a specialized brayer can be helpful for this step, ensuring a perfectly flat application.
Allow the Mod Podge to dry for about 15-20 minutes. It will become clear, creating a seamless bond between the image and the wood. This step is crucial for both the aesthetic appeal and the longevity of your wall art.
Step 3: Adding a Personal Touch and Sealing Your Design
The true magic of this project lies in its personalization. Since this particular piece was destined to be a heartfelt gift for a very handsome young fellow, I wanted to make it uniquely his. I chose to hand-letter his name in Greek, a nod to heritage and a truly special detail. A simple Sharpie marker proved to be the perfect tool, allowing for clear and precise script. This is your chance to get creative! You could write the child’s name, a significant date, a short, sweet quote, or even a whimsical message. Feel free to be as understated or as elaborate as you wish.
Alternatives to a Sharpie include acrylic paint pens for bolder colors, stencils for a perfectly uniform look, or even tiny adhesive letters for a dimensional effect. Whatever method you choose, take your time to ensure the lettering is neat and centered. Let any ink or paint dry completely before moving on.
Once the personalization is dry, it’s time to protect your beautiful work. Apply a generous, even coat of Mod Podge over the entire surface of the wooden art piece, including over the image and your hand-lettered text. This layer acts as a sealant, protecting the paint and paper from moisture, dust, and general wear and tear, ensuring your wall art remains vibrant for years to come. Allow this final layer of Mod Podge to dry thoroughly, creating a durable, clear finish.
Step 4: Crafting the Perfect Hanger
To transform this beautiful creation into a functional piece of wall art, you’ll need a way to hang it. I envisioned a rustic wall hanging, so I simply wrapped some natural twine around the upper edges of my wooden ‘sail.’ The existing shape of the sailboat lent itself perfectly to this method, allowing the twine to create a lovely, secure loop.
If you’re using a flat piece of scrap wood, you have a few excellent options:
- Drilled Holes: Use a small drill bit to carefully create two holes near the top corners of your wooden piece. Thread your chosen twine, ribbon, or even a decorative wire through these holes, tying secure knots on the back.
- D-Ring Hangers: These small metal rings with screws are easily found at craft or hardware stores. Simply screw two D-rings into the back of your wood near the top, then attach your twine or wire between them.
- Sawtooth Hangers: For a simpler, more direct hanging method, a sawtooth hanger can be nailed or screwed into the top center back of your wood. This allows the piece to hang flush against the wall.
No matter which method you choose, ensure it’s robust enough to securely hold your art. For children’s rooms, safety is paramount, so double-check all knots and attachments.
With the twine securely fastened and a pretty knot tied at the top for easy hanging, the personalized children’s wall art was complete!
The Joy of Giving: A Personalized Masterpiece Unveiled
And just like that, a discarded piece of wood was transformed into a heartfelt, personalized wall art for a very special young fellow! There’s an unparalleled satisfaction in creating something with your own hands, especially when it’s destined to bring joy to someone else. I couldn’t help but hope he would appreciate the charm of Winnie the Pooh as much as I do. Of course, he will! Who doesn’t adore Winnie? Even grumpy old Rabbit can’t resist his charm!
This finished piece is more than just decor; it’s a unique narrative. It tells a story of creative reuse, of turning the old into new, and of thoughtful personalization. Imagine this charming sailboat hanging in a child’s room, adding a whimsical touch and perhaps even inspiring dreams of adventures in the Hundred Acre Wood. It’s a gift that carries not only the image of a beloved character but also the warmth and effort put into its creation, making it far more meaningful than any store-bought item.
Handmade gifts are treasures that leave a lasting impression. They represent time, thought, and a personal connection that mass-produced items simply cannot replicate. This easy children’s wall art project is a testament to how simple materials, combined with a little imagination, can produce something truly extraordinary.
Embracing Imperfection: The Art of the Haphazard Brush Stroke
One of the charming details of this wall art, which truly brings its character to life, is the intentional “haphazard” application of paint. If you observe closely in the image below, you’ll see the subtle texture and visible brush strokes. This wasn’t a mistake; it was an artistic decision to evoke a specific feeling – a wind-swept, nautical vibe. It gives the impression that the wooden sail has weathered many journeys, perhaps even carried a relaxed captain enjoying the open sea. (Full disclosure: I’ve never actually been on a sailboat in my life, but a crafter can dream, right?)
This technique adds depth and a tactile quality that a perfectly smooth finish might lack. It celebrates the handmade nature of the piece and adds to its unique story. Don’t be afraid to experiment with your brushwork; sometimes, the most ‘imperfect’ strokes create the most authentic and appealing results. It’s all part of the creative journey and adding a personal touch to your DIY projects.
The beauty of this project lies not only in its ease but also in its versatility. I deliberately chose a simple color palette and design for this wall art, primarily white with the colorful image of Winnie the Pooh. My intention was to create a piece that would seamlessly integrate into the recipient’s room without clashing with existing decor or overwhelming the space. Simple designs often offer timeless appeal and adaptability, making them perfect for children’s rooms where tastes and themes might evolve over time.
Consider the overall aesthetic of the room where your art will hang. Is it vibrant and playful, or calm and muted? Matching your color choices and design complexity to the room’s existing palette ensures that your handmade wall art becomes a harmonious addition rather than a competing element. This thoughtful consideration elevates a simple craft into a curated piece of decor.
Quick, Easy & Uniquely Yours: The Perfect DIY Gift Idea
When time is of the essence, finding a thoughtful yet quick gift can be a challenge. That’s where this project truly shines! From start to finish, excluding drying times, this entire piece of personalized children’s wall art can be completed in approximately 15-30 minutes. It’s an incredibly satisfying project that yields impressive results with minimal effort, making it ideal for those moments when you need a creative gift in a pinch.
The inherent beauty of this craft lies in its remarkable adaptability. While I used a specific image and shape, the personalization possibilities are endless. Imagine adapting this concept for:
- Baby Shower Gifts: With the baby’s name and birth date.
- Birthday Presents: Featuring their favorite cartoon character or animal.
- Nursery Decor: Matching the theme with soft colors and gentle imagery.
- Holiday Gifts: Customized with festive images and names.
The image you choose to decoupage and the personal details you add will completely transform the piece, making each creation truly one-of-a-kind. It’s a wonderful way to express creativity and craft a gift that will be cherished long after the occasion has passed.
Your Next Upcycling Adventure Awaits!
So, the next time you’re racking your brain for a unique, thoughtful, and budget-friendly gift idea, remember this easy children’s wall art project! It’s not just “Winnie approved,” it’s also a fantastic way to create something meaningful that brings joy. And, as an added bonus, my girls are absolutely thrilled that their elementary school pictures are no longer adorning this particular piece of wood!
This project embodies the heart of upcycling: transforming forgotten or discarded items into something beautiful and functional. It’s a creative way to reduce waste, save money, and infuse your home (or someone else’s) with unique, handmade charm. While this sailboat wood piece might be one of the more unusual items I’ve repurposed, it’s a wonderful reminder that inspiration can strike anywhere, from the most mundane objects to the most sentimental keepsakes.
Have you ever stumbled upon wood, or any material, in such an unusual or specific shape and felt compelled to give it a new life? I’d love to hear about your most unique repurposing discoveries in the comments below! Share your stories and inspire fellow crafters. Every piece of salvaged material holds a story, and every upcycled creation adds a new chapter.
For more unique upcycling projects, creative crafts, and home decor inspiration delivered directly to your inbox, I invite you to subscribe to my blog. Join our community and receive exciting new adventures and tutorials twice a week. You can find the subscription form conveniently located on the sidebar, and rest assured, your email address will always be kept private and never shared with any third party.
Explore More Creative Gift Ideas!
<< Repurposing Tire Rim into Wind Chime
HOME
Sweet Inspiration Link Party#54 >>
Linking up to these Link Parties.
Please note: This blog is intended for entertainment purposes only; my DIY tutorials are not professional advice. Always exercise caution and common sense when undertaking projects. Read my full disclaimer here.
I truly cherish your comments and always endeavor to reply to them or visit your wonderful blogs in return. To ensure your comment is published, please refrain from adding hyperlinks directly within your comment. Thank you for being a part of our creative community!