
Transform Your Plain Box into a Vintage Masterpiece: An Old World DIY Tutorial
Welcome, fellow DIY enthusiasts! Today, I’m thrilled to share a captivating project that breathes new life into an ordinary object – a plain wooden box. As someone constantly experimenting with paints and crafting supplies, I find immense joy in discovering fresh techniques and sharing them with you. This particular project offers a fantastic way to elevate a simple item into a beautiful, personalized keepsake with a rich, “old world” aesthetic.
This humble box has been a part of my life for many years, diligently safeguarding beloved photos and cherished cards. But as I embarked on a significant move to Greece, I decided it was time for this box to begin a new journey as a thoughtful gift. However, it certainly couldn’t be gifted in its original, worn condition. It deserved a grand transformation!
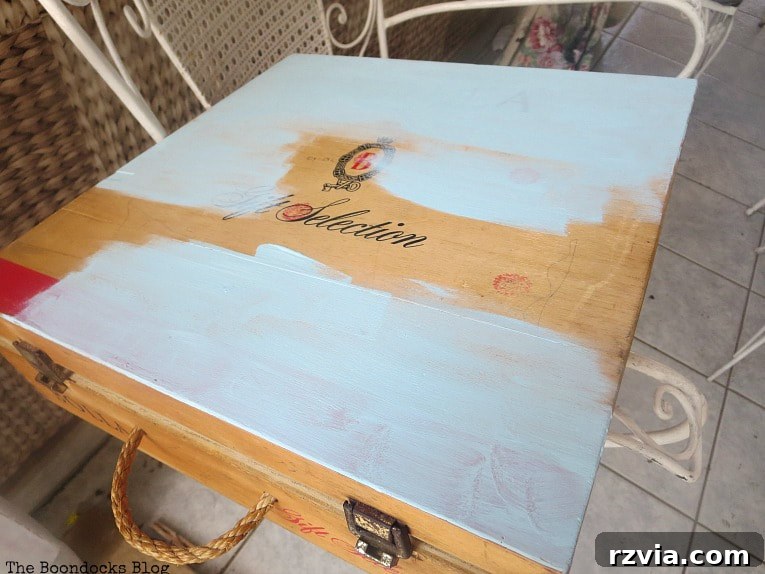
Please forgive the scarcity of “before” photos. In the whirlwind of packing and preparing for our move from Greece, I was so immersed in the creative process that documenting every step visually took a backseat. You might even notice I started painting before remembering to snap a proper ‘before’ shot! This project was completed amidst the beautiful chaos of relocation, adding an extra layer of sentiment to its story.
Today, I’ll walk you through the process of giving a plain wooden box an enchanting “old world” look. Not only will you learn some exciting techniques, but you might also find the inspiration to tackle your own last-minute creative endeavors, even when life feels a bit hectic! So, let’s dive into the magic of crafting a vintage-inspired treasure.
Essential Materials for Your Old World Box Makeover
Before we begin our creative journey, gather these essential supplies. Each item plays a crucial role in achieving that coveted aged, vintage aesthetic:
- A sturdy wooden box (any size will do, depending on your project)
- DecoArt Americana Chalky Type Paint (I used a custom blend of “Everlasting” for a crisp white and “Treasure” for a beautiful turquoise hue)
- DecoArt Americana Cream Wax in Deep Brown (this is key for the aged effect)
- A small sponge (a kitchen sponge cut to size works perfectly if you don’t have dedicated craft sponges)
- Mod Podge (matte finish is ideal for a vintage feel)
- Pages from an old book or maps (look for interesting illustrations, maps, or text that fit your “old world” theme)
Having all your materials ready ensures a smooth and enjoyable crafting experience.
Step-by-Step Guide: Crafting Your Old World Box
1. The Chalk Paint Foundation: Laying the Base
Our first step is to establish a beautiful, muted base using chalky-type paint. I applied two full coats to the entire exterior of the box, ensuring even coverage. For an authentic distressed look, don’t worry too much about perfection; slight inconsistencies can add to the charm. I used a mixture of “Everlasting” white and a “Treasure” turquoise, blending them to create a unique, soft, seafoam-like color that evokes a sense of age and tranquility. The beauty of chalk paint lies in its matte finish and excellent adhesion, making it ideal for achieving a vintage aesthetic.
The inside of the box received the same treatment, except for the top interior lid, which I painted in a clean “Everlasting” white. This contrast creates a pleasing visual break and highlights the decoupage work we’ll add later.
2. The Art of Aging: Applying Deep Brown Cream Wax
This is where the true “old world” magic begins! The next crucial step is to apply a protective, yet transformative, finish using DecoArt’s Americana Cream Wax in Deep Brown. Typically, when working with colored waxes, it’s recommended to apply a clear wax first to create a barrier and prevent the colored wax from staining the underlying paint. However, I had a very specific vision for this box, and I was determined to follow it!
I deliberately wanted the brown wax to deeply stain and interact with the chalk paint, creating an authentically aged and weathered appearance. For this project, the more stain, the better! My goal was a genuinely vintage, time-worn look, and this deep brown wax was the perfect medium to achieve that. You’ll soon see the stunning depth and character it adds.
Without any fancy tools on hand – remember, I was in the midst of packing! – I simply cut a small piece from a regular kitchen sponge. Dipping it into the rich brown wax, I then dragged it across the box, applying varying pressure. In some areas, I layered the wax more heavily for a darker, more concentrated stain, while in others, I used a lighter touch for a subtle aged effect. I continued this process, blending and working the wax until I achieved the desired level of distressed charm. This technique allows for complete control over the aging process, letting you customize the finish to your preference.
3. Decoupage Delight: Adding Vintage Imagery
Initially, my plan involved attempting a paper print transfer onto wood. However, as is often the case in DIY projects, plans sometimes need to pivot! My printer decided to stage a protest, rendering that option impossible. Furthermore, I was hesitant to experiment with a print transfer using regular paper, as the ink adhesion can be unpredictable compared to prints from dedicated books or specialty papers. The last thing I wanted was to accidentally damage this sentimental box, which had become somewhat of a family heirloom.
So, I opted for a safe and equally charming alternative: decoupage. This tried-and-true method allowed me to incorporate beautiful vintage images without the risk. I carefully selected pages from old books and maps that resonated with the “old world” theme. Decoupage is incredibly forgiving, especially when working with sturdier paper, unlike some of my previous Mod Podge adventures with delicate napkins!
4. Sealing the Story: Mod Podge Layers
With the vintage images carefully arranged and adhered, a few coats of Mod Podge later, the exterior transformation was complete. On the lid, you can see how I pieced together a charming boat image from two separate book pages, doing my best to create a seamless illustration. The beauty of decoupage with substantial paper is how easily it adheres and conforms to the surface.
I applied Mod Podge directly to the back of each paper cut-out, carefully positioning it onto the box and smoothing out any bubbles or wrinkles with my fingers or a soft brush. Once the initial layer had dried completely, I added two more coats of Mod Podge over the entire surface of the decoupaged areas. This not only securely seals the paper in place but also provides a durable, protective finish. While the wax itself acts as a sealant, applying Mod Podge over it ensures a consistent finish across the entire decoupaged area and adds an extra layer of protection, creating a beautiful, unified look.
5. The Inner World: A Surprise Awaits
The true magic of this gift box unfolds on the inside. Since I intended this as a gift for a young boy, and knowing his adventurous spirit, I curated appropriate images to complement the exterior’s old world feel. The interior becomes a hidden treasure, enhancing the overall charm and personalization of the gift.
The inside of the lid features a really old map of Greece, which I believe I salvaged from an antique geography textbook. Its faded colors and intricate details immediately transport you to a bygone era. The worn border of the map stands out beautifully against the clean “Everlasting” white paint, creating a striking visual contrast that enhances its historical appeal.
The bottom of the box features an endearing illustration from an old children’s reading book, likely dating back to the 1960s – which certainly makes me feel a bit vintage myself! The little boy’s classic overalls perfectly complement the light turquoise paint of the box’s interior, creating a harmonious and nostalgic scene that adds to the charm.
6. The Beauty of the Aged Finish
Below, you can truly appreciate the intricate details of the brown wax and how it has masterfully aged the box, imbuing it with that desired “old world” feel I was so eager to achieve. The wax settles into the crevices and brushstrokes of the chalk paint, creating a subtle yet impactful distressed appearance that tells a story of time and character.
This brown cream wax was a new product for me to experiment with, and I absolutely loved using it to create this specific effect. As you know, venturing into new techniques is my idea of a creative thrill! While this risky move paid off beautifully, I still have that paper print transfer idea simmering. Now that I have a reliable printer, I’ll definitely be tackling that project in the near future, eager to explore another dimension of crafting.
Conclusion: Embrace the Joy of Creative Transformation
I hope you’ve enjoyed learning something new today and feel inspired to give your own plain boxes an enchanting “old world” look. The beauty of DIY lies in the exploration of new products and techniques. There’s so much fun to be had in experimenting and pushing creative boundaries, especially when there’s such a vast array of crafting supplies available.
This transformed box made a wonderful, personalized gift for a young adventurer, a unique keepsake that holds both memories and new stories. Do you enjoy decorating boxes and repurposing them as gifts or for stylish storage solutions? Share your thoughts and ideas in the comments below!
Explore More Box Transformation Projects:
<< Wooden Wall Hanger
HOME
Sweet Inspiration Link Party #81>>
Linking up to these Link Parties
This blog is for entertainment purposes only; my DIY tutorials are not professional advice. Read my full disclaimer here.
I love it when I get your comments and I will try to reply to every one of them. Please do not add a hyperlink to your comment, otherwise it cannot be published.