
Transforming a Shared Bedroom: A Budget-Friendly Black and White Sanctuary
Embarking on a room transformation project, especially with a minimal budget, presents a unique and exciting challenge. The key to success often lies in embracing the ‘Do It Yourself’ philosophy, combined with a deep understanding of the room’s occupants. For parents creating a shared space, this means finding a harmonious balance between individual tastes and a cohesive aesthetic. Over the past two months, I’ve shared several furniture makeover journeys, pouring sweat and effort into each piece. Now, the culmination of that hard work is finally ready to be unveiled: a complete tour of my daughters’ stunning, mostly black and white bedroom.
This journey wasn’t just about painting walls or revamping old furniture; it was about crafting a tranquil sanctuary that reflects the personalities of two distinct individuals while maintaining a sense of calm and unity. From the moment we envisioned this space, every decision was made with intention, aiming to prove that style and functionality don’t have to come with a hefty price tag. Join me as we explore the details of this budget-conscious, DIY-driven bedroom makeover, complete with before-and-after glimpses and insights into how we achieved this serene escape.
The Foundation: Crafting a Cohesive Black and White Theme
The journey to this serene black and white haven began with a single piece of furniture: the Hemnes dresser. Purchased early in the planning phase, this elegant piece became the anchor for our entire black and white design scheme. When you’re dealing with a shared bedroom, especially for two daughters with their own distinct styles, the challenge lies in creating a space that feels personal to both without becoming chaotic. Our solution was to opt for a minimalist foundation, focusing on a soothing palette that would foster a sense of tranquility and calm, yet still allow for individual expression within its framework.
This was no small feat. As I often admit, I’m not a professional decorator, but I do possess an intuitive sense for spaces—how they feel and whether they truly ‘work.’ For this project, I leaned heavily on that intuition. While a black and white theme might not be the first choice for a young ladies’ room, it offered a clean slate, a sophisticated backdrop against which subtle splashes of personality could shine. With the Hemnes dresser in place, our next step was to create a bright, airy canvas, so we meticulously painted the walls a pristine white, laying the groundwork for the magic to unfold.
Embracing Individuality: The Dynamic Ombre Accent Wall
The pure white walls provided a beautiful, serene backdrop, but the design took an exciting turn when we reached a particular section. My younger daughter expressed a strong desire for an accent wall. Initially, I was hesitant; my vision for the room leaned towards an uninterrupted monochrome, emphasizing calm. However, after revisiting the principles outlined in our DIY Home Planner, which champions incorporating the occupants’ desires, I had a moment of clarity. This was their sanctuary, and their input was invaluable. Why resist their creative spirit?
And so, I relented, allowing their vision to guide this pivotal decision. The result was nothing short of breathtaking: a stunning reverse ombre wall, crowned with a whimsical space theme at the top. My youngest daughter took on the challenge herself, meticulously painting the wall over two days. To say I was impressed is an understatement; my jaw quite literally dropped. It surpassed all expectations, transforming a plain wall into a captivating focal point. This creative compromise proved to be a win-win, especially since the older daughter adores blue, and the ombre transition captured that essence beautifully.
The layout of the beds might seem unconventional at first glance, but this was another one of their deliberate choices. Having committed to embracing their ideas, I went along with this unique furniture arrangement, which, while initially radical for me, ultimately serves their needs. The room might feel slightly snug upon entry, but it gracefully opens up into a spacious area anchored by a plush blue rug, connecting seamlessly with the accent wall’s serene blue hues. This innovative layout fosters a sense of coziness and expands into an area perfect for relaxation and creativity.
A Glimpse of the Cosmos: The Magical Accent Wall
Let’s take a moment to truly appreciate this magnificent wall. Its vibrant ombre design, coupled with the serene blue rug, unequivocally sets the room’s entire tone. Without this bold statement, the space might have felt somewhat uninspired, a mere white box. It’s a testament to how a single, well-executed design element can transform the entire atmosphere of a room. This wall doesn’t just add color; it adds character, depth, and a focal point that draws the eye and sparks imagination.
A Celestial Touch: Glow-in-the-Dark Stars on the Ceiling
To further enhance the captivating space theme introduced by the accent wall, we adorned the ceiling with countless glow-in-the-dark stars. These tiny celestial additions bring a truly magical dimension to the room. When the lights dim, the entire space shimmers with a soft, ethereal glow, creating an immersive, starry night sky overhead. It was impossible not to be enchanted; for the first few days, we all found ourselves sneaking into the room like excited children, just to marvel at the twinkling display. This simple, yet incredibly effective, detail adds a layer of wonder and playful charm, transforming bedtime into an enchanting experience under their very own galaxy.
Disclosure: The items below are affiliate links. If you purchase any of these products through the links, I receive a small commission, that way I can continue to provide you with lovely content. There is no extra charge to you for purchasing through my affiliate links.
Personalized Touches: Nightstands, Duvets, and Inspiring Art
Moving to the other side of the room, we find a cozy corner featuring a nightstand that recently underwent a repair and revival. Its refreshed appearance now seamlessly blends with the room’s updated aesthetic. Perched atop it, a painting rests casually, almost as if contemplating its next adventure, adding an artistic, unfixed element to the space. This subtle detail contributes to the overall relaxed and evolving feel of the room.
To further honor their distinct personalities, each girl was given the freedom to choose her own duvet cover. While my inner decorator would have reveled in a perfectly “matchy-matchy” look, respecting their individual preferences was paramount. There was simply no convincing my blue-loving daughter to settle for a gray striped pattern, and vice-versa. This choice allowed their beds to become personal havens within the shared room, celebrating their uniqueness while the overall black and white scheme tied everything together.
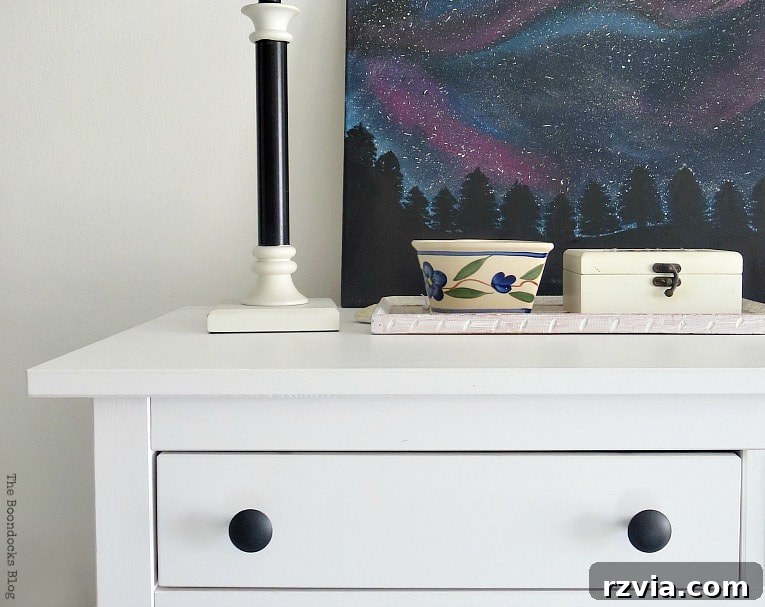
The beautiful painting displayed on top of the Hemnes dresser holds special significance; it was created by one of my daughters several years ago and served as the initial spark of inspiration for the accent wall. Its colors and mood undeniably guided the artistic direction we took. To ensure that these personal touches and the accent wall truly commanded attention, the bed frames were meticulously painted in classic black and white. This strategic choice allowed any existing color, and especially the vibrant accent wall, to take center stage, creating a harmonious balance between monochrome elegance and personalized vibrancy. Complementing these revitalized elements, the existing lamps also received a refreshing makeover, now appearing crisp and new, perfectly integrated into the room’s serene atmosphere.
Functional Zones: The Calm Side and The Creative Hub
An interesting aspect of this room’s design is the deliberate decision to keep the walls relatively bare, save for some enchanting fairy lights draped above the bed on the right. This choice wasn’t arbitrary; my younger daughter, a budding videographer, frequently uses this wall as a clean, uncluttered backdrop for her creative projects. This thoughtful consideration ensured she had a functional space for her passion while maintaining the room’s aesthetic. Consequently, this side of the bedroom radiates an undeniable sense of calm and openness, contributing to the overall tranquil ambiance we aimed to achieve.
In stark contrast to the minimalist calm of the video backdrop, the opposite side of the room is a bustling hub of activity and storage—perhaps even featuring a metaphorical kitchen sink! This section came to life when I unearthed what I fondly refer to as the “Cinderella dresser” from the basement. It was in a deplorable state, a true diamond in the rough. However, I immediately recognized its potential. With a dedicated makeover, I envisioned it perfectly nestled between two Billy bookcases, creating an expansive, highly functional storage unit.
Maximizing Storage with Upcycled Treasures and Thoughtful Design
The transformation of the Cinderella dresser was a labor of love, and the addition of a beautifully revived mirror above it became the crowning glory of this storage ensemble. This mirror not only added a touch of elegance but also amplified the natural light, making the area feel larger and brighter. To unify the myriad of storage boxes and prevent visual clutter, we carefully covered them with charming toile contact paper. This seemingly small detail was crucial; without it, the diverse colors and patterns of the boxes would have overwhelmed the space, completely undermining our goal of creating a tranquil and calm environment. The toile contact paper brought a sophisticated cohesion, allowing the functional storage to blend seamlessly with the room’s serene aesthetic.
Smart Spaces: Desk, Shelf, and Thoughtful Window Treatments
Adjacent to the bookcase, we integrated a very simple black desk, providing a dedicated and efficient workspace for the girls’ computer. Above it, an existing shelf was retained. Initially, we considered removing it, but found that its presence offered convenient storage for essential items, blending functionality with the existing architecture. For seating, an old ottoman with built-in storage serves as a temporary, yet surprisingly fitting, solution. It’s a testament to how existing pieces can be repurposed to great effect, especially when working within a budget.
The wall opposite the vibrant ombre accent wall features a large window, which we adorned with simple white curtains from Ikea. This choice reinforces the room’s overarching theme of tranquility and simplicity. By opting for a clean, unembellished window treatment, we ensured that the focus remained on the interplay of black and white, allowing natural light to flood the room without introducing any visual distractions. Every element, from the desk to the curtains, contributes to the calm, cohesive atmosphere of this thoughtfully designed space.
The Cinderella Dresser: A Diamond in the Rough, Now a Campaign Gem
I simply had to share another close-up of my beloved Cinderella dresser. Just look at how beautifully shiny and pristine the top is now! It’s not just aesthetically pleasing; after the paint has fully cured, it’s as hard as rock, ready to withstand the inevitable daily barrage of beauty products and general use by two busy teenagers. This piece truly epitomizes the power of a thoughtful makeover.
On a side note, I recently discovered that this particular style of dresser is known as a Campaign dresser. While browsing online, I stumbled upon a similar one from Crate and Barrel priced at a staggering $699! It truly highlights the incredible value and satisfaction derived from upcycling. To transform a discarded piece into something so beautiful and functional, rivaling high-end retail options, is incredibly rewarding. This realization only amplified my pride in our budget-friendly transformation.
Budget-Friendly Brilliance: Breaking Down the Costs of Our DIY Makeover
Let’s talk numbers, because one of the most satisfying aspects of this transformation was how budget-friendly it proved to be. For the key new items—the Hemnes dresser, the area rug, and the two Billy bookcases—our total expenditure was approximately $480. This formed the structural backbone of the room. The beds, along with nearly all other furnishings, were pieces we already owned, given a new lease on life through meticulous makeovers. Of course, I may have indulged a little in the toile contact paper, but we won’t dwell on that delightful detail! Additionally, the wall paint represented another minor cost, and I still have plenty left over for future projects.
Considering we essentially started from scratch, transforming an ordinary room into this personalized sanctuary, I believe we did remarkably well. This project stands as a testament to the power of upcycling, strategic purchases, and embracing the DIY spirit. It proves that with creativity and a bit of elbow grease, you can achieve a high-impact design without breaking the bank, crafting a space that feels luxurious and custom-made, all while adhering to a strict budget.
The Ultimate Reward: A Loved and Lived-In Space
This bedroom, in its essence, is a beautiful symphony of contradictions. It masterfully blends the minimalist calm of black and white with the vibrant energy of an ombre accent wall and twinkling stars. It combines carefully curated new pieces with lovingly upcycled treasures. Yet, despite these varied elements, it works together flawlessly to create the desired tranquil effect, proving that harmonious design often thrives on unexpected contrasts. The thoughtful layering of lighting, including a clever clip-on lamp discreetly placed behind the curtain, further enhances the mood, ensuring the room feels warm, inviting, and truly magical at any time of day or night. It is, without a doubt, a perfect sanctuary for my daughters.
But beyond all the design elements and budget triumphs, the most important outcome is that my girls absolutely adore their new room. It has surpassed their expectations, becoming a space they truly love and feel reflects them. This incredible transformation was the direct result of teamwork, open communication, and my commitment as a mom to keeping an open mind and genuinely listening to their ideas and desires. And if a bit of vibrant color peeks through the predominantly black and white scheme, well, that’s perfectly okay! I promise not to “freak out.” It only adds to the unique charm and personal narrative of their space. For more creative ideas on how to infuse fun into your own bedroom decor, you can also find inspiration here. I truly hope you’ve enjoyed this detailed tour of our mostly black and white bedroom, and perhaps you’ve even gathered some fresh ideas for your own home. Remember, even if this specific style isn’t quite yours, looking at design from another perspective, even if it means daring to paint an entire wall in ombre, can spark incredible creativity and lead to truly personalized spaces.
Ready to Tackle Your Own DIY Projects? Explore Our Guides!
As promised, I’ve compiled links to all the individual projects that contributed to this bedroom makeover. Each link below leads to a detailed guide, offering step-by-step instructions and inspiration to help you tackle your own transformations. From reviving tired furniture to crafting unique decorative elements, these posts are your go-to resource for creating a personalized and budget-friendly space. Happy DIYing!
If you really like what you see, subscribe to my blog and get my adventures delivered directly to your mailbox. The subscription form is conveniently located on the sidebar and at the top of the page. Your email will always remain private and will never be shared with any third party.
The Black and White Bedroom: Project Links
<< Colorful Paper Packing Wreath HOME Household Items as Planters >>
Linking up to these Link Parties
This blog is for entertainment purposes only; my DIY tutorials are not professional advice. Read my full disclaimer here.
I love it when I get your comments and I will try to reply to every one of them. Please do not add a hyperlink to your comment, otherwise it cannot be published.