
It’s my favorite time of the month again, and I’m thrilled to join the International Bloggers Club for another exciting challenge! We are a diverse group of friends from various corners of the world, brought together by our shared passion for crafting and a desire to exchange creative ideas. Each month, we delve into a new theme, sharing our unique projects and offering a glimpse into how these crafts resonate with traditions and styles in our respective countries. Our past challenges have seen us explore delightful gift wrapping ideas, perfect for adding a personal touch to any present, and engaging wooden projects that highlight the beauty of natural materials. If you’re curious about our previous endeavors, you can always find more inspiration in our International Bloggers Club archives.
With February just around the corner, our hearts are turning towards all things love and romance. This month, we’re excited to share our heartwarming Valentine’s Day crafts with you, designed to inspire creativity and spread a little extra affection. Get ready to fall in love with these festive projects!
Earlier this month, I shared a collection of ten projects for a truly special Valentine’s Day, but I simply couldn’t resist participating in another creative challenge focused on this romantic holiday. There’s something truly invigorating about a good crafting challenge, and this one absolutely sparked my imagination. One project in particular resonated deeply with me, igniting a surge of creative energy that led to the charming creation you’re about to discover below. It’s a wonderful example of how inspiration can strike from the most unexpected places and transform into something beautiful and meaningful.
What I Used: Crafting Your Valentine’s Heart Box
To bring this delightful Valentine’s Day craft to life, I gathered a few key materials. Most of these can be easily found at craft stores or even repurposed from items around your home. The beauty of this project lies in its adaptability, allowing you to personalize it with your own choice of colors and textures.
- Heart-shaped box with a Styrofoam insert
- Burlap ribbon for rustic charm
- Coral-colored scrapbook paper, 12″ by 12″ (30 by 30 cm), for vibrant paper flowers
- Faux flowers from the dollar store, adding an economical and colorful touch
- A decorative ribbon, originally from Jordan Almonds, for an elegant, sentimental detail
Each component plays a crucial role in creating a multi-textured and visually appealing arrangement within the heart-shaped box, transforming it into a cherished keepsake or a beautiful centerpiece for Valentine’s Day.
This entire project began with an unexpected treasure: a beautiful heart-shaped box that once housed an espresso set. I believe it was a wedding gift favor that my wonderful dad generously passed down to me. A huge thanks to you, Dad! While I’m not much of an espresso drinker myself, I have a deep appreciation for unique and well-crafted boxes. This one, with its elegant design, practically screamed, “Use me for Valentine’s Day!” And, true to its silent plea, that’s exactly what I set out to do.
Repurposing an item like this heart box not only breathes new life into it but also adds a layer of personal history and sentimentality to the finished craft. It’s a testament to the idea that beauty and potential can be found in everyday objects, just waiting for a creative touch to transform them into something truly special. This box, with its inherent charm, provided the perfect foundation for a romantic Valentine’s Day display, inviting me to explore a blend of textures and colors to create a heartwarming artistic statement.
After carefully removing the espresso set, I was left with the empty heart-shaped box, revealing its ingenious interior structure. Below, you can see how it looked once emptied: a sturdy Styrofoam insert lay beneath a smooth satin fabric, featuring precisely cut-out spaces designed to hold a coffee machine, cups, and saucers. Instead of trying to smooth out this unique internal landscape, I decided to embrace its existing design. These pre-formed cut-out spaces offered an exciting opportunity for creative arrangement, almost like little cradles waiting to be filled with new decorative elements.
My goal was to work *with* these integrated sections, utilizing them to create distinct compartments for the various floral components I planned to introduce. This approach not only simplified the crafting process but also added an unexpected dimension to the final display, making the box even more interesting. By leaving the Styrofoam and satin as they were, I maintained a touch of the box’s original elegance while preparing it for a vibrant transformation into a Valentine’s Day masterpiece.
The How To: Crafting Your Heart-Shaped Valentine’s Box
Creating a beautiful Valentine’s Day box doesn’t have to be complicated. With a little creativity and a few simple steps, you can transform an ordinary object into an extraordinary piece of decor or a heartfelt gift. This project is all about layering different textures and elements to build a rich, visually appealing display.
The first step in my creative process was to craft some charming roses from burlap ribbon. This particular technique is one I find myself improving upon with each attempt, proving that practice truly makes perfect in the world of crafting. I had previously experimented with burlap roses for my basket bottom craft, and each time, the results get a little bit better. For those who are new to making burlap roses or want to refine their technique, I highly recommend watching this fantastic video tutorial from someone who truly master the art. The burlap ribbon I used for this project had delicate white edges, which gave the finished roses an extra special, refined touch, adding a subtle elegance to their rustic appeal. These handmade roses bring a wonderful texture and warmth to the heart-shaped box, setting a lovely foundation for the other elements.
Disclosure: This post contains affiliate links. If you purchase any of these products through the links, I receive a small commission, which helps me continue to provide you with lovely content. There is no extra charge to you for purchasing through my affiliate links.
Once my burlap roses were meticulously crafted, I strategically placed them within the heart-shaped box. The three larger openings in the satin-covered Styrofoam insert provided perfect cradles for these rustic beauties. Their placement immediately began to define the structure and texture of the arrangement, giving the box a charming, handcrafted feel. The natural color and tactile quality of the burlap offered a wonderful contrast to the smooth satin, creating an inviting visual depth.
This initial step was crucial in establishing the foundational elements of the Valentine’s display. Each rose nestled comfortably, filling the designated spaces and contributing to a harmonious composition. The decision to utilize the existing cut-outs proved to be a smart one, as it guided the arrangement and made the process of filling the box intuitive and satisfying. The burlap roses instantly added a touch of warmth and an organic, romantic aesthetic, setting the stage for the additional floral elements to come.
Next, I turned my attention to another sentimental detail: the delicate ribbon that was originally included with the heart box, once nestling the Jordan Almonds. I decided to repurpose most of this elegant satin ribbon by transforming it into yet another beautiful rose. This choice added a layer of continuity and personal history to the craft, tying back to the box’s original purpose as a wedding favor.
Working with satin ribbon offers a different aesthetic than burlap, providing a softer, more luxurious texture. The subtle sheen of the satin rose added a touch of refined elegance to the arrangement, contrasting beautifully with the rustic burlap. This step highlighted the versatility of materials and the joy of giving new life to components that might otherwise be discarded. The resulting rose was a lovely complement, perfectly blending tradition with my contemporary crafting vision.
Just like its burlap counterparts, this elegant satin ribbon rose also found its rightful place inside the heart-shaped box. I nestled it carefully among the existing burlap roses, allowing its softer texture and gentle sheen to add another dimension to the overall floral display. The blend of textures — the rustic warmth of burlap alongside the smooth luxury of satin — created a captivating visual interest, making the arrangement feel more dynamic and layered.
Integrating this sentimental piece into the box not only contributed to the aesthetic but also reinforced the theme of repurposing and personal touch, which is central to this Valentine’s Day craft. Each element, thoughtfully chosen and meticulously placed, built upon the last, transforming a simple box into a sophisticated and heartfelt decorative piece. The satin rose served as a beautiful bridge between the box’s past and its new vibrant present.
The next step in my crafting journey was brilliantly inspired by Canary Street Crafts, a truly inspiring source for creative ideas. They showcased how to make exquisite spiral flowers using nothing more than simple paper. This technique immediately captivated me, offering a fresh way to add dimension and color to my Valentine’s box. During a visit to Michael’s, I discovered a stunning shade of coral scrapbook paper – its vibrant hue and lovely texture made it absolutely perfect for this project.
I carefully outlined four circles on the paper and then precisely cut them out. These circles would become the foundation for my unique paper spirals. The choice of coral paper was intentional, as it provided a beautiful pop of color that perfectly complemented the rustic burlap and the delicate satin, infusing the box with a joyful, romantic energy. This stage of the project allowed for both precision and artistic flair, setting the groundwork for the fascinating transformation of flat paper into three-dimensional floral elements.
Once the circles were outlined, the next step was to transform them into beautiful spirals. This part of the process is surprisingly simple yet incredibly satisfying. I carefully cut each circle into a continuous spiral, starting from the outer edge and working my way inwards. To achieve the distinctive spiral flower shape, I gently twisted the paper around itself, starting from the narrower inner tip of the spiral. I held the tightly woven paper in place for a few minutes, allowing it to “set” its new form.
When I released the paper, it gracefully unfurled into a lovely, three-dimensional flower, just as you can see depicted below. While the talented ladies who originally inspired this technique often used glue to secure their spiral flowers, I found that for my project, no adhesive was necessary. The paper held its shape remarkably well on its own, a testament to the simplicity and effectiveness of this method. This discovery made the crafting process even more enjoyable, eliminating the need for drying time and making the placement within the box quick and easy.
With my delicate paper spiral flowers complete, I carefully placed them within the heart-shaped box. To my delight, they held their unique, intricate shapes exceptionally well, nestled perfectly among the burlap and satin roses. This stability meant that, for now, there was absolutely no need for glue to keep them in place. The individual elements created enough friction and support for each other, forming a cohesive and stable arrangement.
This adhesive-free approach is particularly convenient for projects where you might want to adjust the arrangement later or if you envision repurposing the box for another occasion down the line. Of course, if I decide to transform this beautiful creation into a wall hanging – a possibility I’m definitely considering – then securing each element with a touch of glue would be a necessary step to ensure everything remains perfectly positioned. For a tabletop display or a centerpiece, however, the current arrangement is wonderfully secure and allows the natural beauty of each component to shine through without any visible intervention.
The final touch to this blossoming Valentine’s Day creation involved adding these lovely faux flowers, which I found at an incredible price at the Dollar Tree. Instead of opting for more roses, which I already had in burlap and satin, I deliberately chose these smaller, more varied flowers. Many of them featured beautiful coral tones, perfectly echoing the scrapbook paper and creating a harmonious color palette throughout the box.
To integrate them seamlessly, I used pliers to carefully cut the larger floral stems into smaller, manageable branches. This allowed me to distribute them evenly and precisely throughout the arrangement. The goal was to add volume, depth, and a vibrant burst of color that would complete the rich tapestry of textures already present. These little faux blooms acted as wonderful fillers, enhancing the overall fullness and romantic appeal of the heart-shaped box.
With the faux flowers trimmed into smaller branches, I began the delightful process of stuffing them all over the place within the heart-shaped box. My objective was to eliminate any visible gaps and ensure a lush, overflowing appearance. Anywhere the stark white satin of the Styrofoam insert was still showing through, I meticulously added the small faux flowers. This layering technique allowed the arrangement to grow in volume and complexity, giving the impression of an abundant garden bursting forth from the box.
The delicate coral hues and varied shapes of these faux blossoms beautifully complemented the handcrafted burlap and paper flowers, adding a touch of natural softness and a pop of vibrant color. This final addition brought the entire composition to life, creating a truly enchanting and full display that captured the essence of Valentine’s Day. The interplay of different textures and shades created a visually rich experience, turning the simple heart box into a captivating centerpiece.
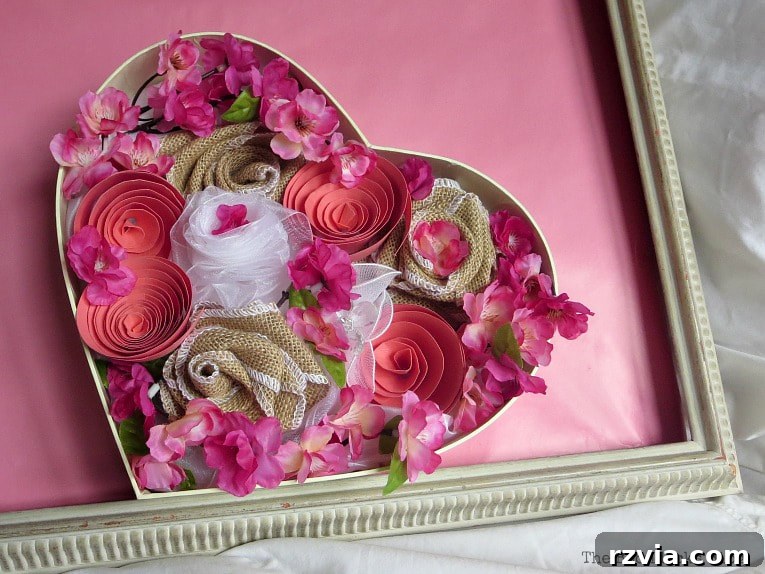
Once all the elements were in place, the heart-shaped box truly came alive. The combination of burlap, satin, paper, and faux flowers created a stunning visual symphony, giving the impression that the flowers are not just placed, but actively bursting out of the box with joyous exuberance! This overflowing effect is what makes the piece so captivating and rich, conveying a sense of abundance and heartfelt emotion.
Every angle reveals a new detail, a different texture, or a fresh burst of color, inviting viewers to appreciate the intricate craftsmanship. The variety of floral forms, from the rustic charm of burlap roses to the delicate swirls of paper and the soft touch of faux blooms, work in concert to create a multifaceted display. It’s a testament to how diverse materials can come together to create a cohesive and breathtaking piece of art that truly embodies the spirit of Valentine’s Day.
Adding another layer of sentimental detail, I made sure to incorporate the small flower and faux diamond piece that originally adorned the ribbon containing the Jordan Almonds. This delicate accent, with its subtle sparkle, found its perfect spot within the vibrant floral arrangement. Here, you can clearly see this charming embellishment nestled amongst the blooms, adding a touch of elegance and a hint of the box’s previous life.
This small detail serves as a lovely reminder of the box’s history and the joy of repurposing. It’s these thoughtful inclusions that elevate a craft from simply decorative to deeply personal and meaningful. The faux diamond catches the light, drawing the eye and adding a focal point that enhances the overall beauty of the Valentine’s Day creation, proving that even the smallest elements can make a significant impact.
To further enhance the fullness and intricate detail of the floral arrangement, I even took a few of the smaller faux flowers and strategically tucked them into the centers of the burlap roses. This technique added an extra layer of depth and visual interest, making the burlap roses appear even more vibrant and multi-dimensional. The contrasting textures of the rustic burlap and the delicate faux petals created a beautiful interplay, enriching the overall aesthetic of the heart-shaped box.
This small but significant touch helped to tie all the different floral elements together, creating a cohesive and harmonious display. It’s often these subtle finishing details that truly elevate a craft, demonstrating careful consideration and artistic vision. The heart-shaped box now feels even more complete and lush, a testament to the power of thoughtful layering and arrangement in DIY projects.
Now that this delightful heart-shaped box is complete, the natural question arises: what will I do with it? For now, I believe it makes an absolutely lovely piece to place on a dresser, adding a touch of romantic charm to a bedroom, or serving as a captivating centerpiece on a dining table or coffee table. Its vibrant colors and varied textures are sure to draw attention and spark conversations.
However, its versatility extends beyond just a flat surface display. I can also envision it beautifully hung on a wall, perhaps as a unique piece of Valentine’s-themed art. If I choose to hang it, I will, of course, need to take the extra step of carefully gluing all the individual elements securely in place to ensure they remain perfectly arranged. This would transform it into a more permanent decorative fixture, bringing a burst of heartfelt creativity to any room. Whether standing proud or adorning a wall, this repurposed heart box is ready to spread love and beauty.
Currently, I have it elegantly leaning against a frame, which provides a beautiful soft pink background that perfectly complements the coral and natural tones within the box. This simple placement instantly creates a focal point, drawing the eye and radiating a warm, inviting ambiance. The harmonious blend of colors and textures effortlessly sets a romantic mood.
I genuinely believe that this charming heart-shaped box, overflowing with its handcrafted blooms, is more than enough to fully immerse me in the joyous and loving spirit of Valentine’s Day. It’s a constant reminder of the beauty that can be created with a little imagination and a touch of repurposed charm. Each glance brings a smile and reinforces the warmth of the season, making my home feel cozy and festive for this special occasion.
I must extend a heartfelt thank you once again to my dad for gifting me this wedding favor all those years ago. While the espresso set might not have been my everyday go-to, the elegant heart-shaped box proved to be an absolute hit with me, sparking this delightful Valentine’s Day crafting adventure! It truly shows how a seemingly ordinary item can hold extraordinary potential for creative transformation.
I sincerely hope that you are inspired by this “outside the heart-shaped box” thinking and feel encouraged to come up with your own unique creations for your Valentine’s Day crafting. There’s immense joy in repurposing and personalizing.
And if heart-shaped boxes aren’t quite your cup of tea, or if you’re simply eager for more Valentine’s Day inspiration, I invite you to hop on over and visit my four wonderful friends from the International Bloggers Club. They are also sharing their incredible Valentine’s Day crafts, offering a diverse range of ideas and styles. Simply click on their project images below my name to discover their unique creations. If you’d like to see more past challenges from our club, you can always click here for a treasury of collaborative crafting projects.
If you truly enjoy what you see, consider subscribing to my blog to get my latest adventures and crafting tips delivered directly to your mailbox. You’ll find the subscription form conveniently located on the sidebar and at the top of the page. Rest assured, your email address will always remain private and will never be shared with any third party.
International Bloggers Club: Valentine’s Day Crafts
More projects for Valentine’s Day:
<< Sweet Inspiration Link Party #91 HOME Astonishing Brooklyn Bridge >>
Linking up to these Link Parties
This blog is for entertainment purposes only; my DIY tutorials are not professional advice. Read my full disclaimer here.
I love it when I get your comments and I will try to reply to every one of them. Please do not add a hyperlink to your comment, otherwise it cannot be published.