
Breathe New Life into Old Furniture: A Stunning Stenciled Side Table Makeover
Welcome, fellow DIY enthusiasts! Another week has flown by, and while my bedroom furniture project awaits its turn, I’m thrilled to share a delightful, quick makeover that’s been on my mind. Today, we’re taking an unloved side table and transforming it into a charming piece with the magic of stencils and a little creativity. Please forgive the natural chaos of a lived-in home in some of these photos – our playful puppy, Tatou, often thinks the living room is his personal playground!
This little table had a somewhat sad story. We tried to sell it at our last month’s garage sale, hoping it would find a new home. But alas, despite its potential, it remained unsold. Instead of relegating it to a donation pile, I saw an opportunity. Why not give this humble piece a vibrant new identity and integrate it into our living space? Upcycling isn’t just about saving money; it’s about giving items a second chance, reducing waste, and infusing your home with unique character that store-bought pieces simply can’t match.
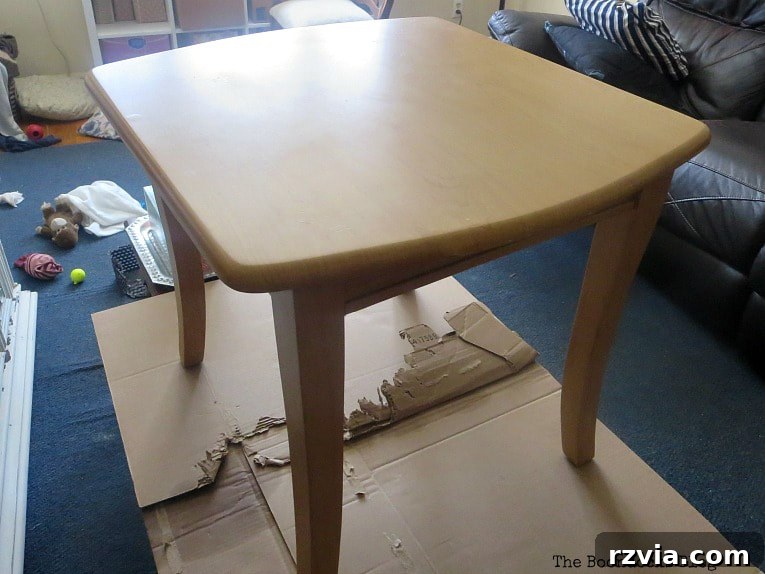
The Unloved Side Table: Before Its Grand Transformation
As you can see, the table was simple, functional, but utterly lacking in personality. It sat there, unappealing even at a bargain price of $15. I considered what its ideal form might be. If it had looked like a sleek, modern piece, I might have kept it as is. But its current state demanded a change.
My initial thoughts veered towards a very rustic farmhouse aesthetic, but then a softer, more blended approach emerged as the preferred path. The perfect solution presented itself in an unexpected way: a beautiful stencil I had originally purchased for my bedroom dresser. After reconsidering the dresser design, the stencil was gathering dust. Why let such a lovely pattern go to waste when it could be the star of this side table transformation?
Disclosure: The items listed below are affiliate links and link to Amazon.com. If you purchase any of these products through the links, I receive a small commission, which helps me continue to provide you with lovely content. There is no extra charge to you for purchasing through my affiliate links.
DIY Stenciled Table Makeover: What You’ll Need
Gathering your materials before you begin ensures a smooth and enjoyable DIY experience. Here’s everything I used to bring this table back to life:
- Cleaning Solution: Simple water and vinegar mixture for thorough surface preparation.
- Decoart Americana Chalky Finish Paint in “Everlasting”: A beautiful white chalk paint that offers excellent coverage and adhesion.
- Your Chosen Stencil: The star of our show! Mine was from ArtMinds.
- Masking Tape: Essential for securing your stencil and preventing bleed-through.
- Acrylic Craft Paints in Blue: To create the custom stencil color.
- Round Spongy Brush for Stenciling: The secret weapon for precise, beautiful stencil work.
- Measuring Tape: For accurate stencil placement.
- Decorative Wax in White: To seal and add a beautiful, soft, distressed finish.
- Round Brush for Wax: For smooth and even wax application.
- Clean Cotton Rags: For buffing the wax to a perfect finish.
Step-by-Step Guide: Stenciling Your Way to a Beautiful Table
Let’s dive into the fun part – bringing this old table to life! This project is surprisingly straightforward and incredibly rewarding.
Step 1: Prep Your Surface for Success
First things first, a clean surface is a happy surface, especially when painting. Since my table had a laminate top, I started by thoroughly wiping it down with a simple mixture of water and vinegar. This not only cleans away any dirt or grease but also provides a good base for the paint to adhere to. For chalk paint, extensive sanding isn’t usually necessary, which is fantastic for those of us who appreciate a good shortcut (or are, dare I say, a little lazy sometimes!). A quick wipe was all it took to get this surface ready.
Step 2: Laying Down the Base Coat
With the table clean, it was time for the base coat. I used the chalky type paint in “Everlasting” white. Chalk paint is incredibly forgiving and creates a lovely matte finish. I applied three thin coats, allowing each coat to dry completely in between. This process took about half an hour of actual painting time, not including drying. The beauty of chalk paint is its quick drying time and excellent coverage, even over laminate surfaces, making it ideal for furniture makeovers without the hassle of priming or heavy sanding.
Step 3: Precise Stencil Placement
Accuracy is key for a professional-looking stencil. I meticulously measured the table surface to find the exact center, then carefully positioned my stencil. A helpful tip, especially if your piece isn’t perfectly square (like mine!), is to measure from multiple points to ensure the stencil appears visually centered. Once I was happy with the placement, I secured the stencil firmly with masking tape. This prevents the stencil from shifting during application and helps achieve crisp, clean lines.
Step 4: The Art of Stenciling with the Pouncing Technique
For the stencil color, I mixed a dark blue acrylic paint I already had on hand with some of the white chalky finish paint. This allowed me to create a custom, softer blue that perfectly suited the farmhouse aesthetic I was aiming for. You can, of course, simply purchase your desired color, but I’m always looking for ways to use up what I have!
I’ve done stenciling before with varying results, but I was eager to try this round, spongy brush that my friends had been raving about. Instead of brushing, you use a “pouncing” motion – gently dabbing the paint onto the stencil. The key is to offload any excess paint onto a paper towel first. This technique prevents paint from bleeding under the stencil, resulting in beautifully sharp lines.
The stencil set I used, called “DIY Home Bone Inlay Laser Stencil Set by ArtMinds,” was purchased at Michael’s. While I haven’t seen this specific set on Amazon, it’s worth checking Michael’s directly if you love this pattern. (Note: this is not an affiliate link; I simply adore this stencil!)
Step 5: Enhancing with Border Details
To create a truly finished look, I utilized the border stencil that came with the set. This allowed me to apply a complementary pattern along the sides and bottom edges of the table. Using the same pouncing technique, I carefully extended the design, ensuring it flowed seamlessly with the main top stencil. These small details make a big difference in elevating the overall aesthetic of your furniture makeover.
Step 6: Choosing the Perfect Protective Finish with Wax
Once the paint and stencil work were complete and thoroughly dry, the next crucial step was sealing in all that beautiful goodness. This protective layer is vital for durability, especially for a functional piece of furniture. To make an informed decision, I decided to test out three different waxes I had in my craft stash. I painted a box top from some resume paper with the same white chalky finish paint – this made for a perfect, quick testing surface.
Testing waxes is incredibly helpful because they can dramatically alter the final look. The black wax, while gorgeous on certain pieces, was simply too dark for the soft farmhouse feel I was going for. It would look stunning on a more industrial or gothic-style piece, perhaps. I even wondered if applying a clear wax underneath first might have softened the effect – an experiment for another day! The brown wax offered an appealing antique effect, adding a subtle warmth and a bit of color to the white base. However, for this particular project, I had my heart set on a specific aesthetic.
Step 7: Applying the White Decorative Wax
Ultimately, I chose the farmhouse white decorative wax. My goal was a soft, slightly distressed look that would complement the stenciled pattern without overpowering it. Using a dedicated wax brush, I applied a thin, even coat of the white wax over the entire stenciled top. After letting it sit for a few minutes, allowing it to slightly set, I gently rubbed it with clean, white cotton rags. This buffing process is critical; it removes excess wax, polishes the surface, and creates that beautiful, subtle distressed effect.
The white wax subtly softened the blue stencil color, giving it an aged, worn character that perfectly embodies the farmhouse style. It protects the paint while adding a charming, slightly antique patina, making the table feel like it has a history and a story to tell.
Step 8: Finishing the Table Legs with a Custom Wax Mix
While the tabletop received the white wax treatment, the legs got a slightly different, equally subtle finish. It’s quite hard to capture in a photograph, but I dabbed my brush into the brown wax first, then immediately added a bit of the white wax to the mixture on the brush. This custom blend was then applied to the legs, giving them just a hint of warm color and depth without being too stark. It added another layer of dimension to the overall distressed farmhouse aesthetic.
The Grand Reveal: Our Farmhouse Chic Stenciled Side Table
After all the careful planning, painting, and waxing, the true star of this makeover is undoubtedly the tabletop. It’s where the stencil truly shines, transforming a bland surface into a focal point.
From where I’m sitting, it looks perfectly farmhouse fresh! But is this truly “my” style? Who knows! I’m still very much in a phase of discovering and refining my personal decor style, often mixing and matching elements as I go. Does it perfectly match the vintage TV Cabinet in the living room? Maybe not entirely, but that’s part of the fun of creating a home that feels uniquely yours. Are you also on a similar journey, experimenting with different styles?
For now, the table will stay exactly like this, a testament to what a little vision and elbow grease can achieve. However, I can already envision future enhancements – perhaps a burst of flowers stenciled onto the top to add even more charm! The beauty of DIY is that your projects can evolve with your taste.
I always advocate for upcycling before discarding anything. Giving an item a new purpose is often my last resort when it comes to decluttering. With just a bit of paint and a beautiful stencil, I was able to give this old table of mine a completely new lease on life. It’s such an easy process, yet the resulting transformation is truly remarkable. So, what do you think – does it lean more towards farmhouse charm or a sweet cottage vibe? Let me know in the comments!
If you’re inspired by this transformation and enjoy creative home decor projects, be sure to subscribe to my blog! Get all my DIY adventures and tips delivered straight to your inbox. The subscription form can be found on the sidebar. To understand how I handle your data, please see my privacy policy here.

Discover More Stenciled DIY Projects
<< Easy No-Sew Bed Skirt HOME
Linking up to these Link Parties
This blog is for entertainment purposes only; my DIY tutorials are not professional advice. Read my full disclaimer here.
I love receiving your comments and will do my best to reply to every one of them. Please do not include hyperlinks in your comments, as they cannot be published.